


This guide shows you how to add an AI chatbot to a Shopify store. The steps depend on which product experience you use.
For new setups, we recommend building an AI Agent in Text. You configure it in the Text App, where it uses knowledge, instructions, customer and order context, and Skills to answer questions and take actions without requiring you to design every conversation path.
If you already use the previous ChatBot Visual Builder and AI Assist workflow, it remains available. You can find those instructions later in this guide.
How to add an AI chatbot to Shopify with AI Agent in Text
Connect your Shopify store to the Text website widget to bring conversations, ecommerce context, and your AI Agent together. The Shopify installation method does not require you to paste widget code.
Before you start
Make sure you can sign in to your Shopify admin and approve an app installation.
Before making the widget available to customers, open Team → AI agents in the Text App. Add the knowledge and instructions your AI Agent should use, configure its Skills, test its responses, and turn on Accept chats. See AI agents in the Text Help Center for details.
Step 1: Open your website widget settings
Log in to the Text App and go to Settings → Website widgets. If you are connecting a website during onboarding, you can also select Connect website widget from the homepage task list.
Step 2: Enter your Shopify store URL
Enter the URL of the Shopify store where you want to add the widget, then select Continue.

Step 3: Select Shopify as the installation method
The Text App should recommend Shopify as the installation method. Keep Shopify (Recommended) selected and choose Connect.
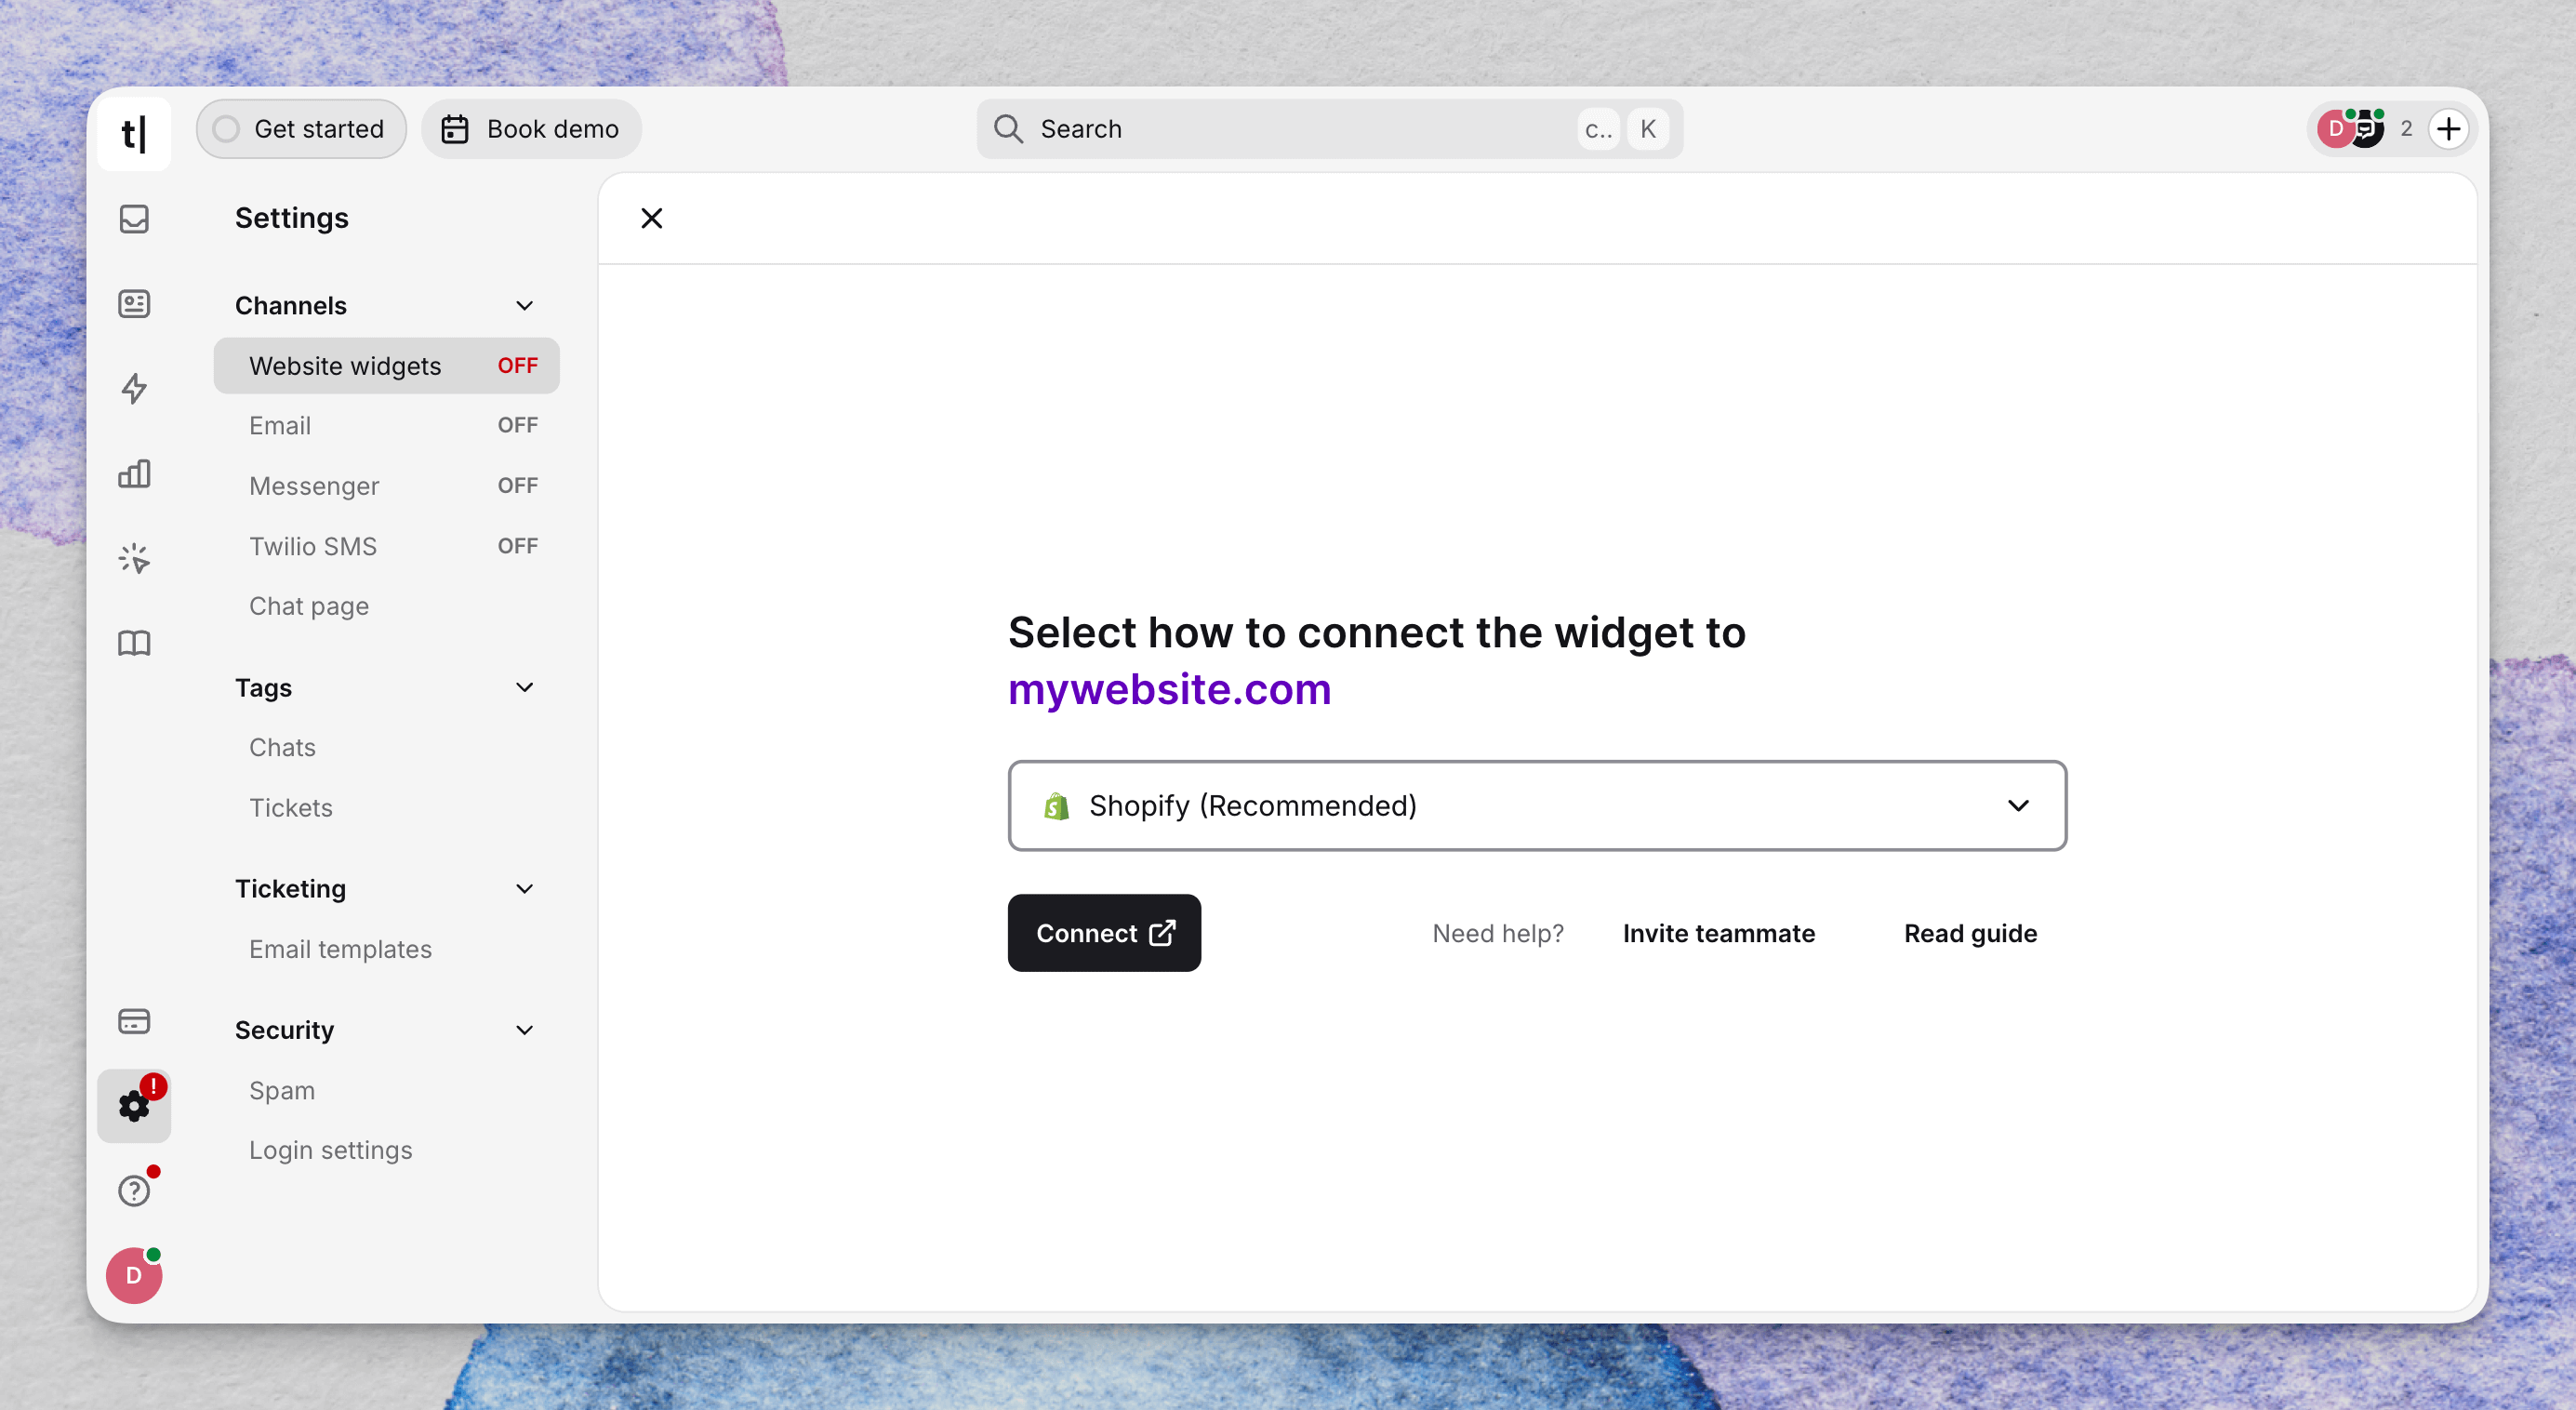
Step 4: Install the Text app in Shopify
You will be redirected to your Shopify admin. Review the view and edit permissions requested by the Text app, then select Install.

Make sure you are logged in to the correct Shopify store before approving the installation.
If necessary, you can use an alternative installation method, such as adding the widget code manually or connecting the widget through Google Tag Manager.
Step 5: Add the widget to your Shopify store
Return to the Text App. In the Add the widget to your Shopify store prompt, select Add widget. You will be redirected to Shopify to enable the widget.

Step 6: Enable the widget in Shopify Theme Editor
In Shopify Theme Editor, confirm that the Text Chat Widget is enabled under App embeds, then select Save.
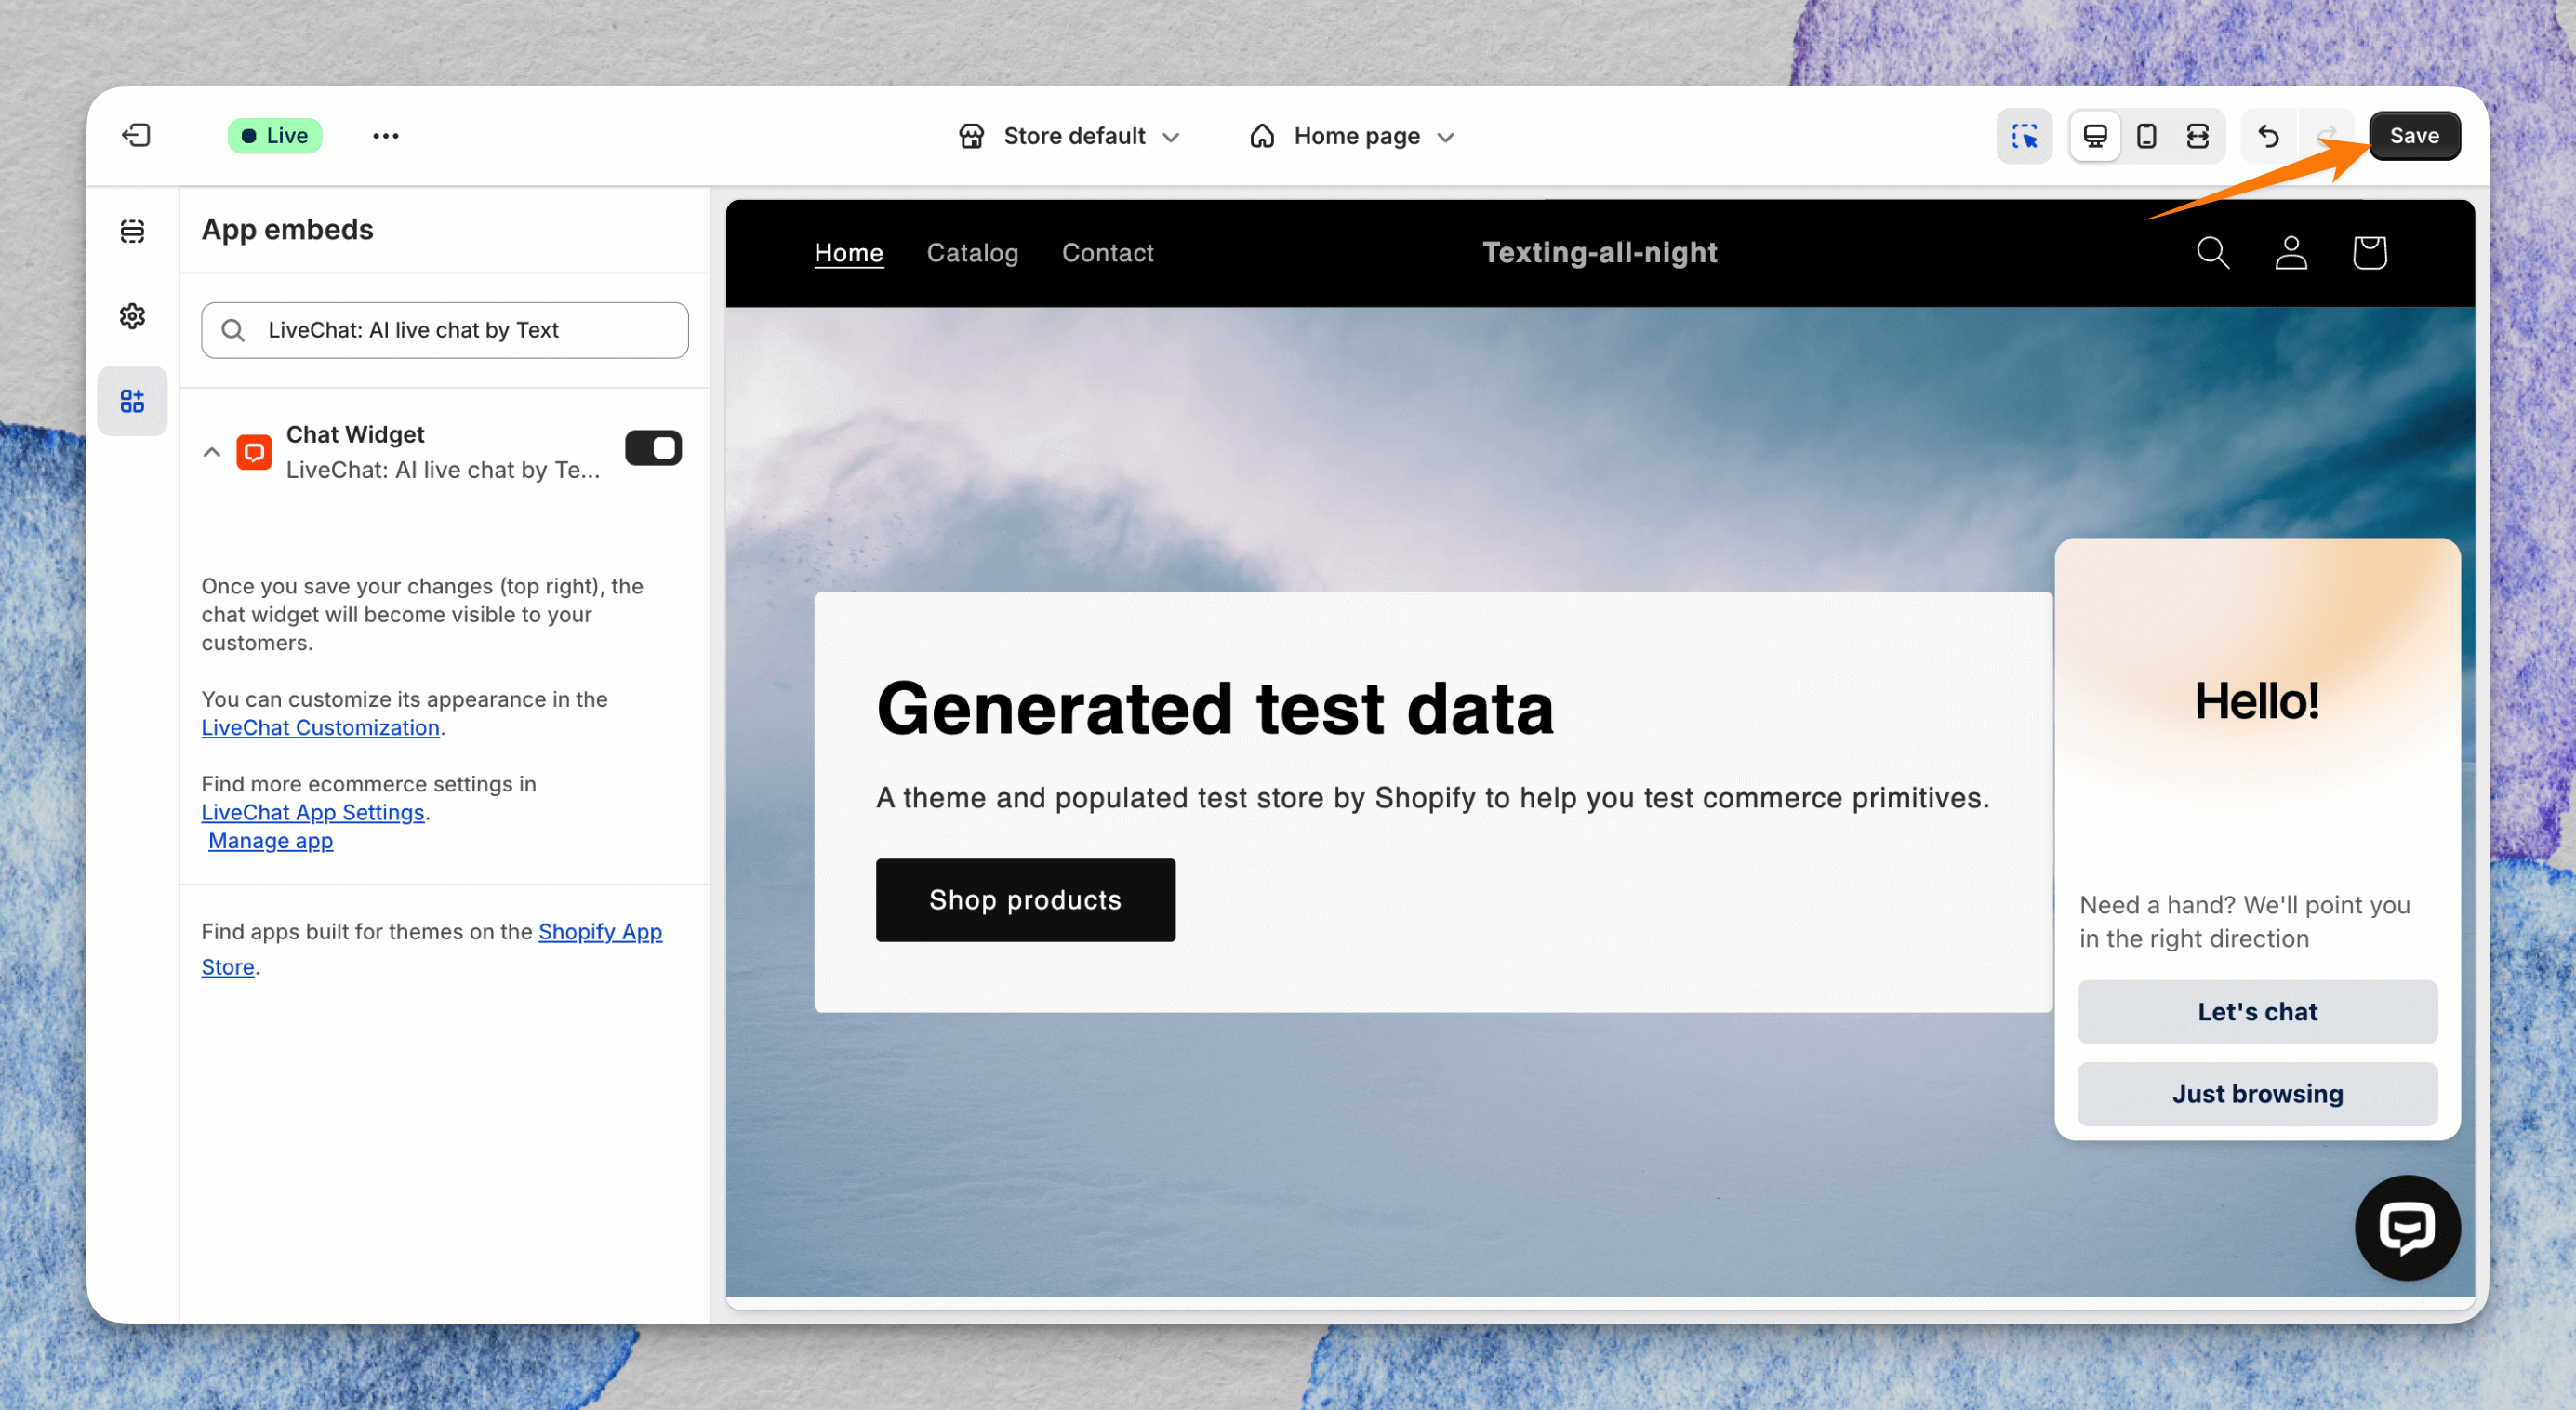
Once the changes are saved, the website widget becomes visible to visitors. You can preview the store and customize the website widget to match your site’s design.
Step 7: Confirm that Shopify is connected
Return to Settings → Website widgets in the Text App. The installation status should show Connected, and the Text App should confirm that the website widget is live.
If Shopify shows the widget as enabled but Text has not detected it, select Continue and visit your store to trigger another check. If the status still says Widget not detected on your website, select Start over or choose another installation method.
Test your AI Agent
Visit your Shopify store, open the widget, and send a test message. Confirm that the AI Agent answers using the expected knowledge and instructions.
Add the website widget to Checkout and Thank you pages
The website widget can appear on the Checkout page for Shopify Plus stores. It can appear on the Thank you page for all Shopify plans from Basic upward.
- After connecting the website widget, go to Home page → Checkout and customer accounts in the Text App. Alternatively, open your Shopify admin, select Checkout, and then select Customize.
- Open Apps and locate Text (LiveChat Checkout Chat).
- Select (+) Text and choose the available Checkout or Thank you page placement.
- Select Save.
- If another placement is available for your plan, repeat the steps and save that view as well.
Manage your Shopify installation in Text
Open Settings → Website widgets in the Text App to review and manage connected websites.
For each website, you can see its URL, who added it, the setup method, connection date, and installation status. Open the three-dot menu to visit the store, open Shopify, get the installation code, or customize the website widget.
How to connect Shopify with the previous ChatBot workflow
If you already use the previous ChatBot Visual Builder and AI Assist workflow, follow the existing instructions below to connect and manage Shopify.
The ChatBot Shopify integration lets you automate customer service and enrich the user experience simultaneously. Use our integration to add a chatbot to your Shopify store. Chatbot conversations can improve shoppers’ experience of your online store and supercharge your online sales.
The integration provides extra actions that make ChatBot an even more effective selling channel for any Shopify business:
- display your store offerings in the chat
- use a chatbot to help users search for products
- show shoppers their order status
How to integrate the products
The ChatBot <> Shopify integration can be activated in three ways. You can choose the one that best meets your needs.
If you already have an active Shopify store, you can add the bot in the Shopify Admin panel. This way, you can use a pre-built chatbot and customize it to your store faster. The bot will be automatically added to the store.
If you’d like to build the bot from scratch and ensure every step of the chat meets your needs, you can activate the integration in the ChatBot app in the Integrations panel after the bot-building process is done. In this approach, you can also use the pre-built bot structure, customize it, and load it into your store when all adjustments are done.
The third way to connect ChatBot and Shopify is to start the integration process using Shopify actions directly in the bot conversation tree. You can add the actions to the bot structure while developing the bot without activating the store. When you finish the development phase, you can active the store.
How to add a bot in the Shopify Admin panel
- Log in to your Shopify store admin panel. Go to the Apps section and search for the ChatBot app.

- Select the ChatBot app and click the Add app button. Confirm with the Install button.

-
Log in to your ChatBot account and configure the integration.
If you’re a new user, you must set up your account first. Provide your email address and password. Then select Sign up.
-
Choose from the three options. After selecting your preferred option, select Continue.
- Use a pre-built Shopify template — import the Shopify-specific bot structure.
You need to customize the imported template once the integration is complete. - Select an existing bot — choose one of the bots you have created.
You can always edit the selected bot later. - Build from scratch — create your bot from scratch.
Once you configure the integration, you need to build your bot in the ChatBot app.
- Name the newly created bot (1) or select one of the bots you already have. Decide if your bot should be enabled in your store from the start or if it should be disabled (2). Continue with the Create your chatbot button.


In the Chatbot enabled section, you can decide whether your chatbot should be active on your Shopify store when the integration is complete. If you turn this setting on, the chatbot will appear on your store even if your bot is incomplete.
We recommend disabling this setting if you’re creating your chatbot from scratch. This way, you can finish your bot in the bot builder first and turn it on when it’s ready
In the Chatbot enabled section, you can decide whether your chatbot should be active on your Shopify store when the integration is complete. If you turn this setting on, the chatbot will appear on your store even if your bot is incomplete.
We recommend disabling this setting if you’re creating your chatbot from scratch. This way, you can finish your bot in the bot builder first and turn it on when it’s ready
How to add a Shopify store in the Integrations panel
- Go to your bot and choose Shopify from the list in the Integrations panel. Select Connect with Shopify.

- Provide your Shopify store name (1). Click the Connect with Shopify button (2).
If you are not already logged into your store, log in. Continue with the Install app button.

- The integration will appear on the list. Click the name of your store to manage your integration.
How to add the Shopify store using Shopify actions in the bot
Select the Shopify action and add it to your bot flow. Open the block and select Connect with Shopify button. Finish the installation process.

The integration will appear on the integrations list in the Integrations panel. You can manage it there.
How to manage or delete the Shopify integration in ChatBot
You can manage the integration when you click on it on the Integrations list. You can decide if you’d like to enable or disable the bot in the store (1), if you want to proceed with the store management, or if you’d like to delete the bot from the store entirely (2).

We recommend leaving the bot disabled in the Bot enabled section at first. This way, you can test your bot in the bot builder first and turn it on when it’s ready. This will give you time to develop the bot correctly before it starts chatting.
How to manage the subscription
When you create a new ChatBot account via Shopify
If you change your ChatBotsubscription details in the Shopify panel, the subscription section in ChatBot will be blocked.
When you add your existing ChatBot account to Shopify
If you add an existing ChatBot account to Shopify, you can manage your subscription details in the ChatBot billing section.
Read more