Attributes allow you to assign information to visitors or ongoing chats and pass them to web services. They can also help you personalize your chats.
Check out how attributes work with entities in our video tutorial.
You can also see how easy it is to use them along the bot flow and make your chat more personalized in this video.
Check out how attributes work with entities in our video tutorial.
You can also see how easy it is to use them along the bot flow and make your chat more personalized in this video.
Good to know:
-
There are two attribute types: Custom attributes created to match visitors’ specific needs and ready-to-use Default attributes created by us to cover basic end-user information.
-
Attributes are related to User Entities and System Entities.
-
You can assign attributes at any conversation step using the Set attribute action.
-
Use the Question action to validate the visitor message and collect attributes in a single step.
-
You can use attributes in User input blocks and Bot Responses by typing two curly brackets or using the attribute symbol in a text field.
-
You can use a maximum of 99 attributes in one interaction.
Types of attributes
Attributes save visitors’ information and allow for its reuse in conversations. In ChatBot, we can distinguish default and custom attributes.
Some of the default attributes are collected when the chat starts, and depending on the integration you use, you need to collect some in the bot flow.
Check the Visitors section to see which attributes have values from the start and which need to be collected. In a single-visitor view, you can see all the details collected when the chat started in an integration.
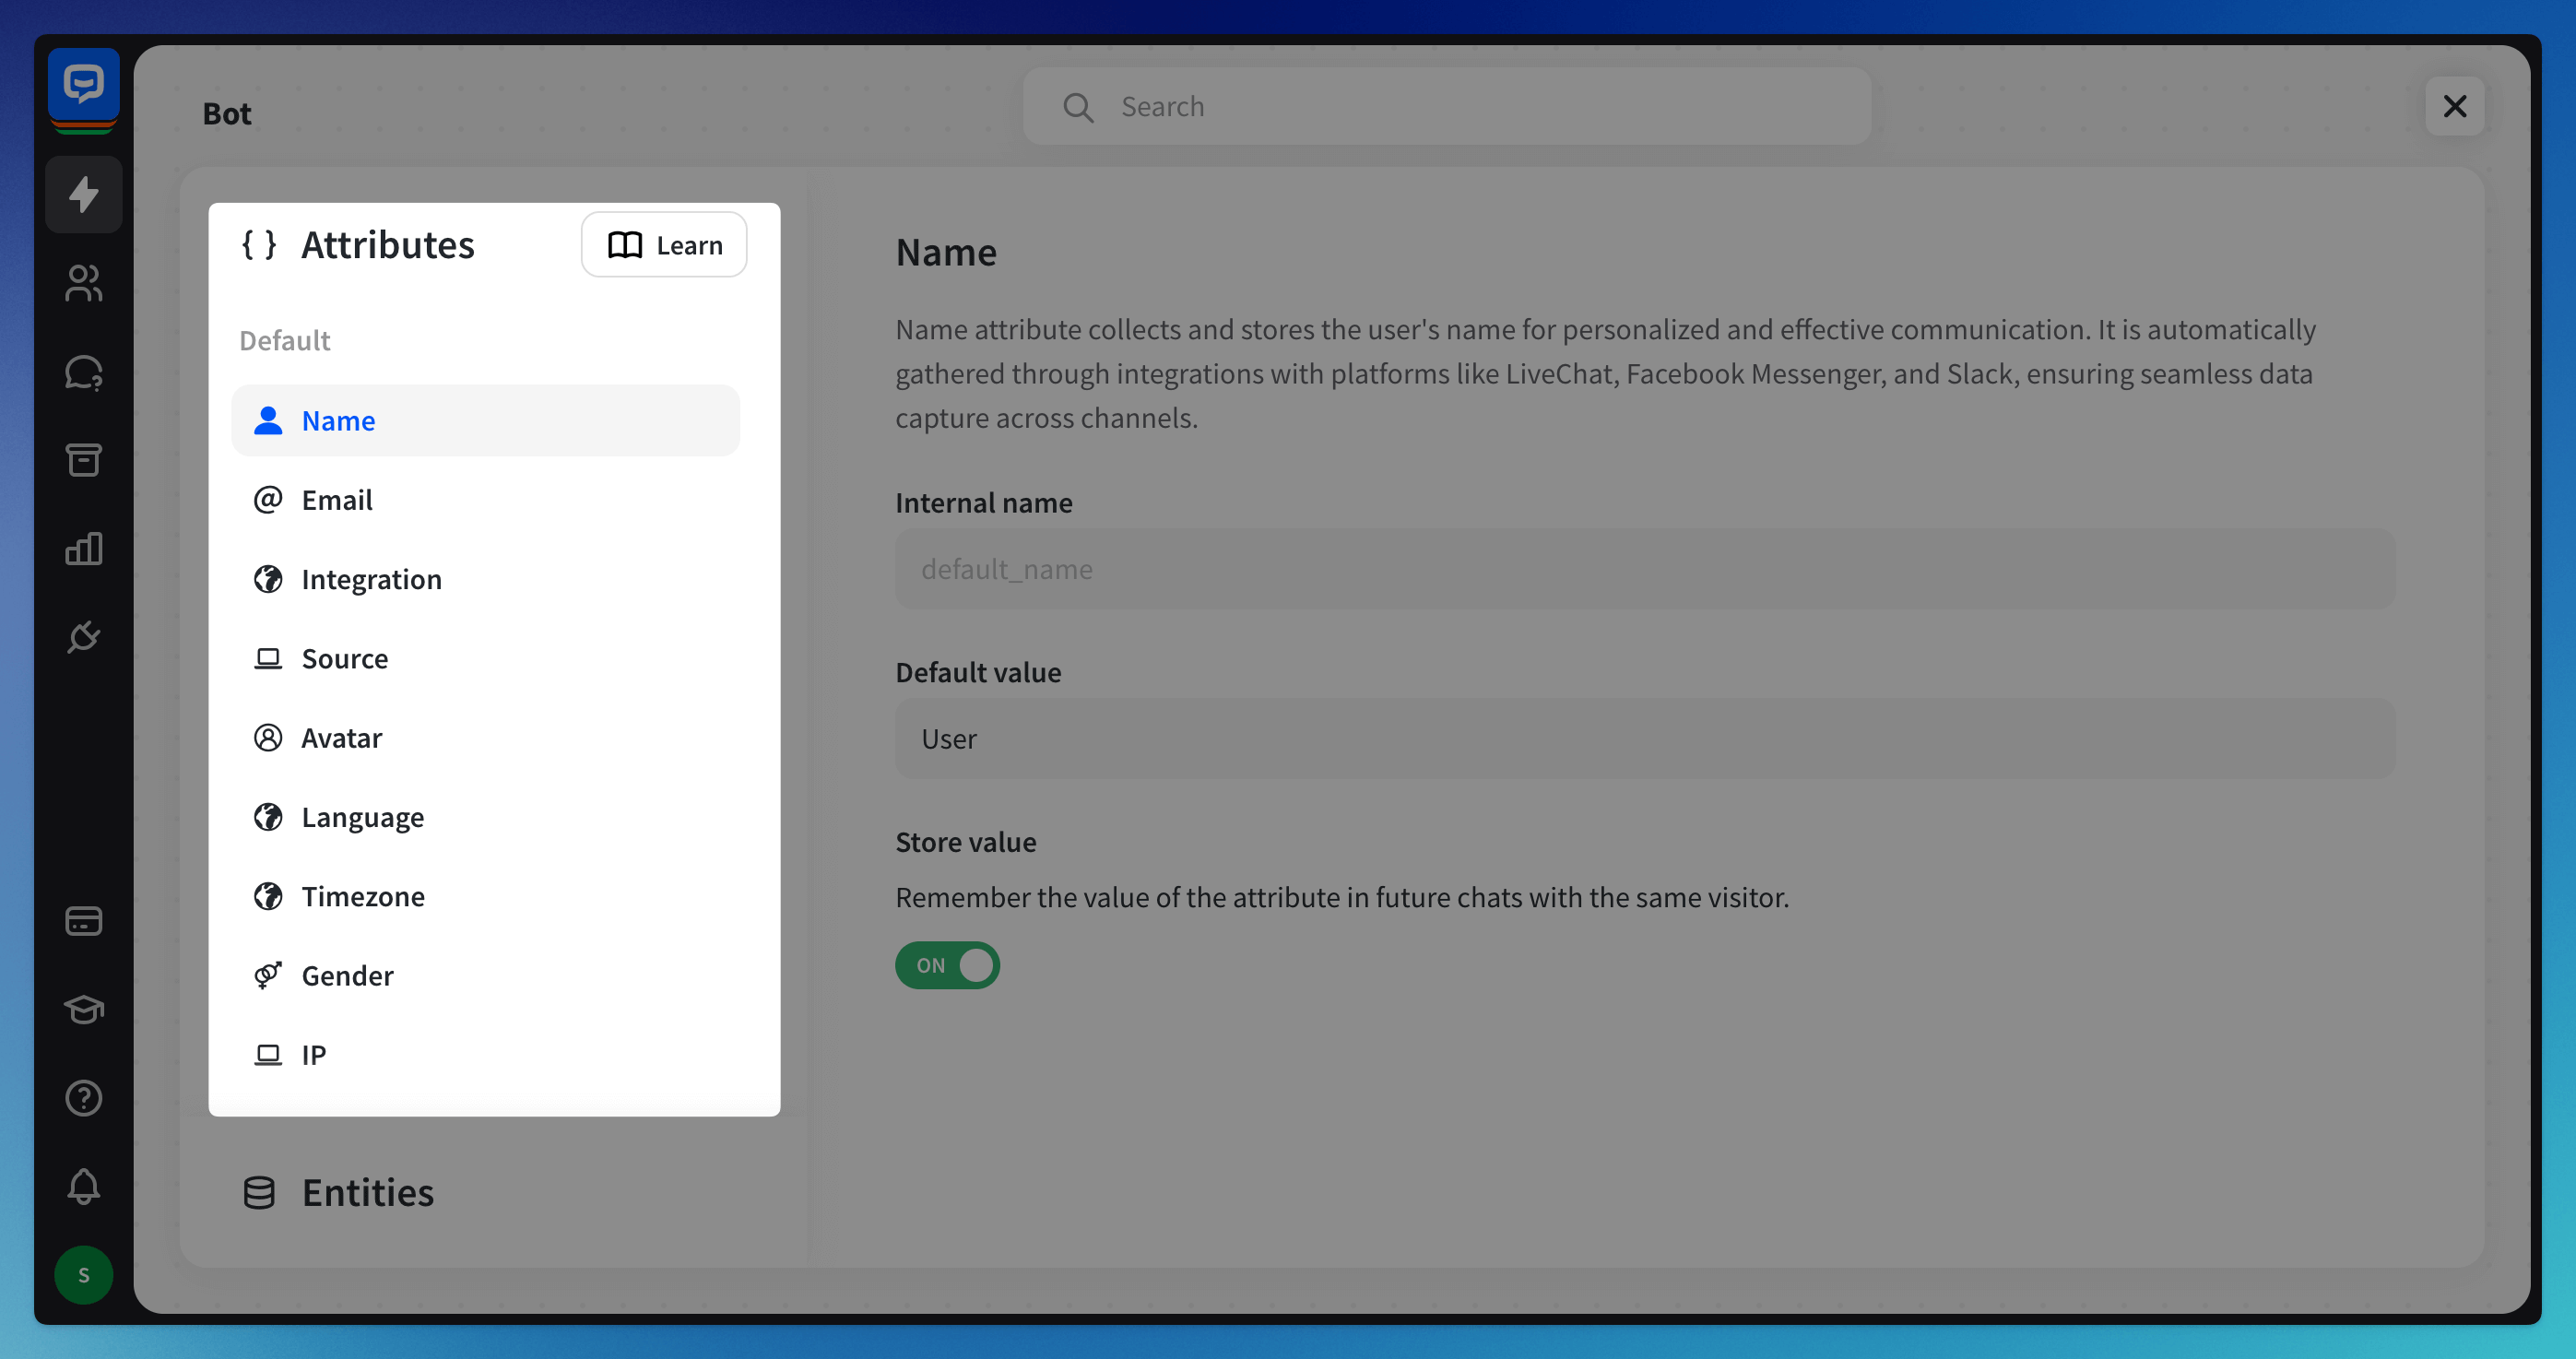
Default attributes automatically collect and save data about your visitors from integrated apps. You can use these attributes in the bot flow to personalize chats or analyze where most of your visitors are coming from.
Visitors predefine Custom attributes. These attributes are created specifically to meet the visitors’ needs and fulfill the information requirements to resolve the end-user’s case. They can be captured with entities or set manually with the Set attribute action.
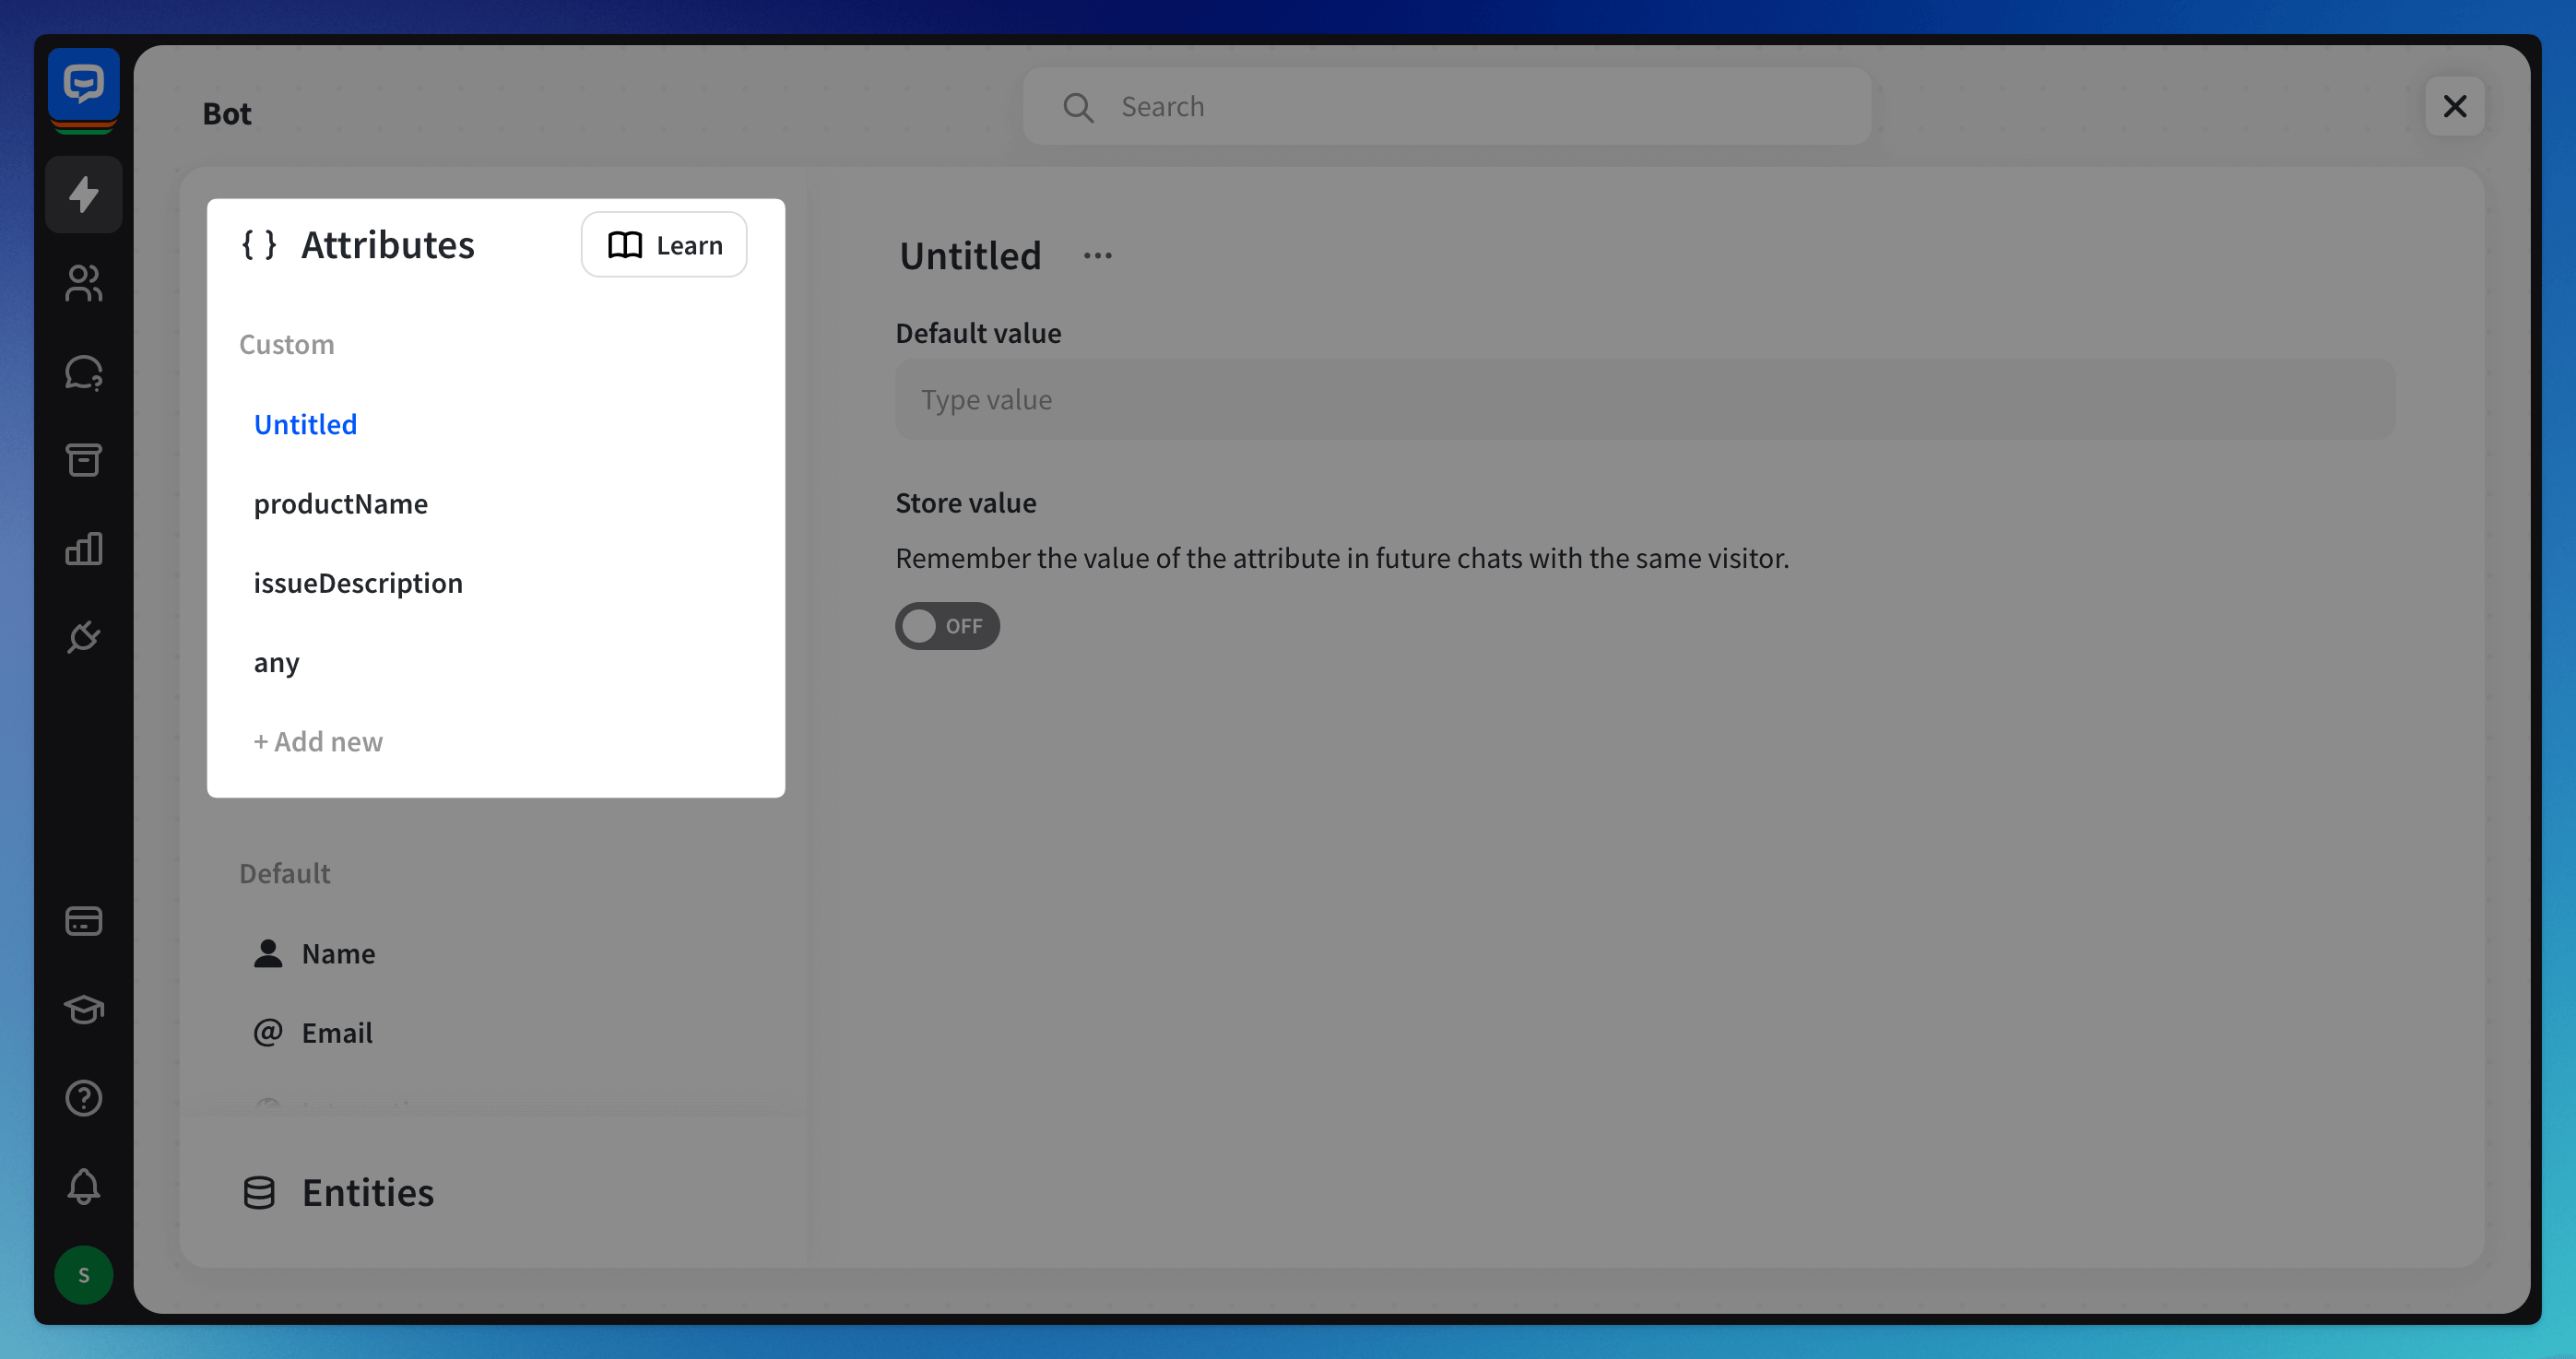
If you created your bot automatically by scanning your website, some of the information available on your site (company address, social media links, etc.) will be saved as Custom attributes from the beginning.
You can check and adjust these details in the Attributes section.
If you created your bot automatically by scanning your website, some of the information available on your site (company address, social media links, etc.) will be saved as Custom attributes from the beginning.
You can check and adjust these details in the Attributes section.
The list of Default attributes
Below is a list of all visitor attributes available by default in ChatBot. These attributes can be filled with data automatically (by one of our Integrations) or manually using the Ask Question action. You can also validate the response saved to one of these attributes using Entities.
Attribute name | Parameter name | Description |
Name |
| visitor's login/name |
| visitor's email | |
Avatar |
| link to the visitor's avatar |
Source |
| URL of the page on which the chat started |
Language |
| configured visitor's language |
Timezone |
| visitor's timezone |
IP |
| visitor's IP address |
City |
| visitor's city |
Region |
| visitor's region |
Country |
| visitor's country |
Postal code |
| visitor location's postal code |
Referrer |
| URL referring to an item leading to this request |
Integration |
| integration used in the conversation |
Attribute |
| your custom attribute |
Attributes section
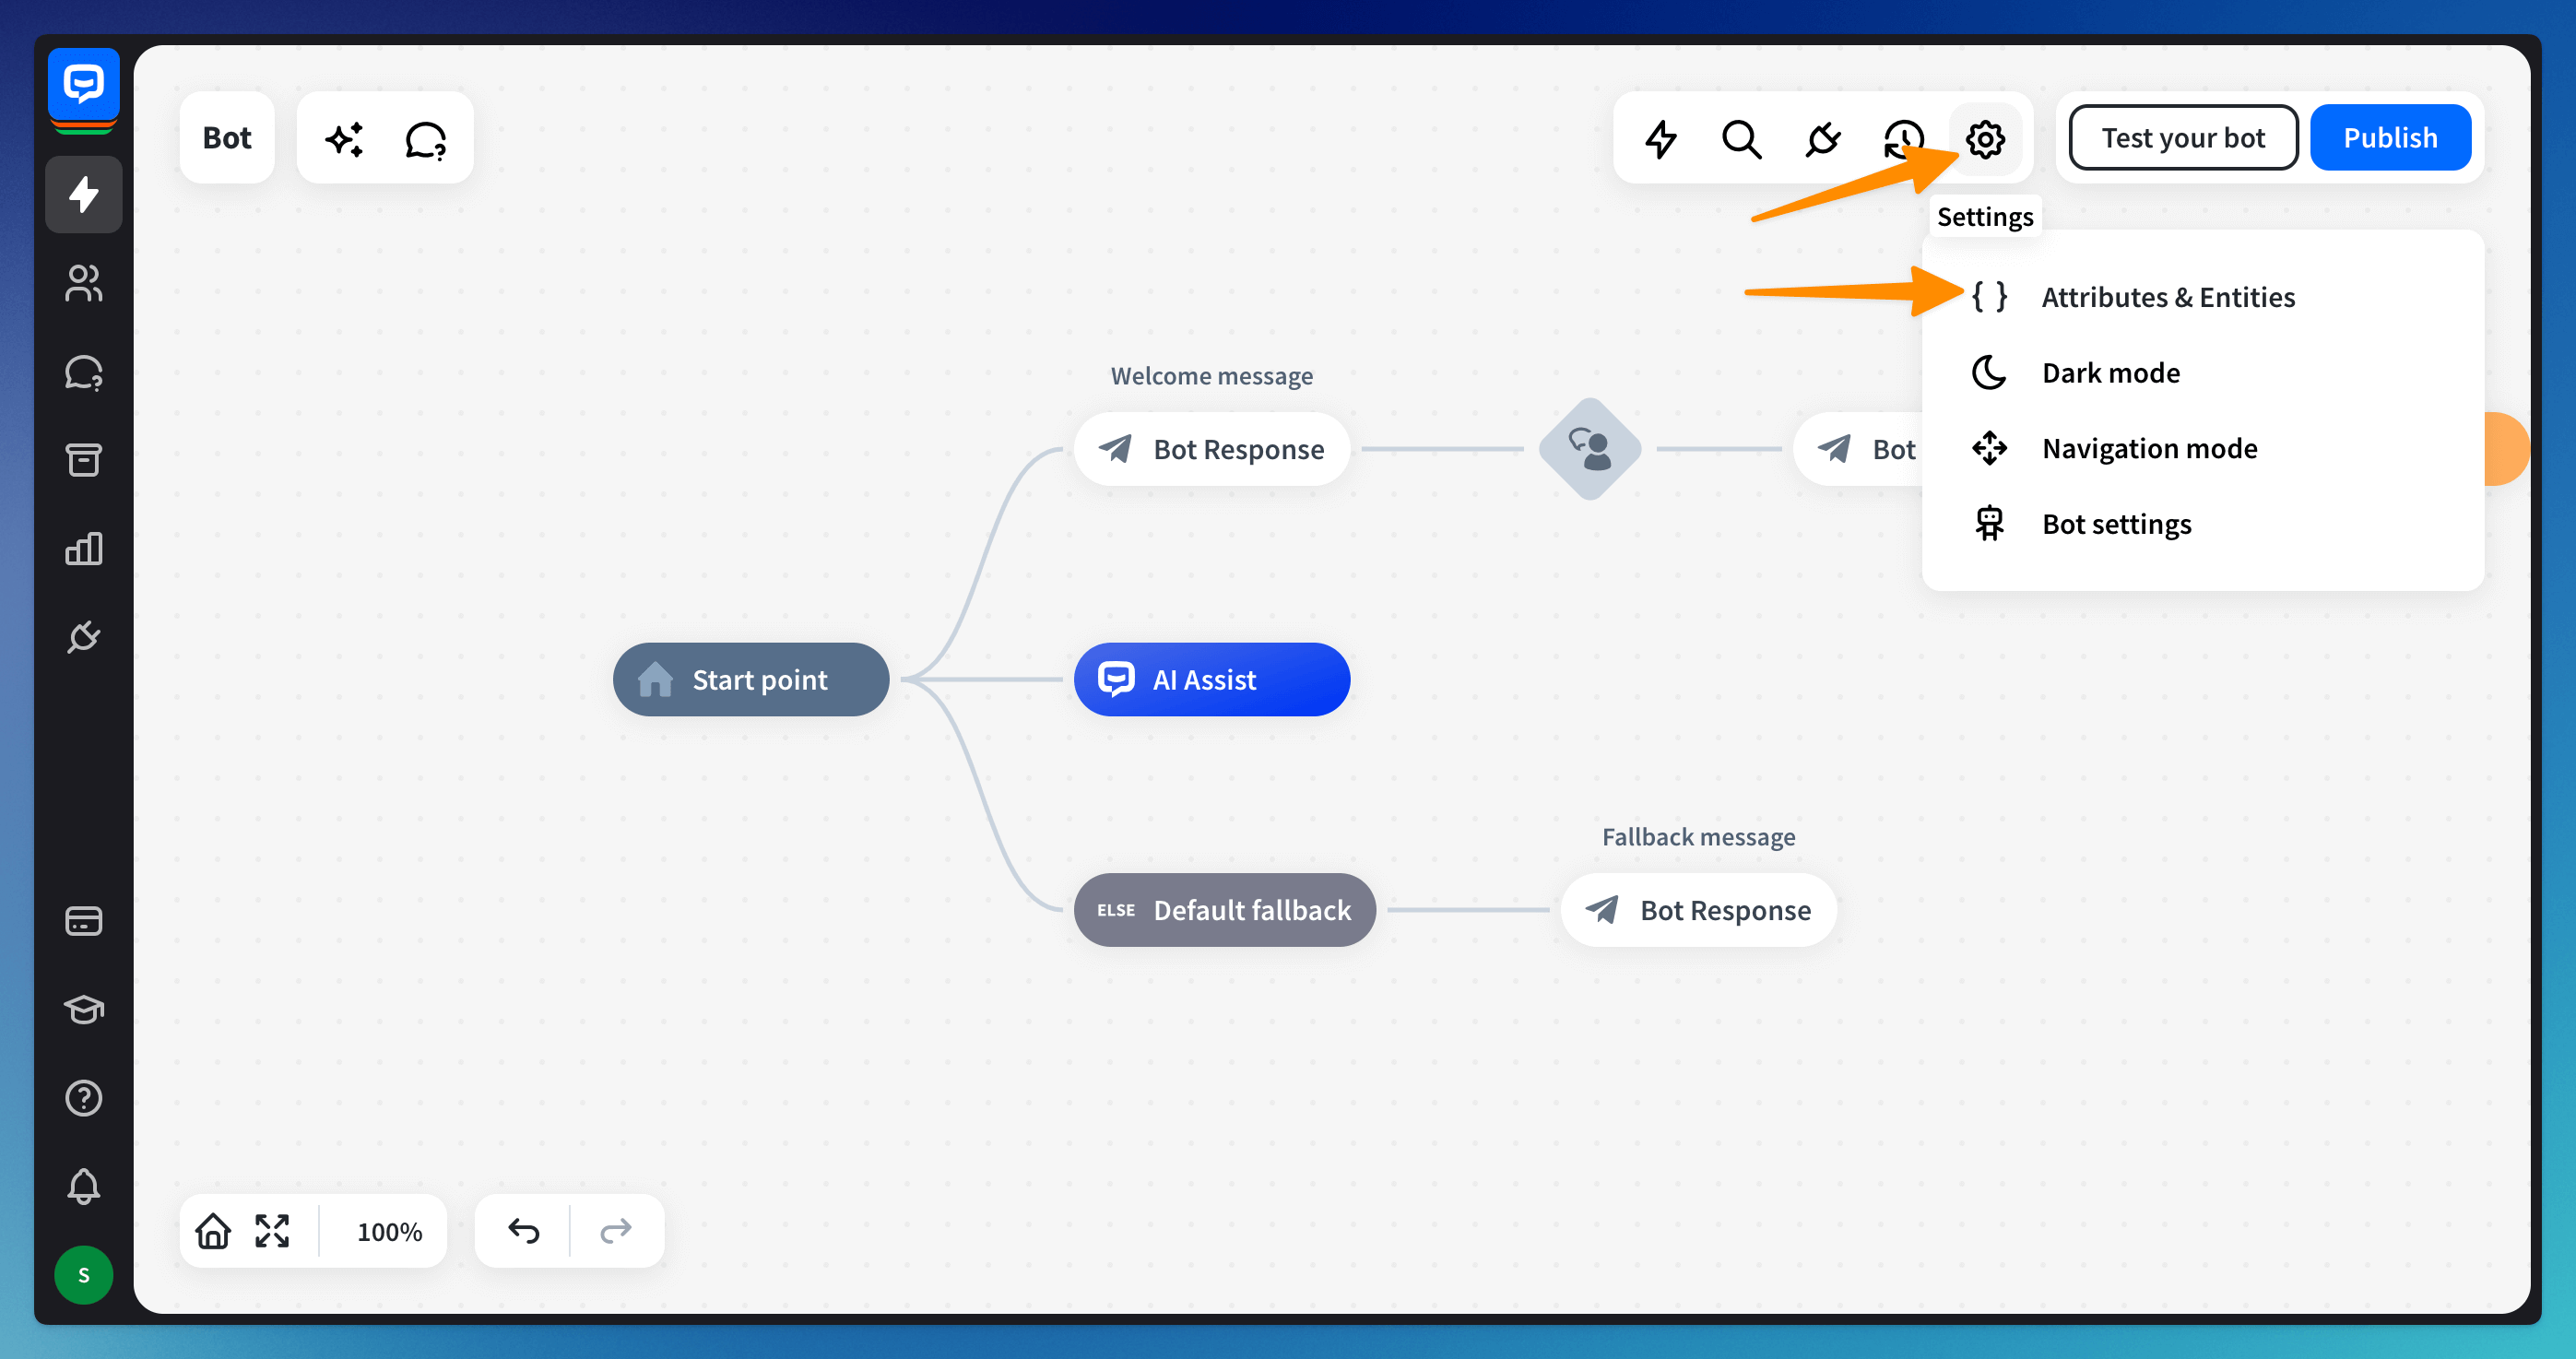
The Attributes section is the main attributes panel. You can edit all your Attributes and Entities there. Go to your bot and choose the Settings icon. Click the Attributes & Entities option to open the section.
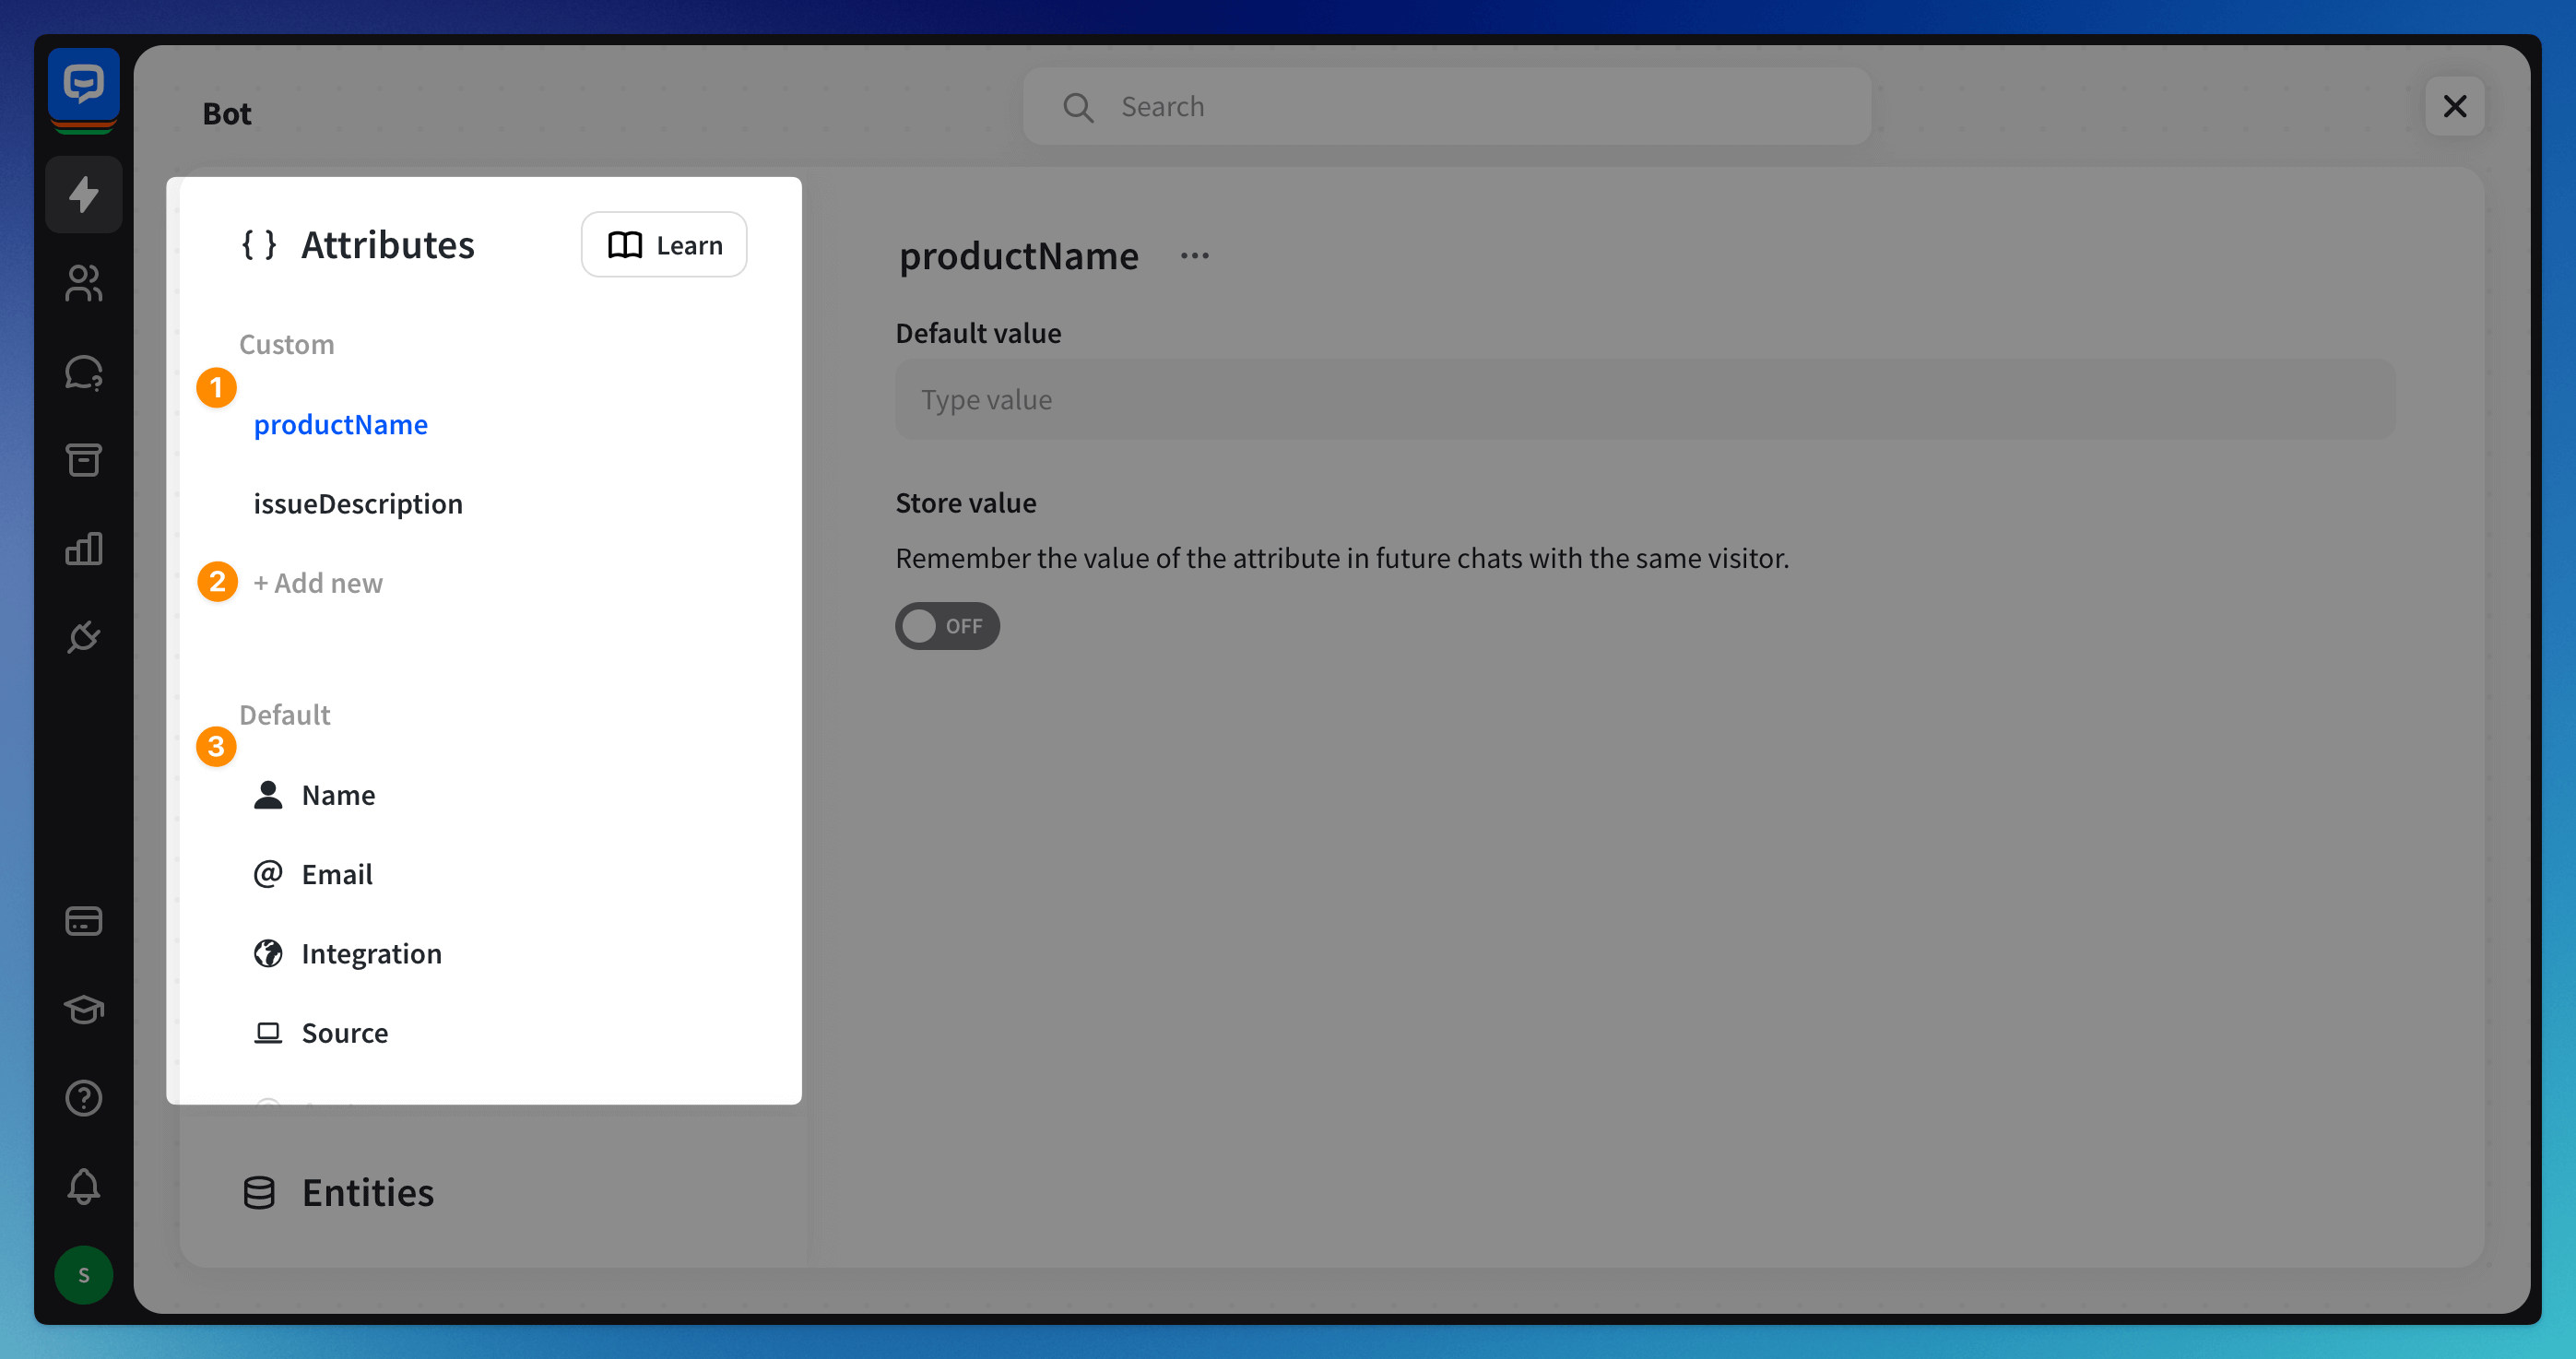
 See the full list of attributes available to use on the left-side menu:
-
Your custom attributes are at the top.
-
You can add more custom attributes with the +Add new option.
-
The default attributes are at the bottom.
 You can enable attributes to be saved in the visitor’s data and remembered when a new chat starts. When this option is disabled, the bot won’t have the information provided in the last chat, even when the user is a returning one.
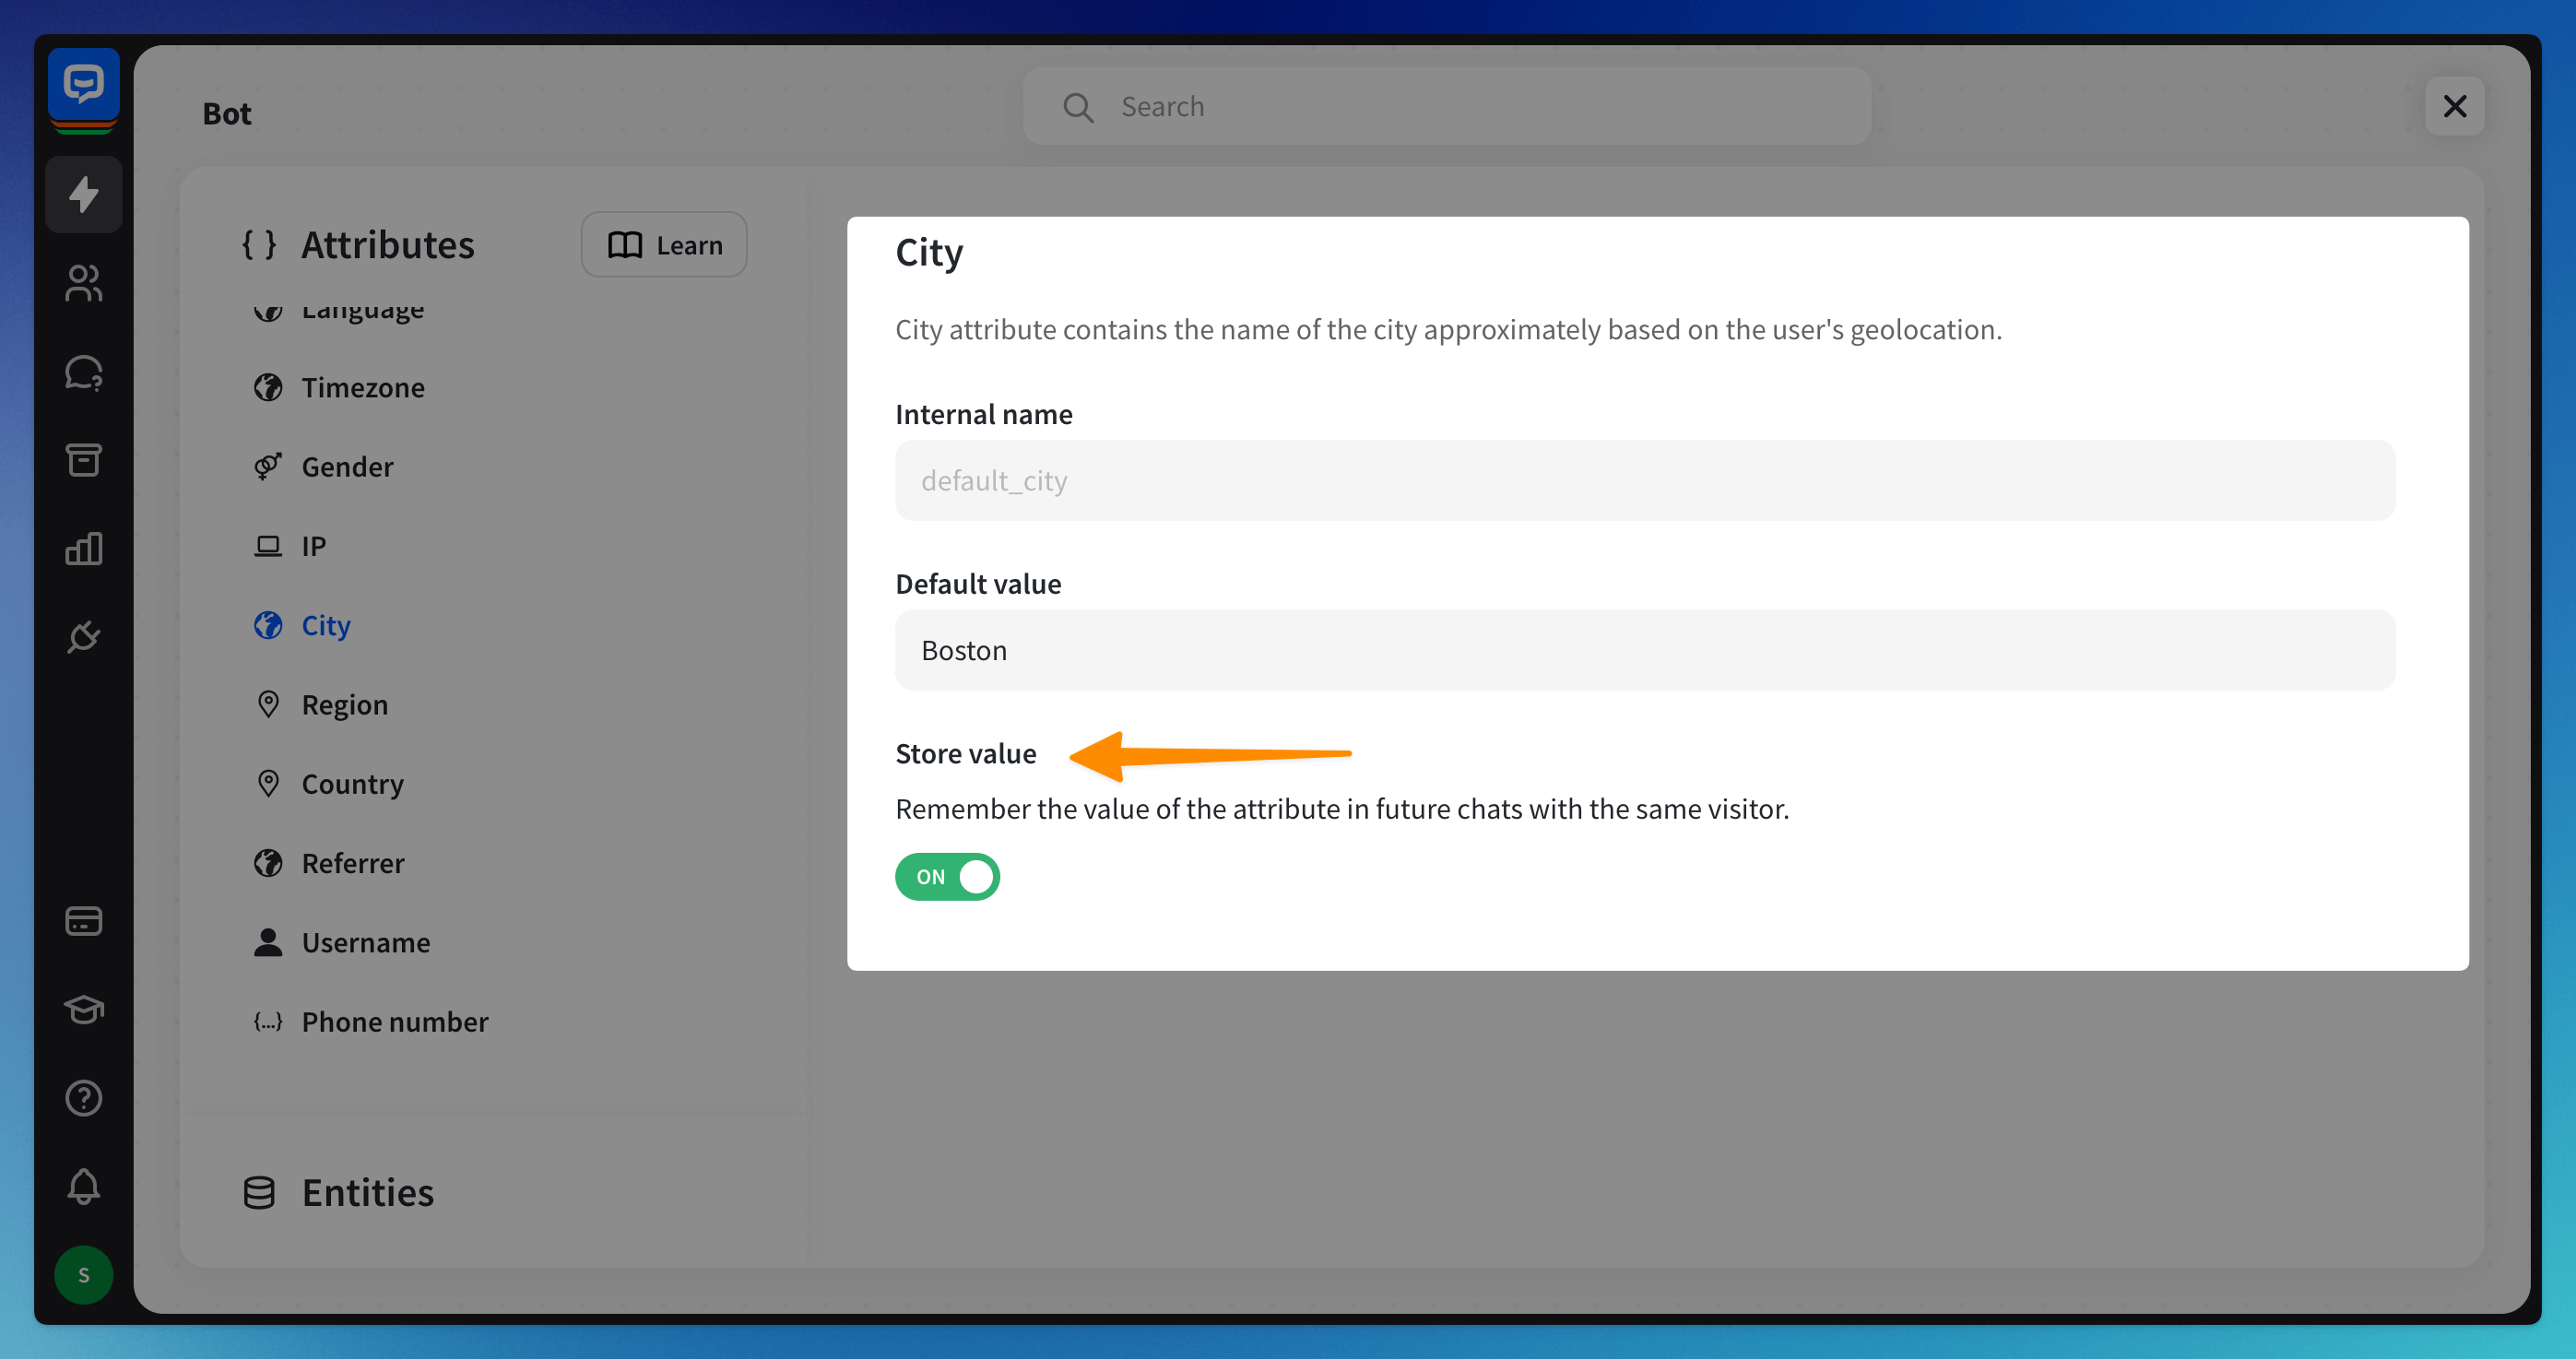
How to add a custom attribute in the Attributes section
You can also create a custom attribute directly in the bot flow. Check the How to Use Attributes section.
When you create them in the bot flow, you can check them later in the Attributes section and see all the attributes in one place.
You can also create a custom attribute directly in the bot flow. Check the How to Use Attributes section.
When you create them in the bot flow, you can check them later in the Attributes section and see all the attributes in one place.
Create attributes that match your needs to ensure all necessary information is gathered and saved during the chat. Go to the Attributes section and click the +Add new option. Then, name the attribute, provide a value if needed, and decide if you want to store the value for future chats or collect the new value each time the visitor comes to chat.
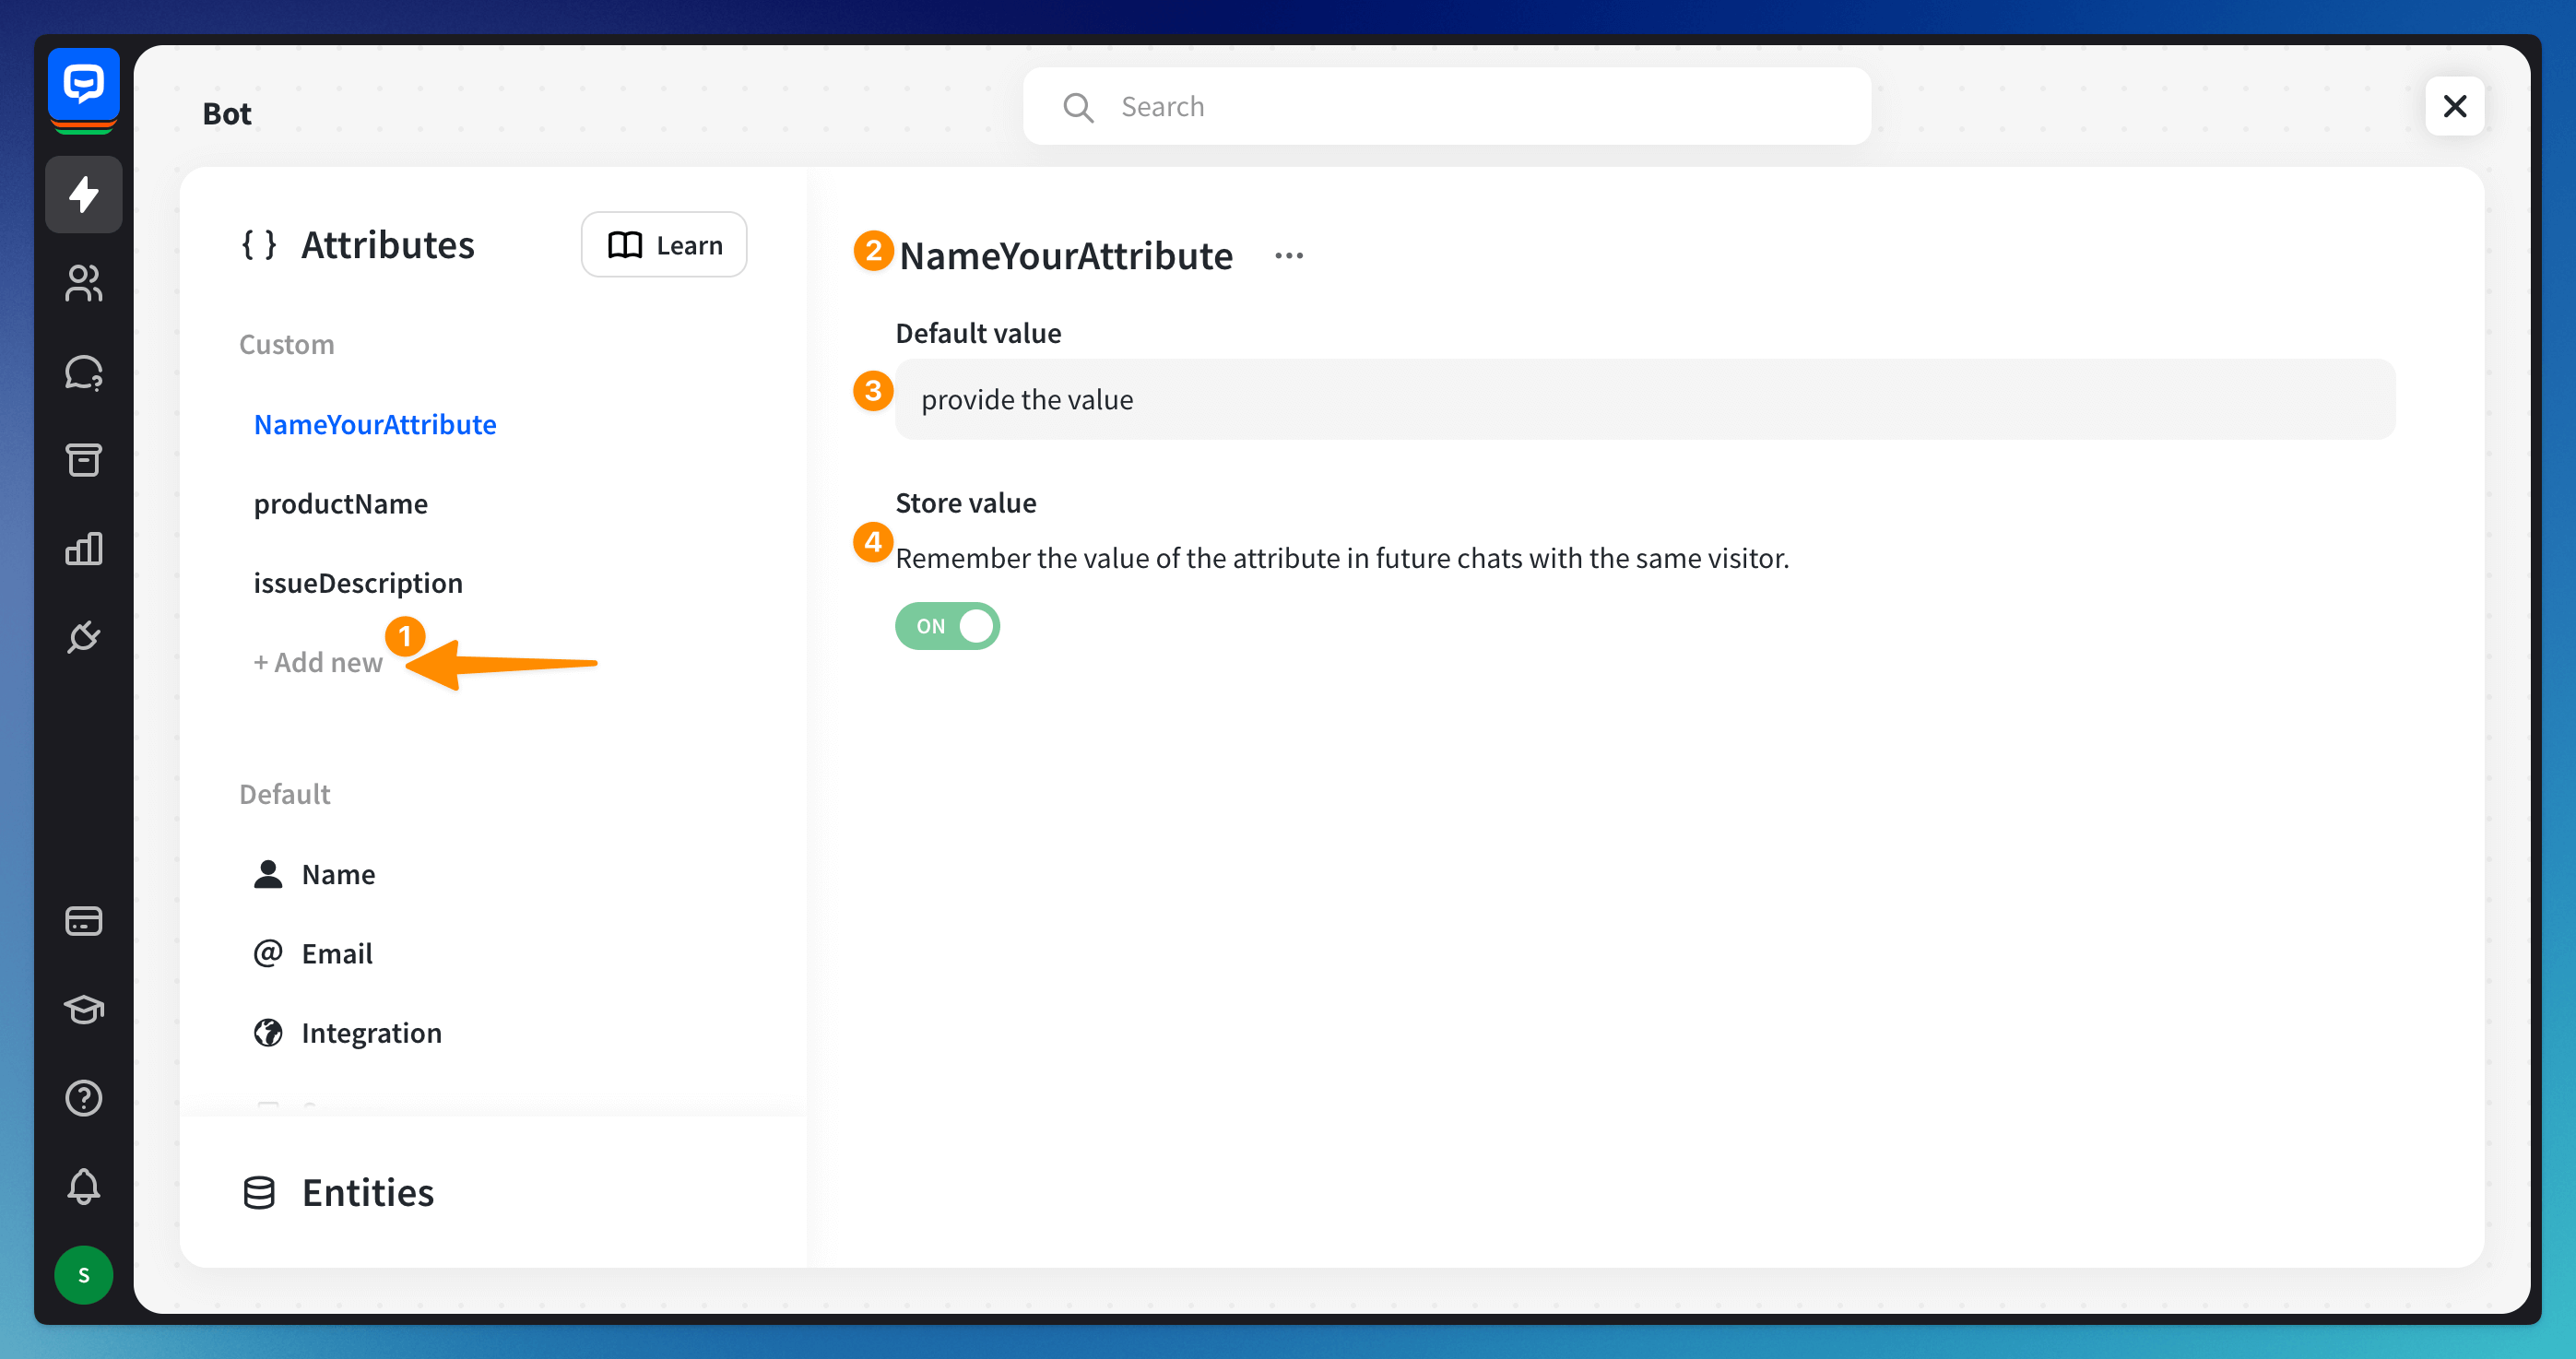
You can rename or delete the custom attribute by clicking on the 3-dot symbol next to the attribute’s name.
You cannot rename or delete a default attribute.
You can rename or delete the custom attribute by clicking on the 3-dot symbol next to the attribute’s name.
You cannot rename or delete a default attribute.
How to use attributes in a bot flow
Before you use any attribute in a Bot response, you must ensure that an attribute has an assigned value. Some default attributes have values assigned to them when the chat starts, but most are empty. You must collect the values before you use them in chats.
To get the data, you can use system entities or user entities.
Collect attributes with a Question action
The Question action allows you to ask for the information and save the response in a single step. If you ask the visitor for details in the Question action, you can use that information in your bot responses later in the chat. You can use the action to collect values of default and custom attributes.
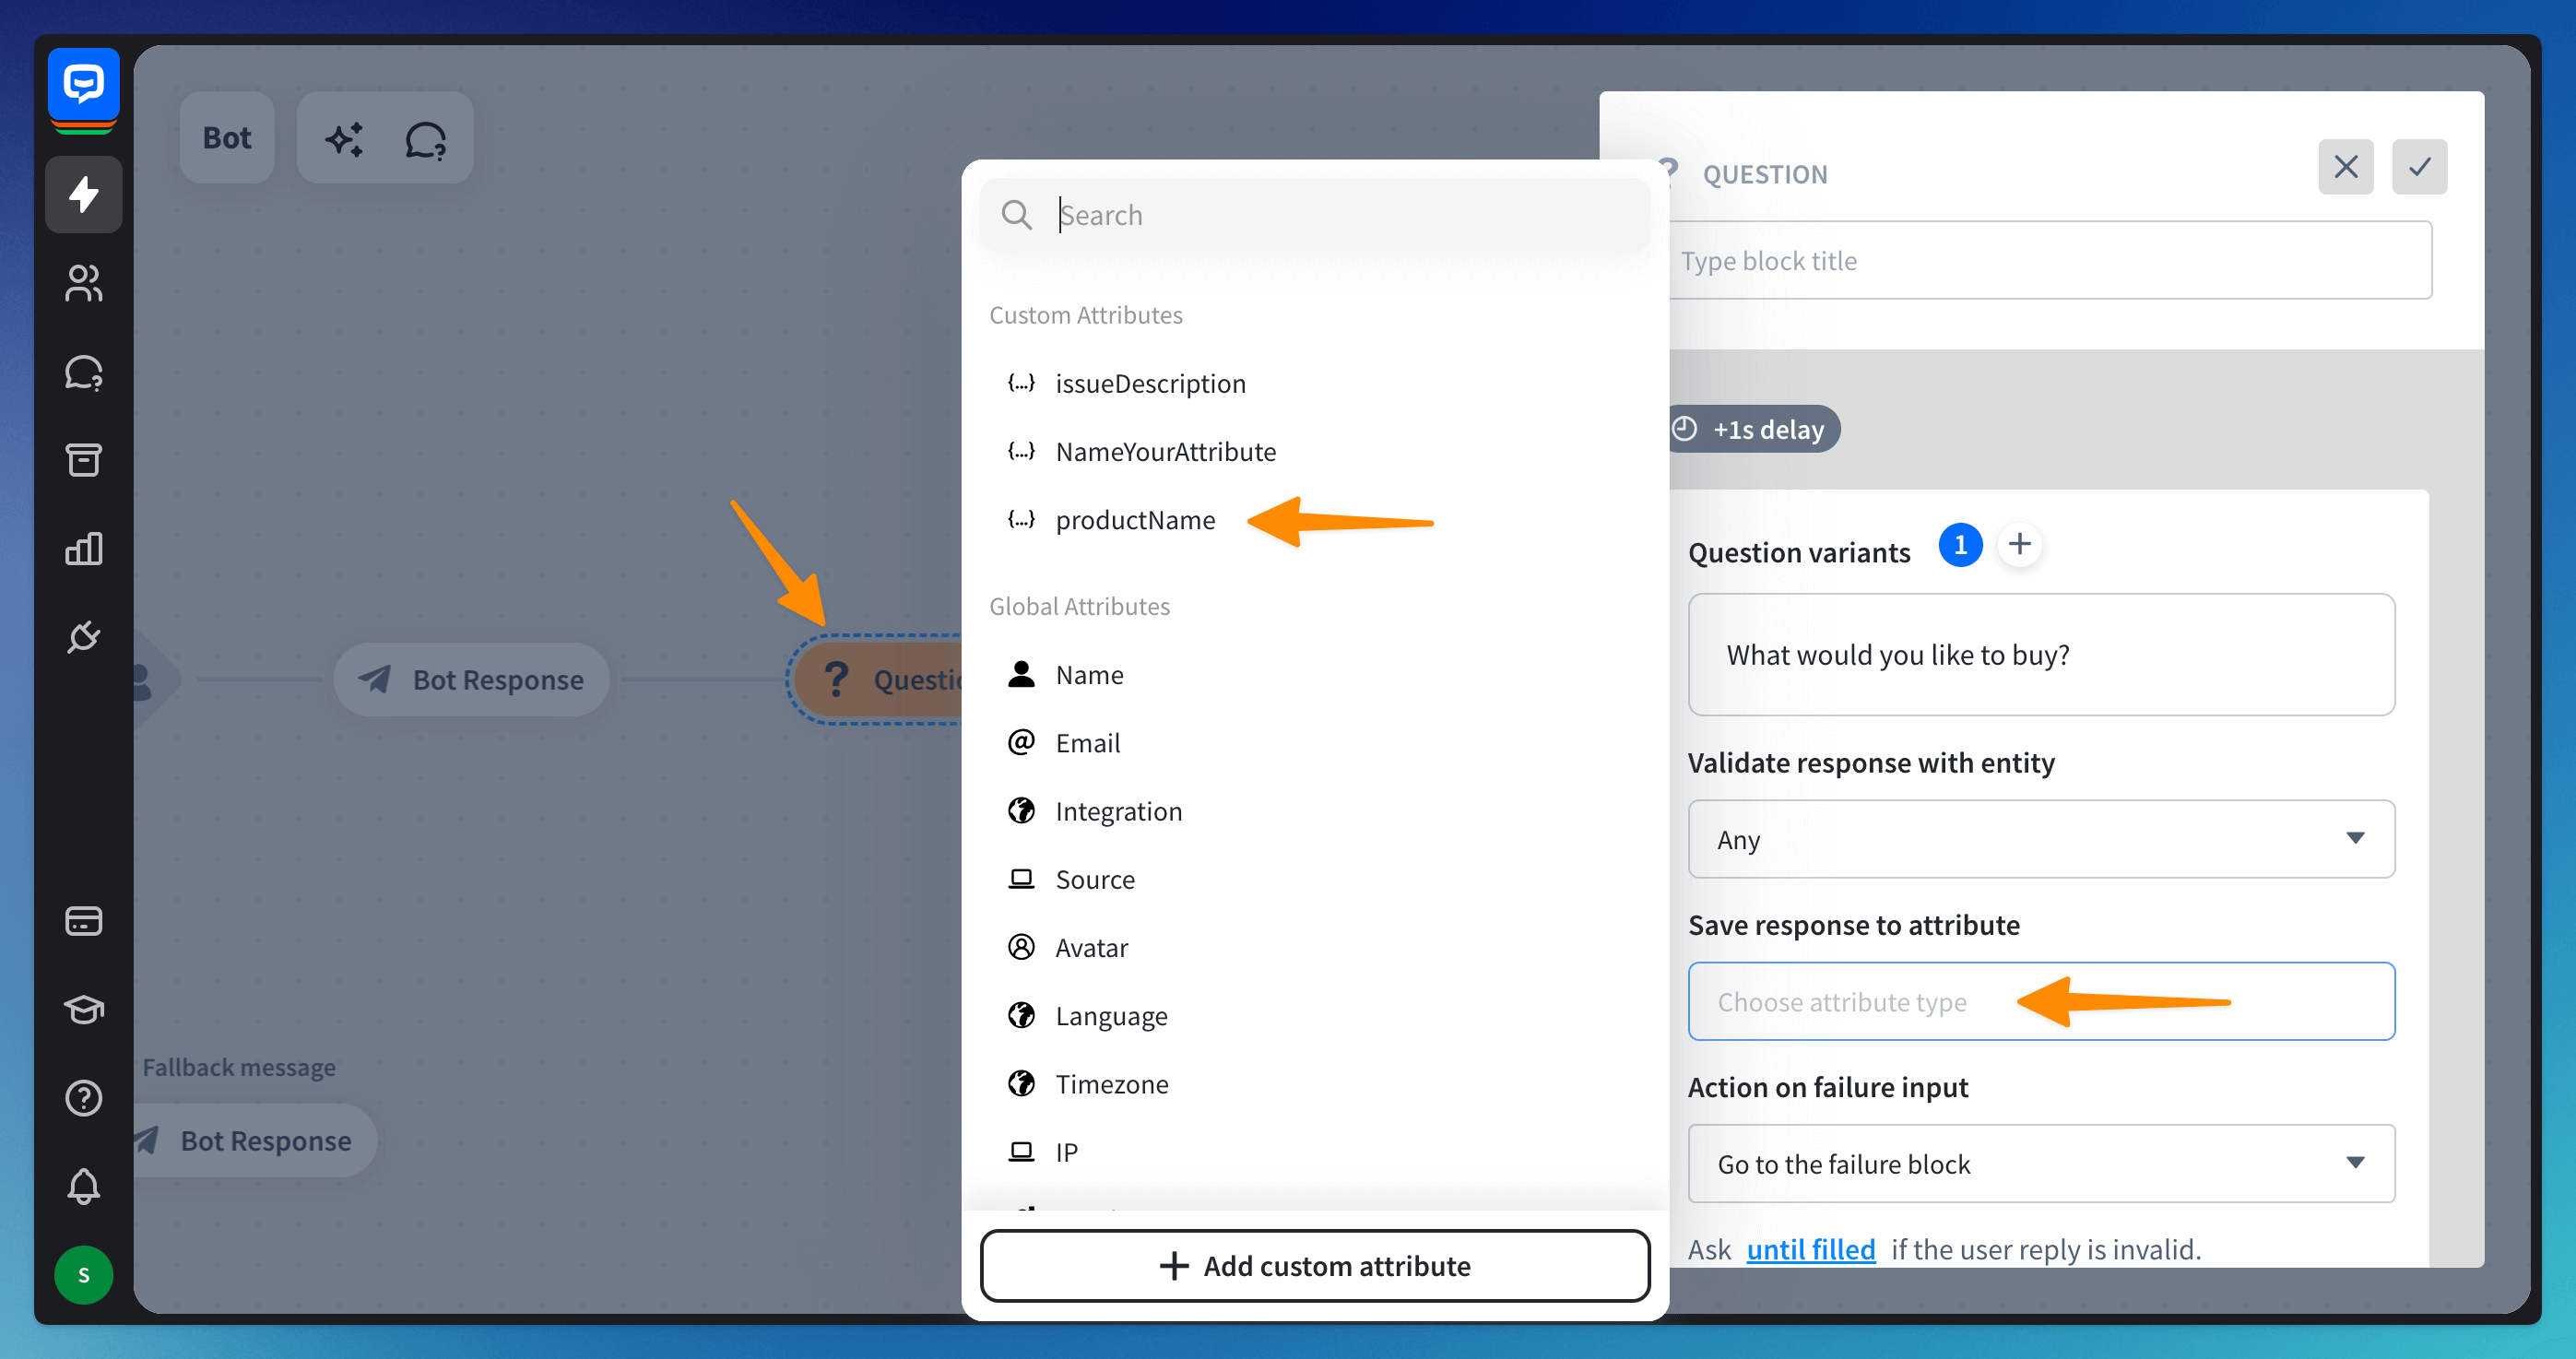
Collect attributes with a User Input
Open the bot flow and add a new User Input block. In the User Says section, type two curly brackets or click the attributes symbol. Select the validation parameter you’d like to use, and choose the attribute you’d like to save the value to from the list. Click Done.
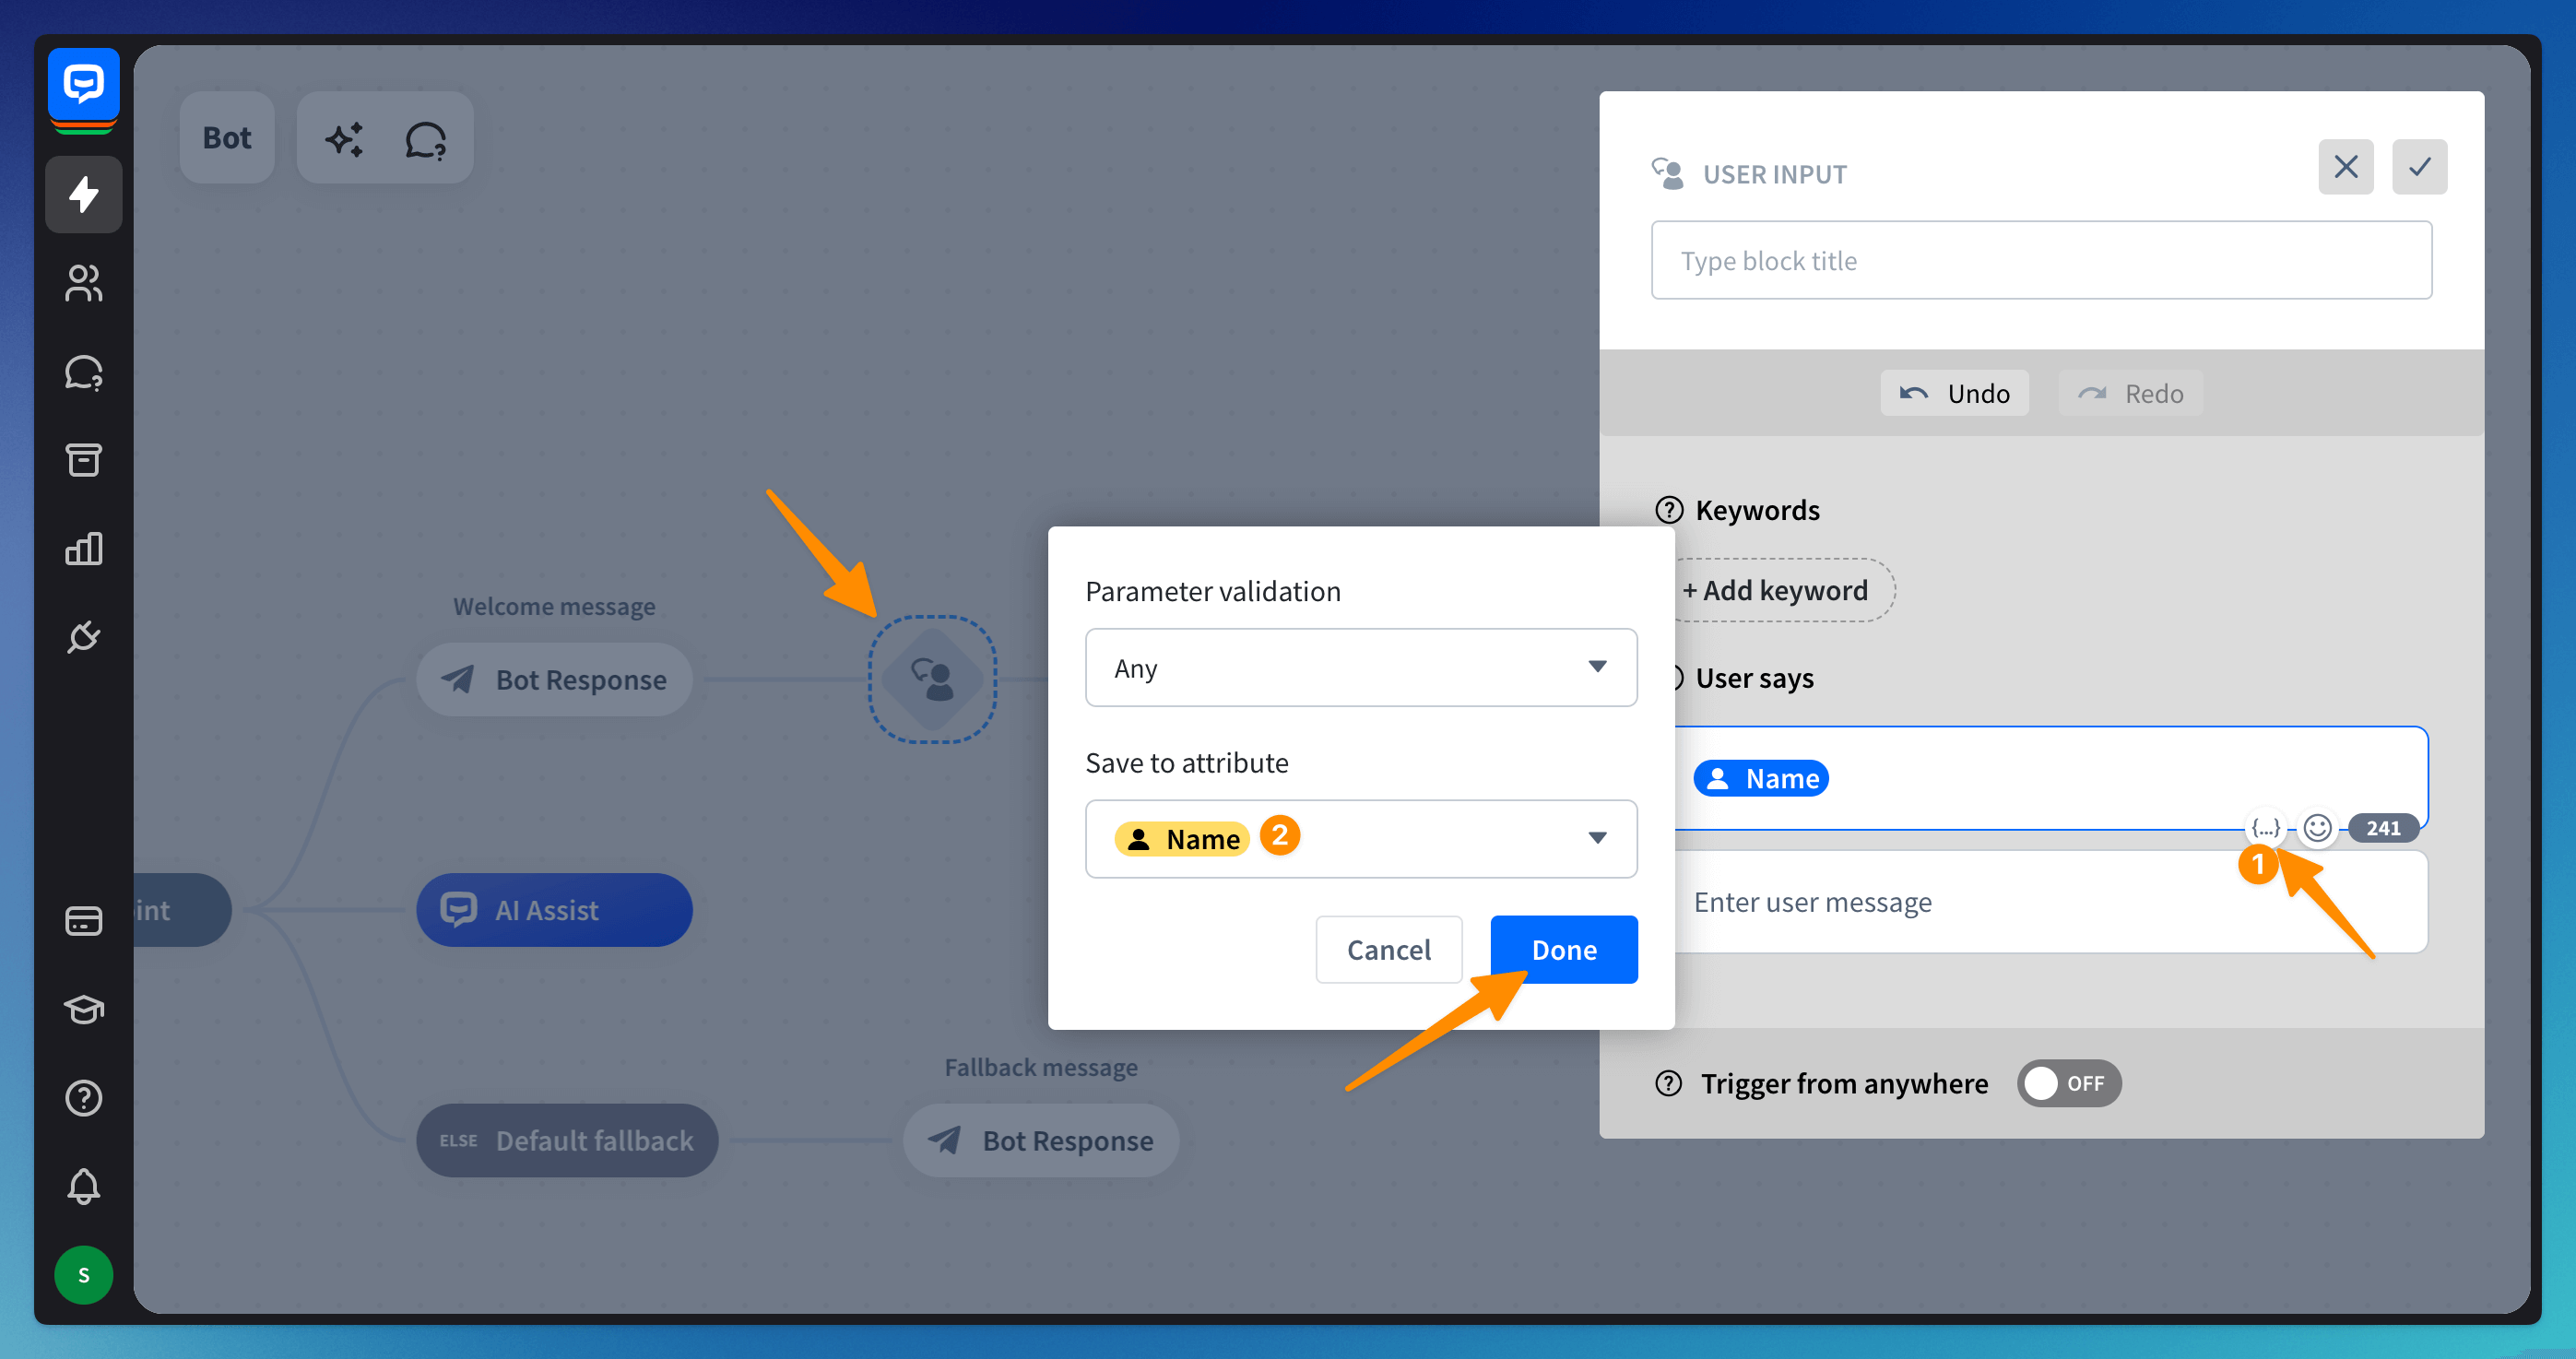
Your bot will now save any message the visitor sends to the Name default attribute. You can use this attribute later in the chat and the bot will display the content of the saved message.
You can check the values of all attributes collected during the chat in the Archives. You can see them on the right side of the screen.
You can also check the values and collected attributes in the Visitors section, in the single-user view.
You can check the values of all attributes collected during the chat in the Archives. You can see them on the right side of the screen.
You can also check the values and collected attributes in the Visitors section, in the single-user view.
Use Default attributes in a bot flow
Add the Bot response block after the User input block. Open the added Bot response and add a new response. Attributes can be added to all bot responses, including titles and buttons. To select an attribute, click on the attribute symbol available in all text fields or type in two brackets — the attribute’s configurator will be displayed.
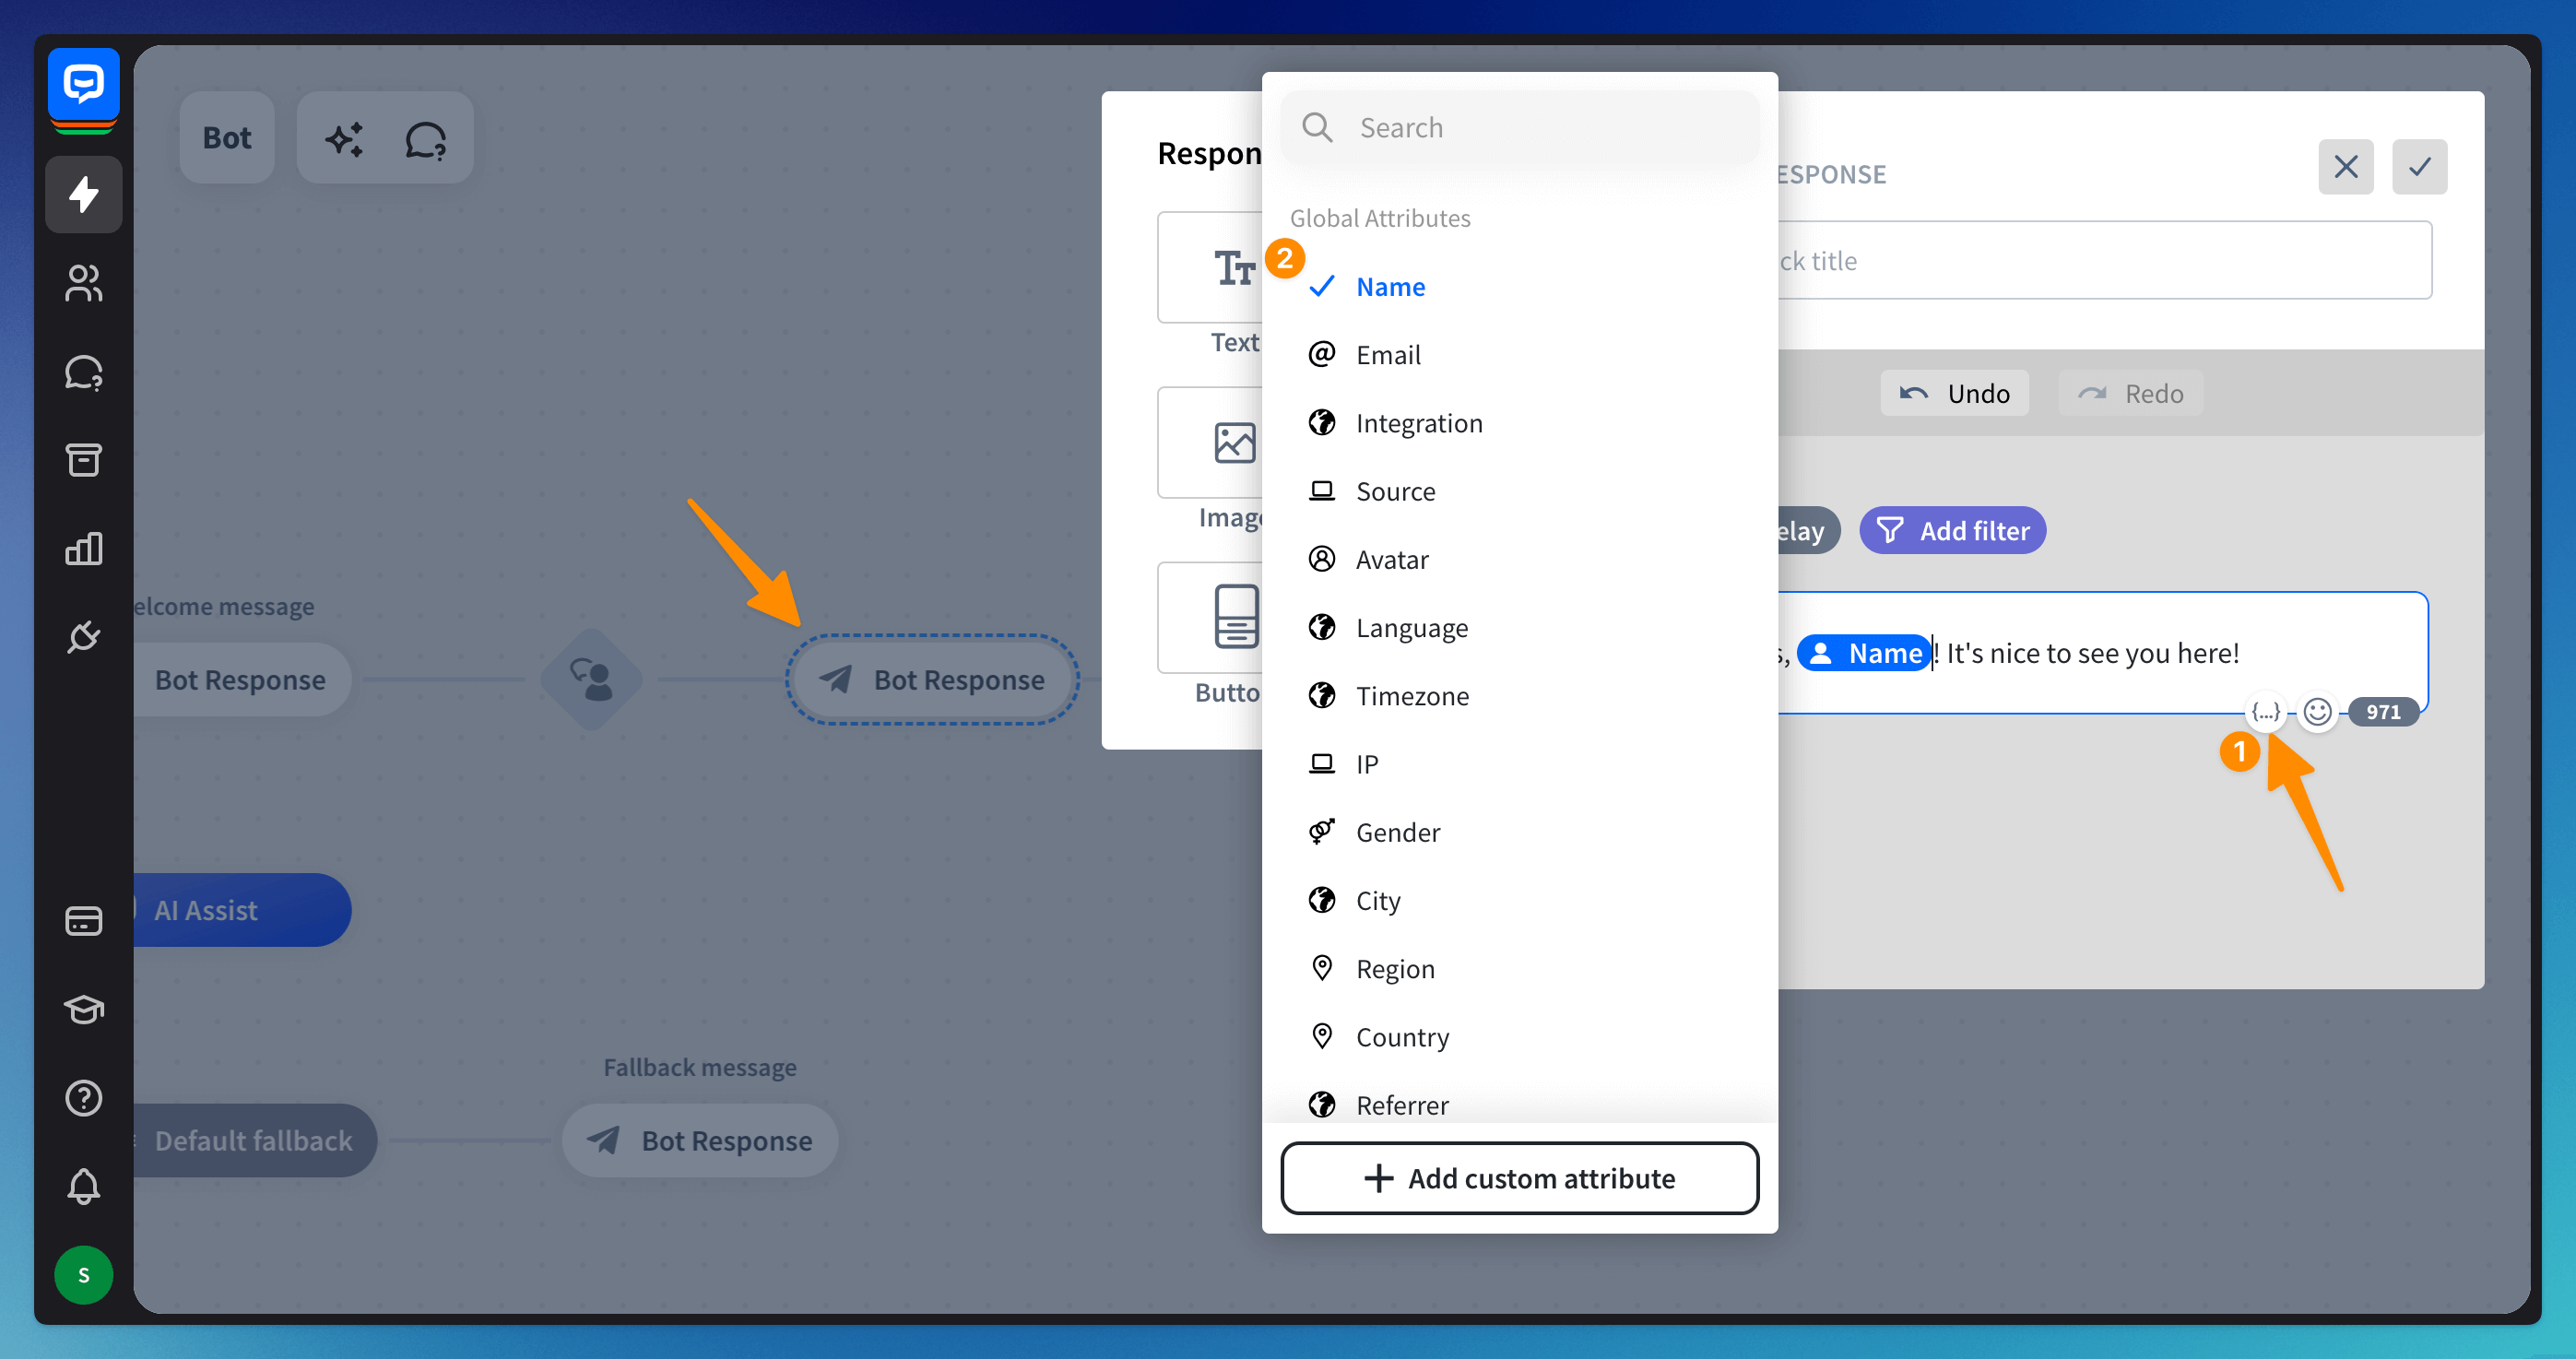
The attribute is ready. The bot will use the information it collected beforehand in the chat or pull the information from the integration and display the visitor name instead of the attribute.
Use Custom attributes in a bot flow
You can create custom attributes if you need to collect visitor data that isn’t listed in the default attributes list. Type in two curly brackets or click on the attributes symbol to open the attribute configurator. Then, click on the + Add custom attribute field.
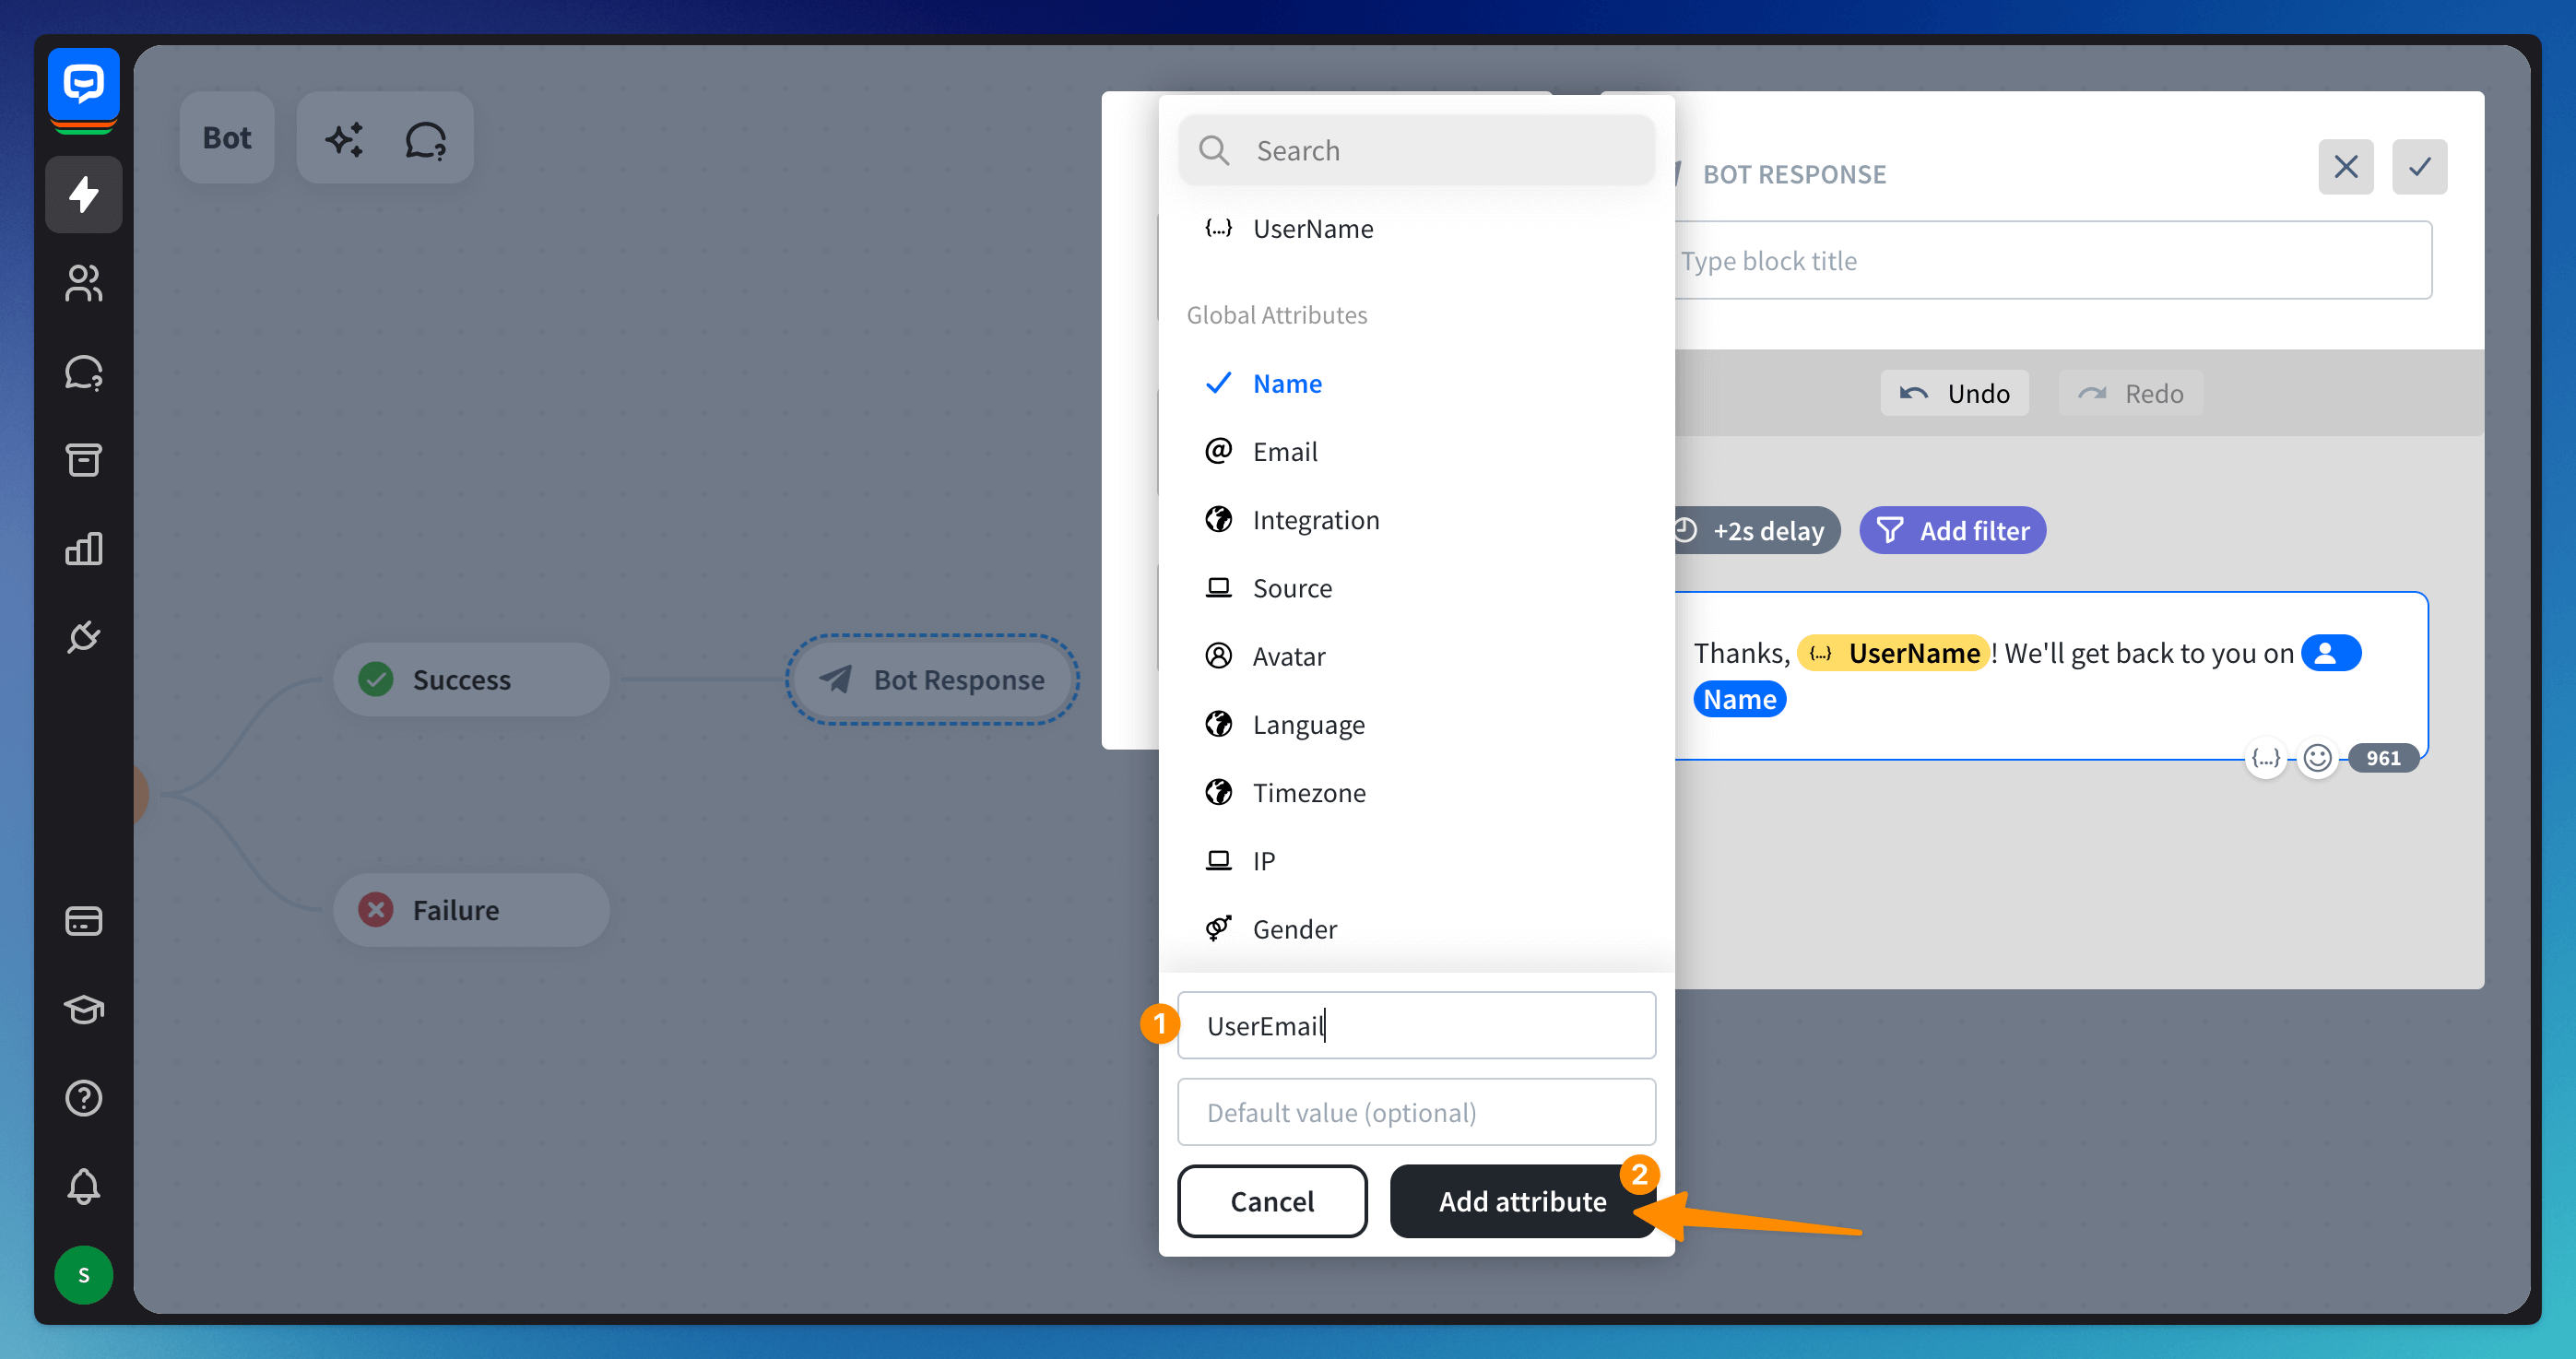
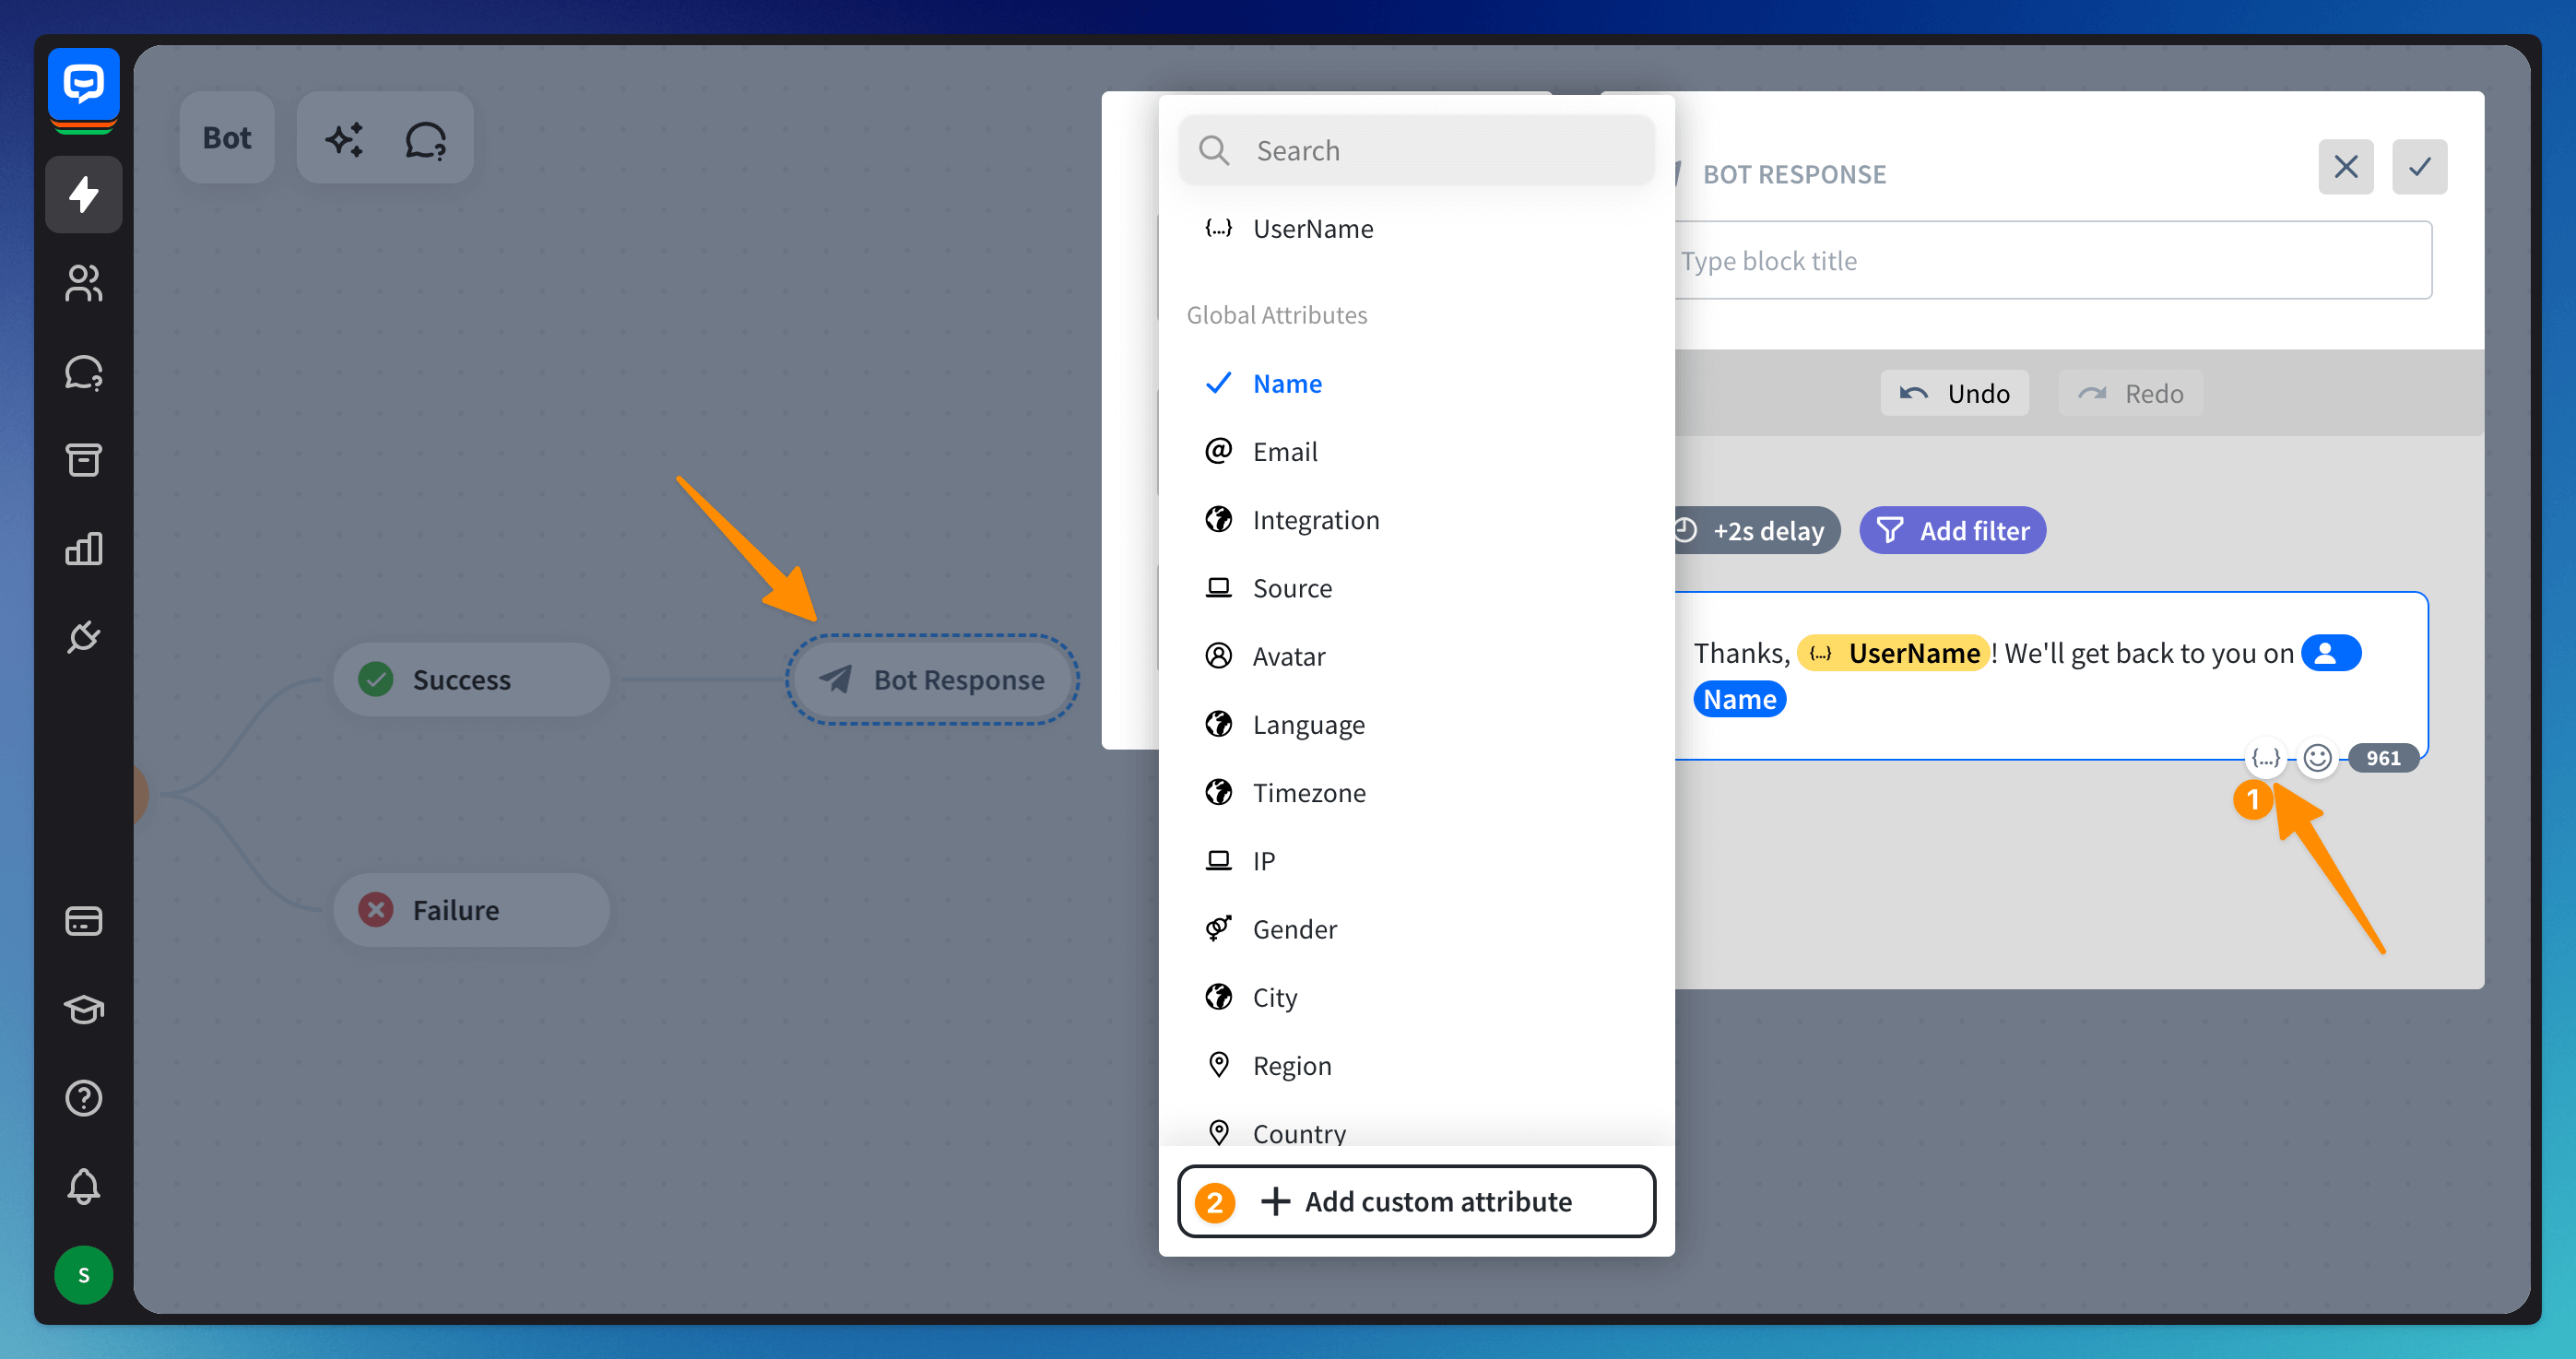 Name your custom attribute. Then, click Add attribute to save it.
Use Advanced button actions to save attributes
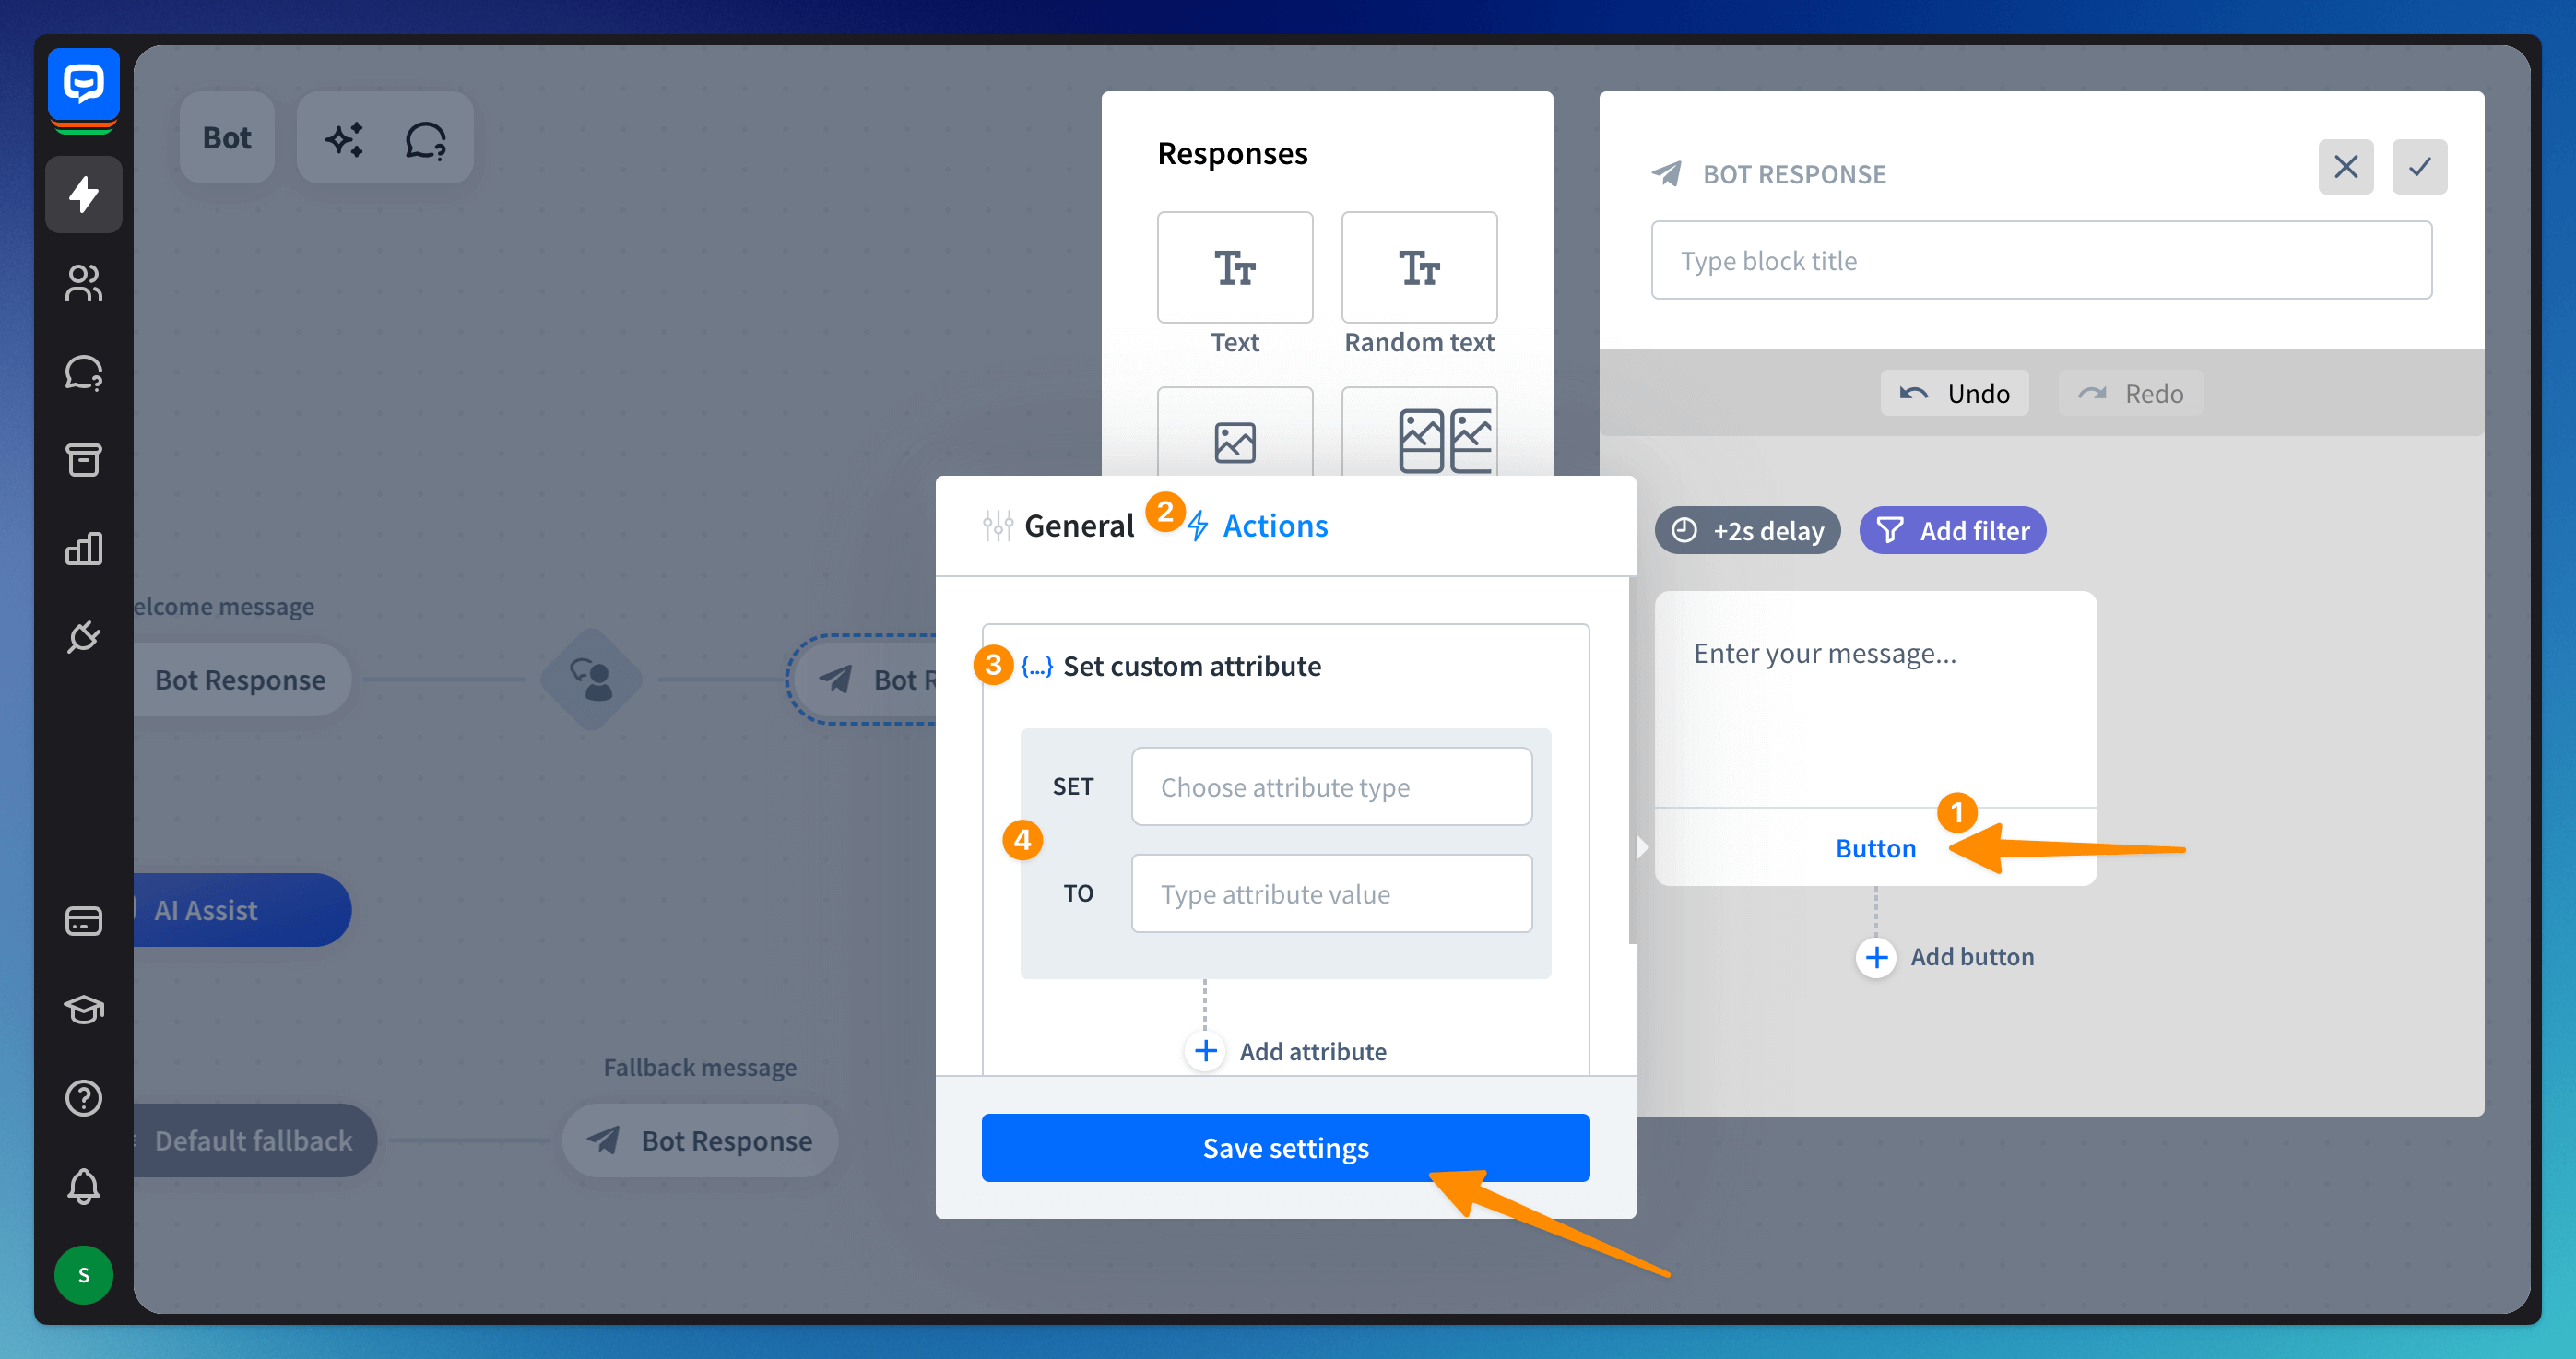
Advanced button actions allow you to add special events triggered when clicked. You can save an action the visitor made as an attribute. Advanced button actions are invisible to end-users.
Click on the button, select Actions, and then Set custom attribute. Now, SET custom attribute TO the value from the button.
Use the Set attribute action
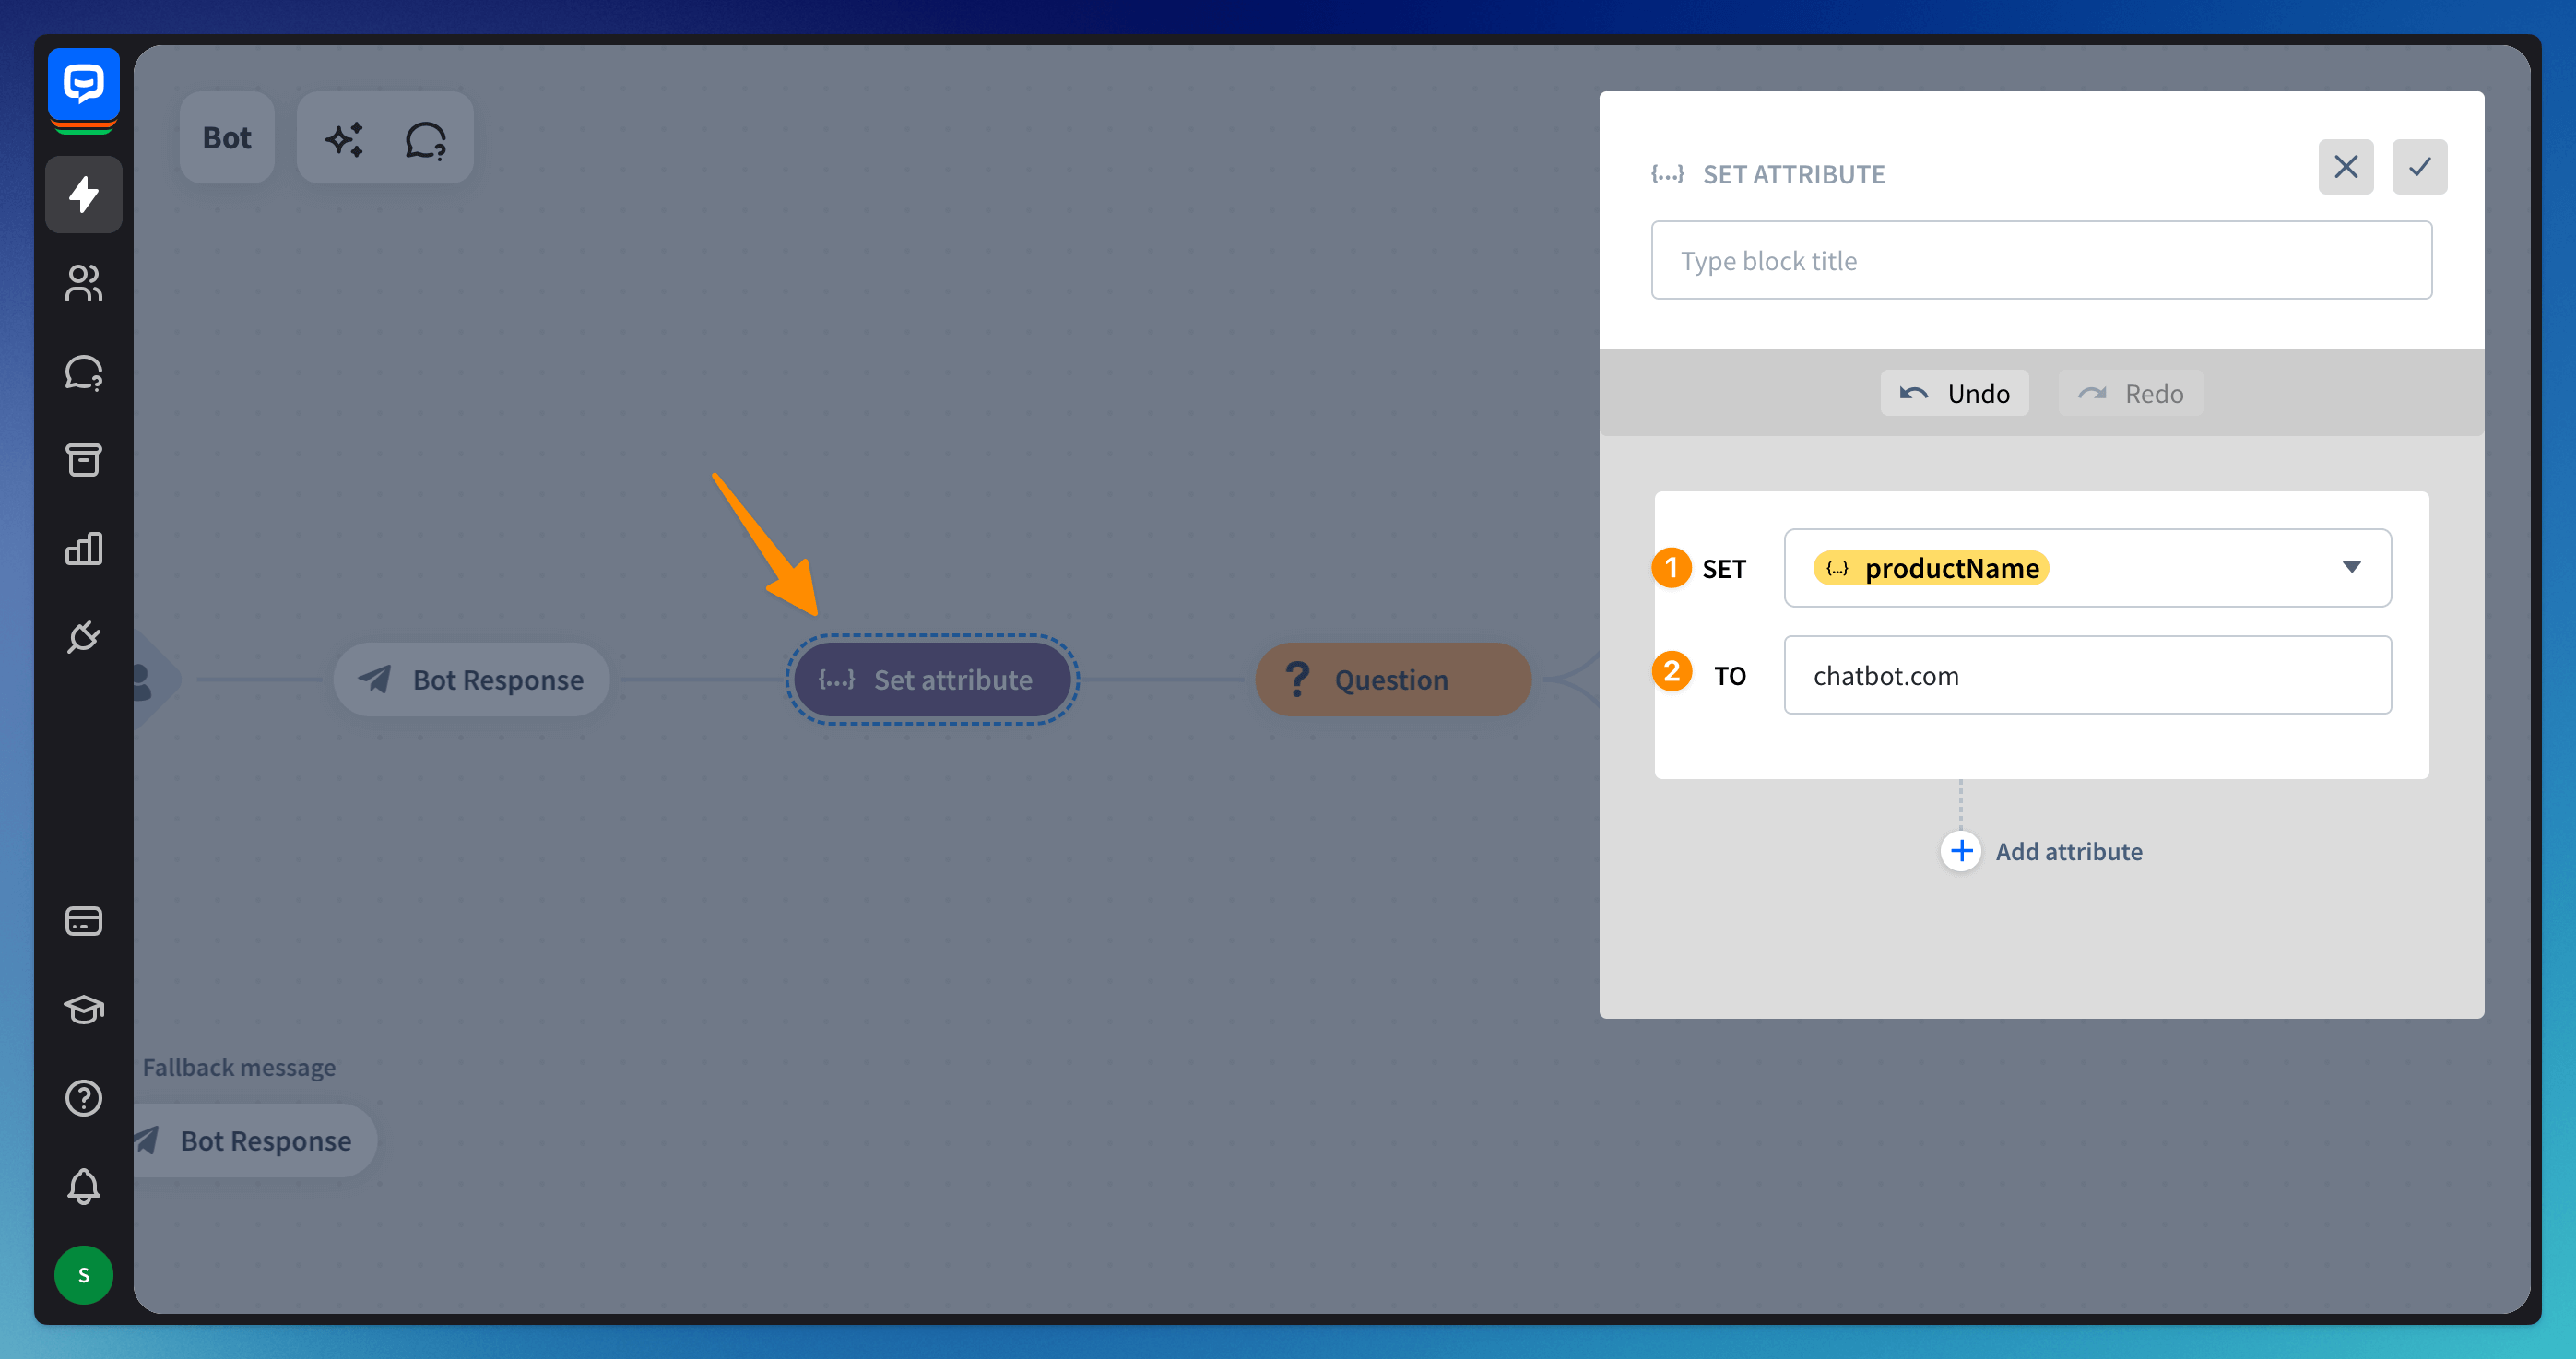
You can save attributes at any point in your chatbot by dragging the Set attribute block from the Actions menu. Click on the block to edit it and choose an attribute. SET the attribute TO your chosen value.
You can check every attribute collected during a chat and its values in the Archives. Attributes are displayed on the right side of the screen.
You can also see all attributes associated with a single visitor in the Users section after selecting the visitor from the list.
You can check every attribute collected during a chat and its values in the Archives. Attributes are displayed on the right side of the screen.
You can also see all attributes associated with a single visitor in the Users section after selecting the visitor from the list.
Attributes with integrations
ChatBot’s integrations automatically save data about visitors and ongoing chats. You can easily reuse collected information to personalize your conversations.
Some integrations get different data than others. Before using attributes in your interactions, check the list below to verify what data your integration collects.
Attribute name | ChatWidget | LiveChat | HelpDesk | Slack | Freshdesk | Zendesk | Shopify | |
Name |
|
|
|
|
|
|
|
|
- |
|
| - |
|
|
| - | |
Avatar | - | - | - |
|
| - | - | - |
Source |
|
|
|
| - |
|
|
|
Language | - | - | - |
| - | - | - | - |
Timezone |
|
|
|
|
|
|
|
|
ID |
|
| - | - | - | - | - | - |
IP |
|
|
| - | - |
|
|
|
City |
|
|
| - | - |
|
|
|
Region |
|
|
| - | - |
|
|
|
Country |
|
|
| - | - |
|
|
|
Postal code |
| - |
| - | - |
|
|
|
Referrer | - |
| - | - | - | - | - | - |
Real name | - | - | - | - |
| - | - | - |
Integration |
|
|
|
|
|
|
|
|
Custom attribute |
|
|
|
|
|
|
|
|
Follow these articles to see the integration processes:
Read more: