The ChatBot platform allows you to communicate with customers all over the world. In this article, you’ll learn how to add a new language to your AI bot. We’ll also show you how to make it work with your LiveChat integration.
Setting up a multilingual bot in ChatBot
-
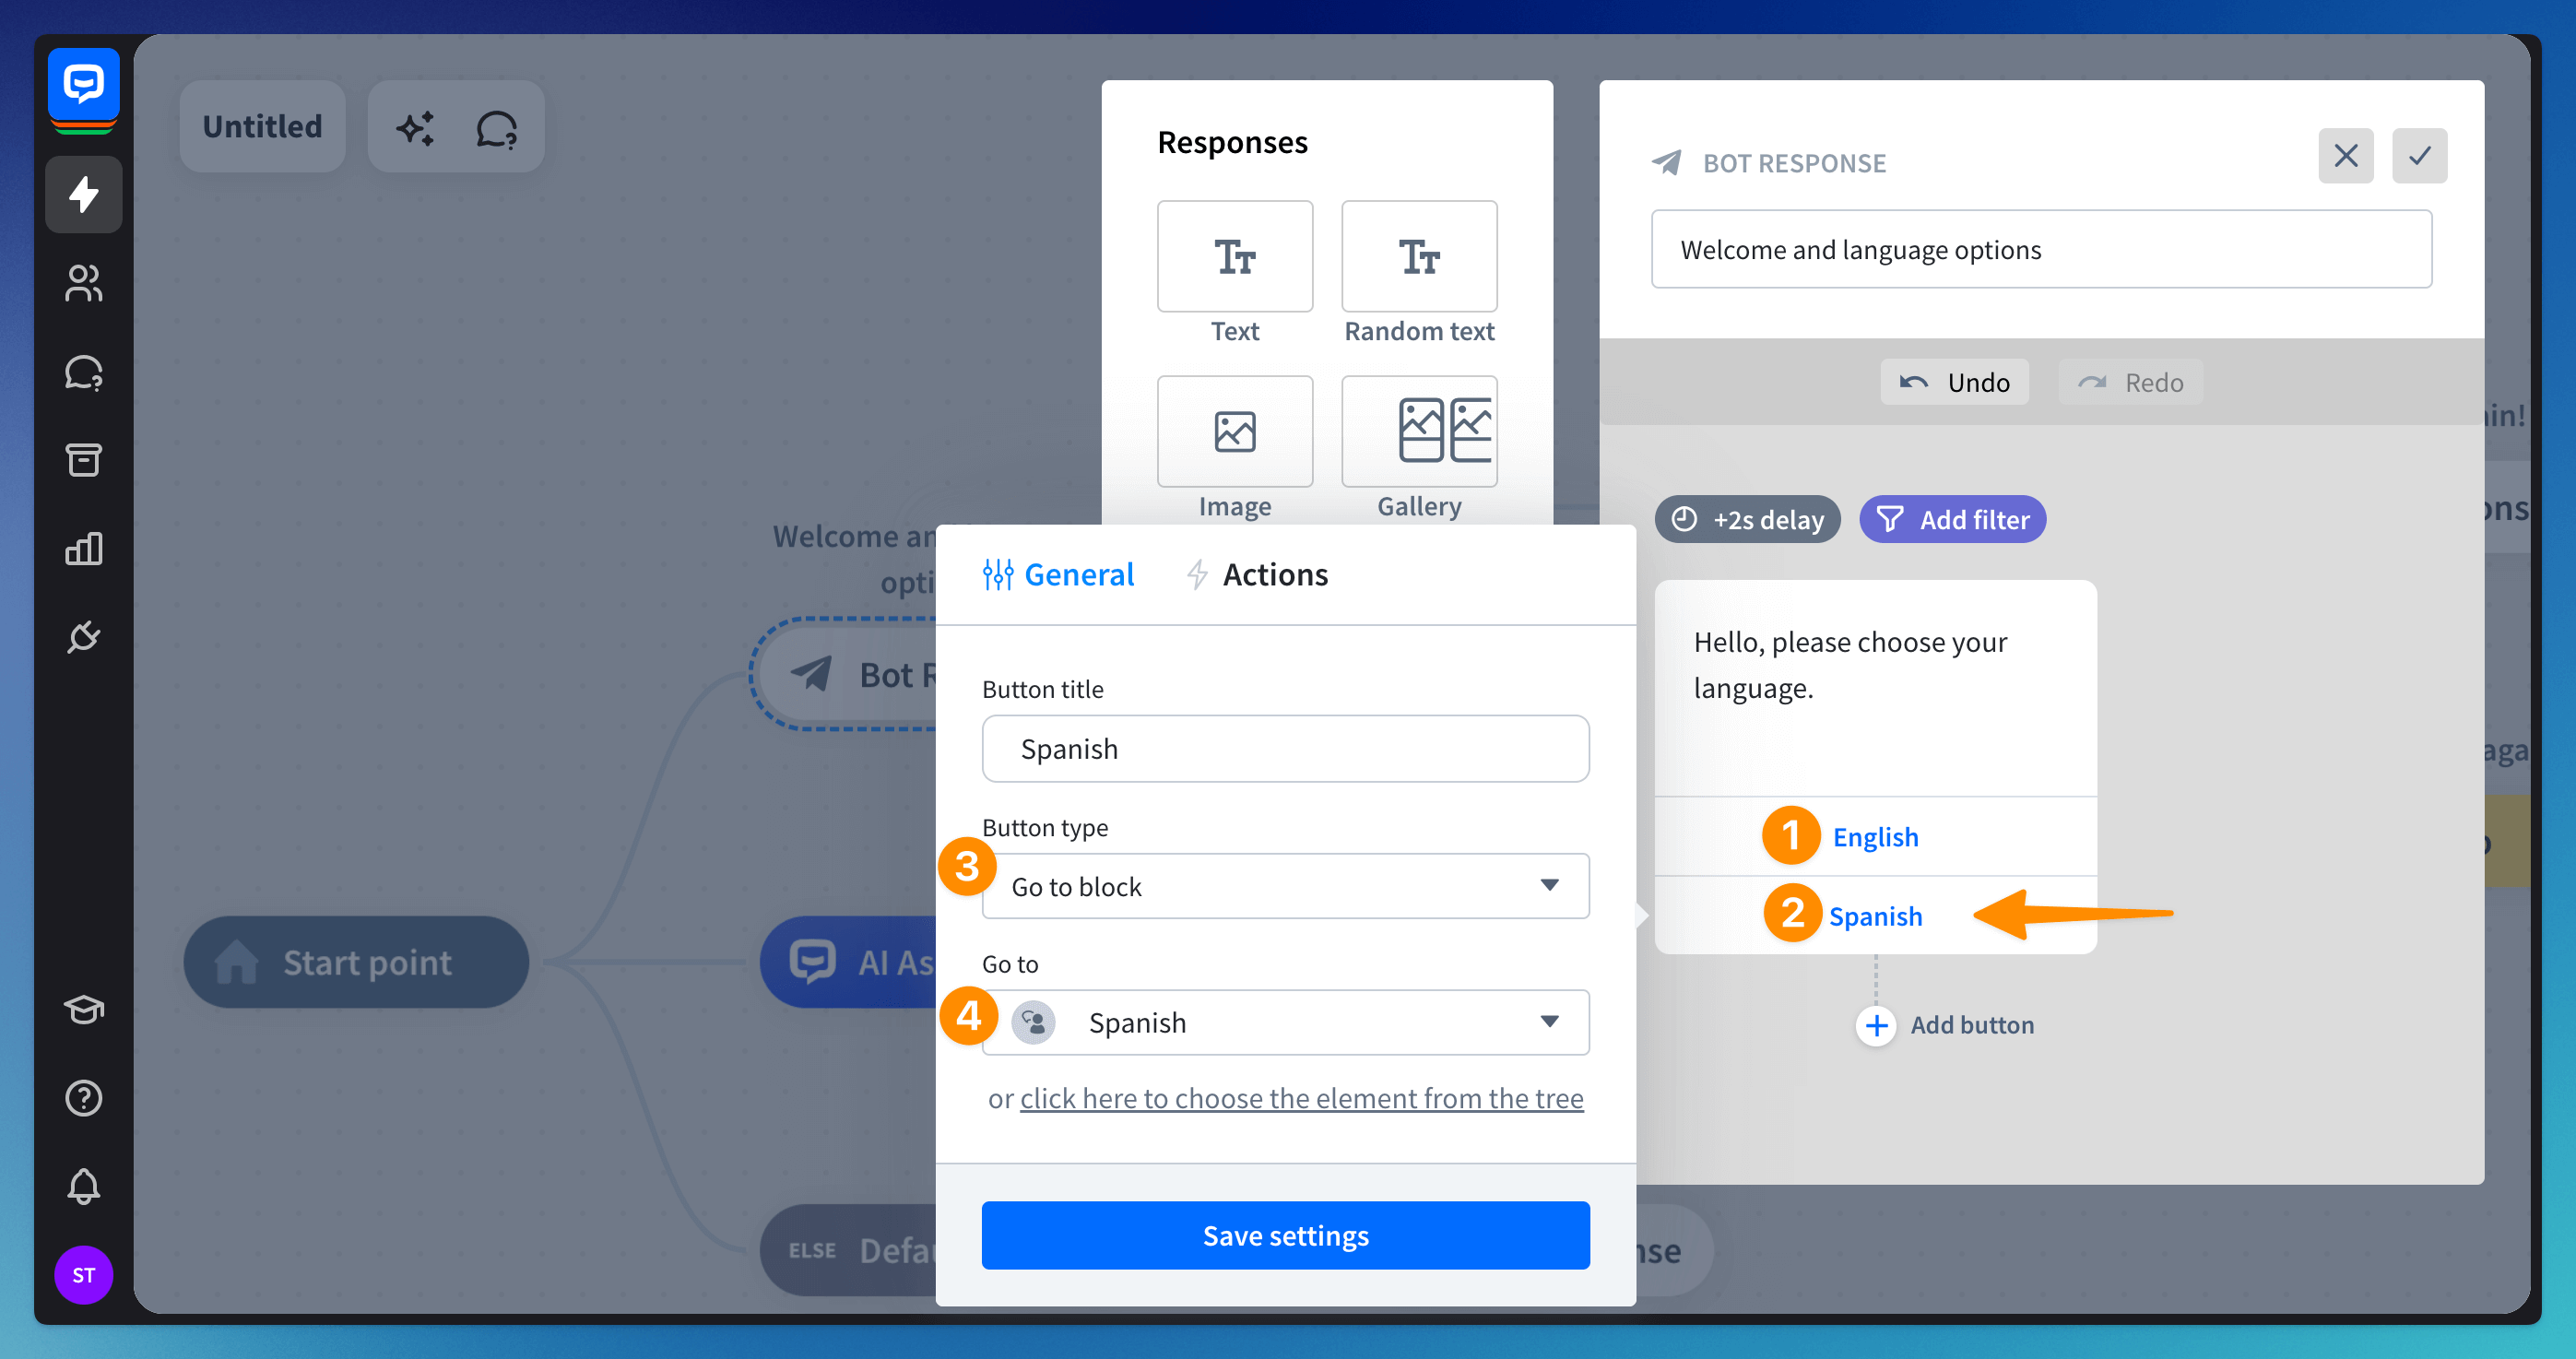
Ask users about their language - use the Bot Response block to ask users about their language. In this example, we use the “Welcome and language options” block.
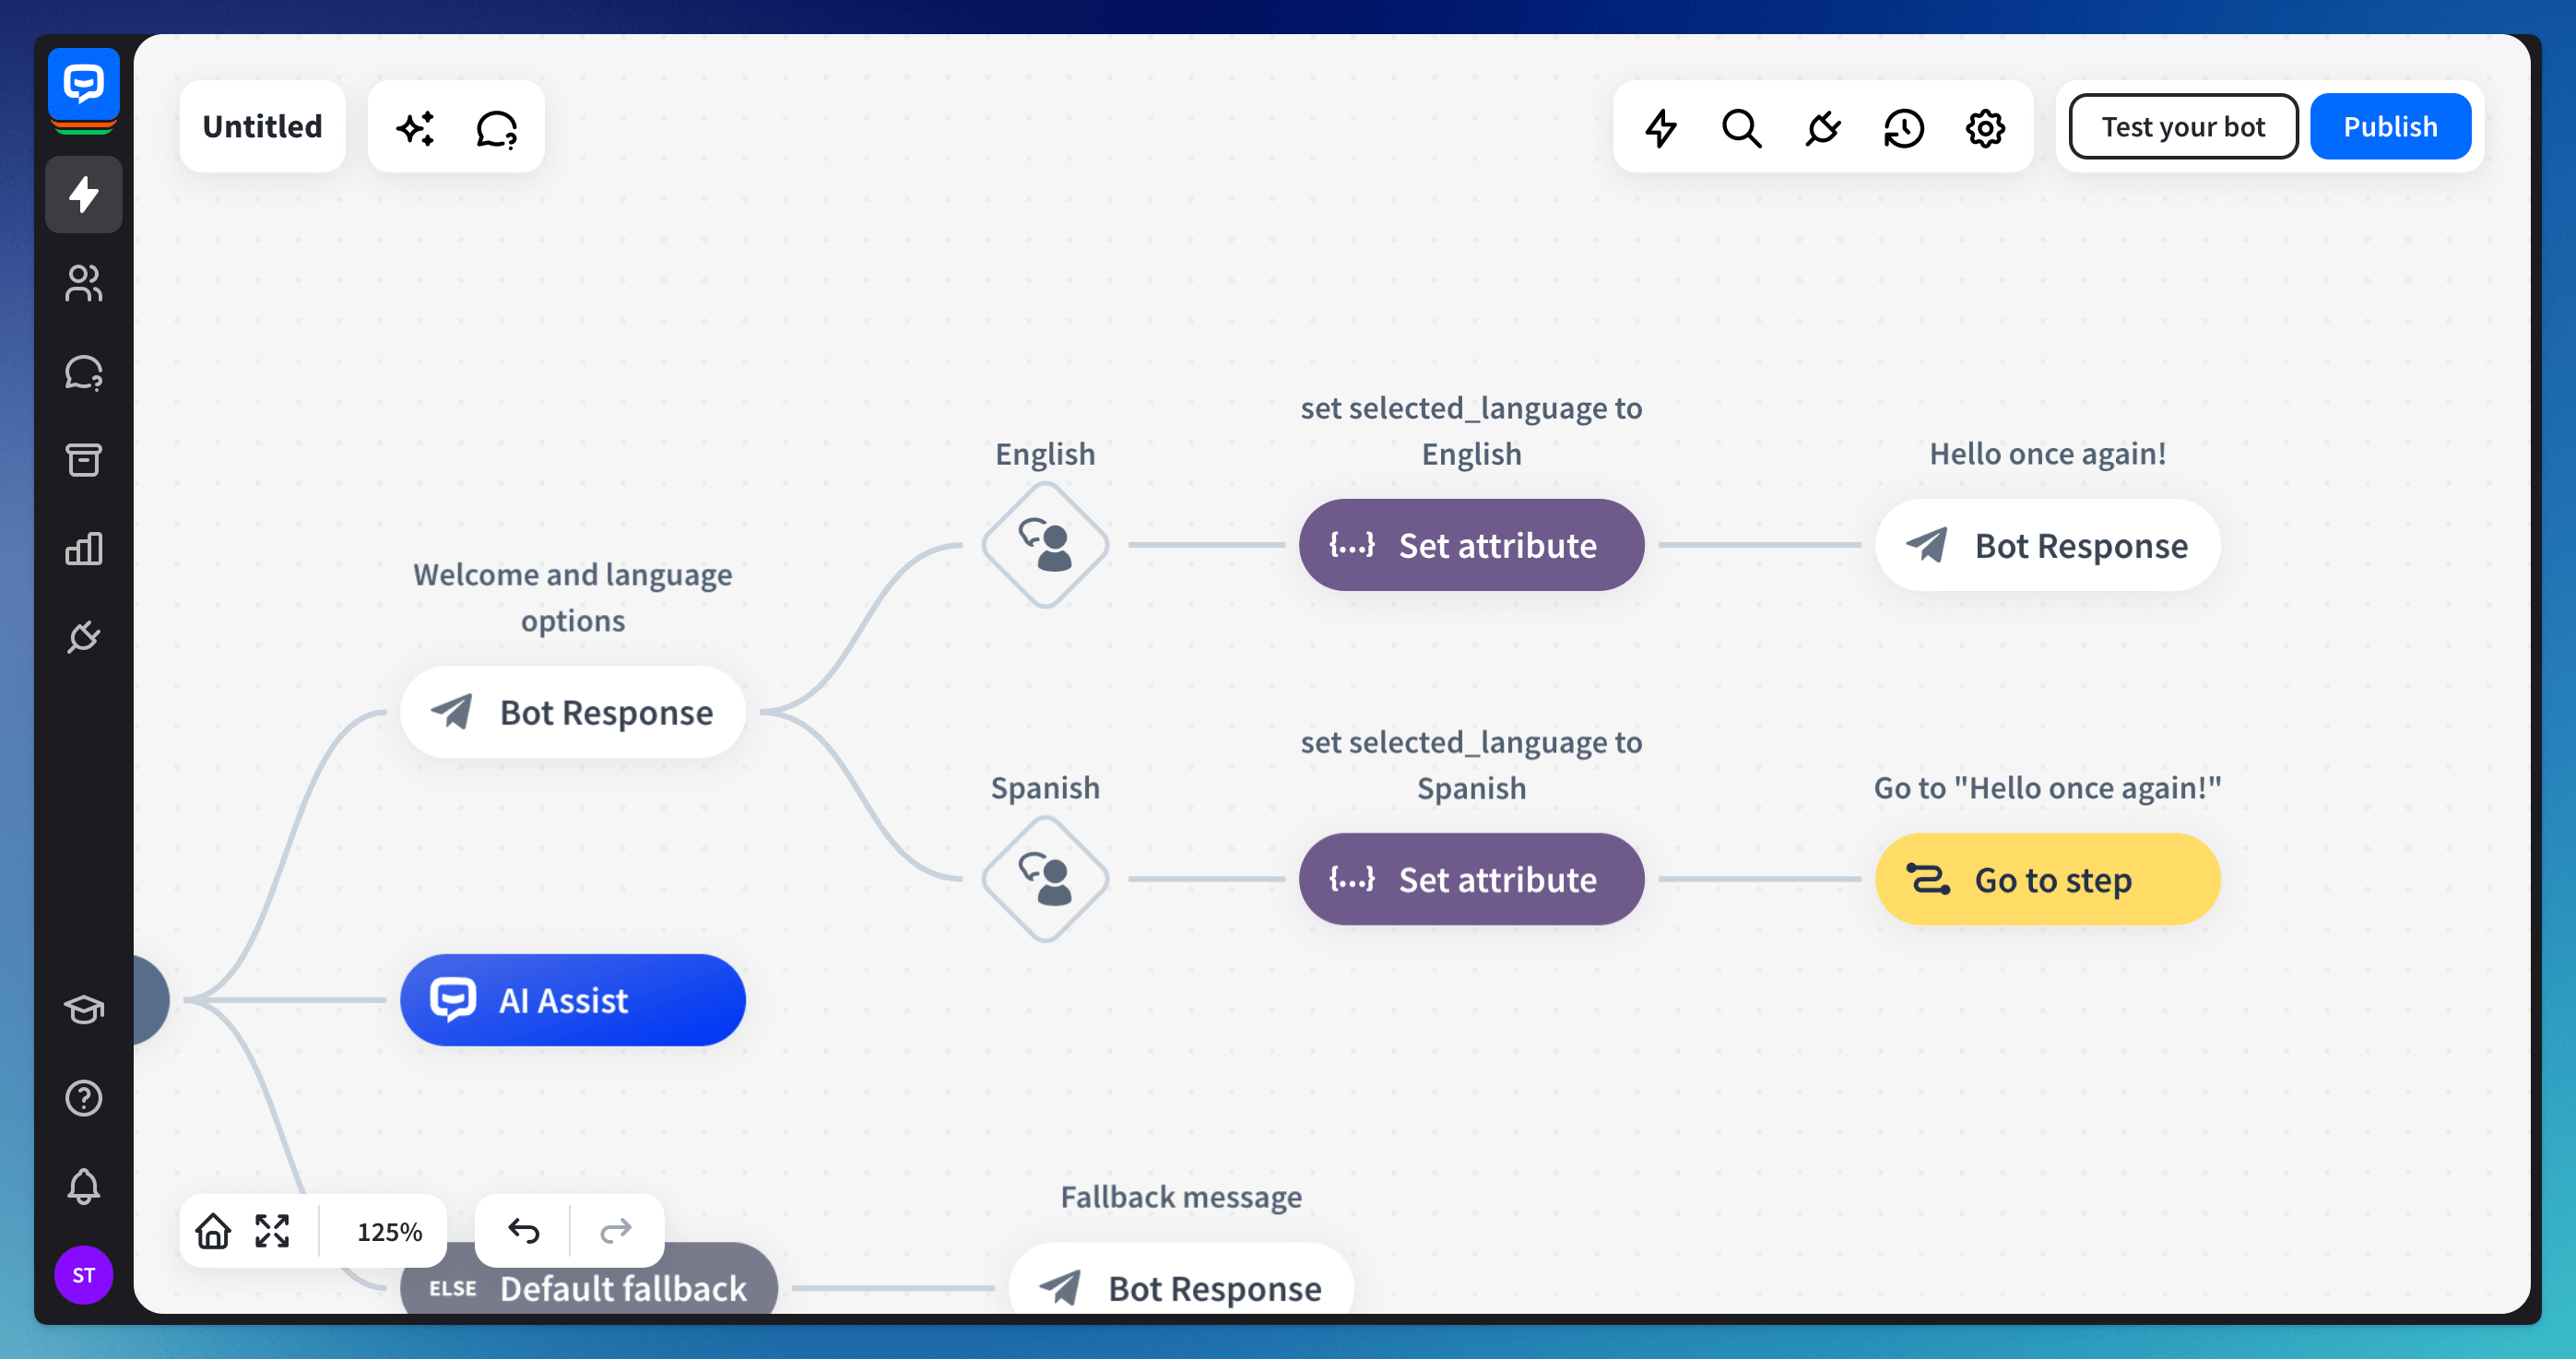 In this example, we use a Button response with two buttons: English (1) and Spanish (2). Once clicked, each button is set to go to the respective User Input block (3)—English or Spanish (4).
-
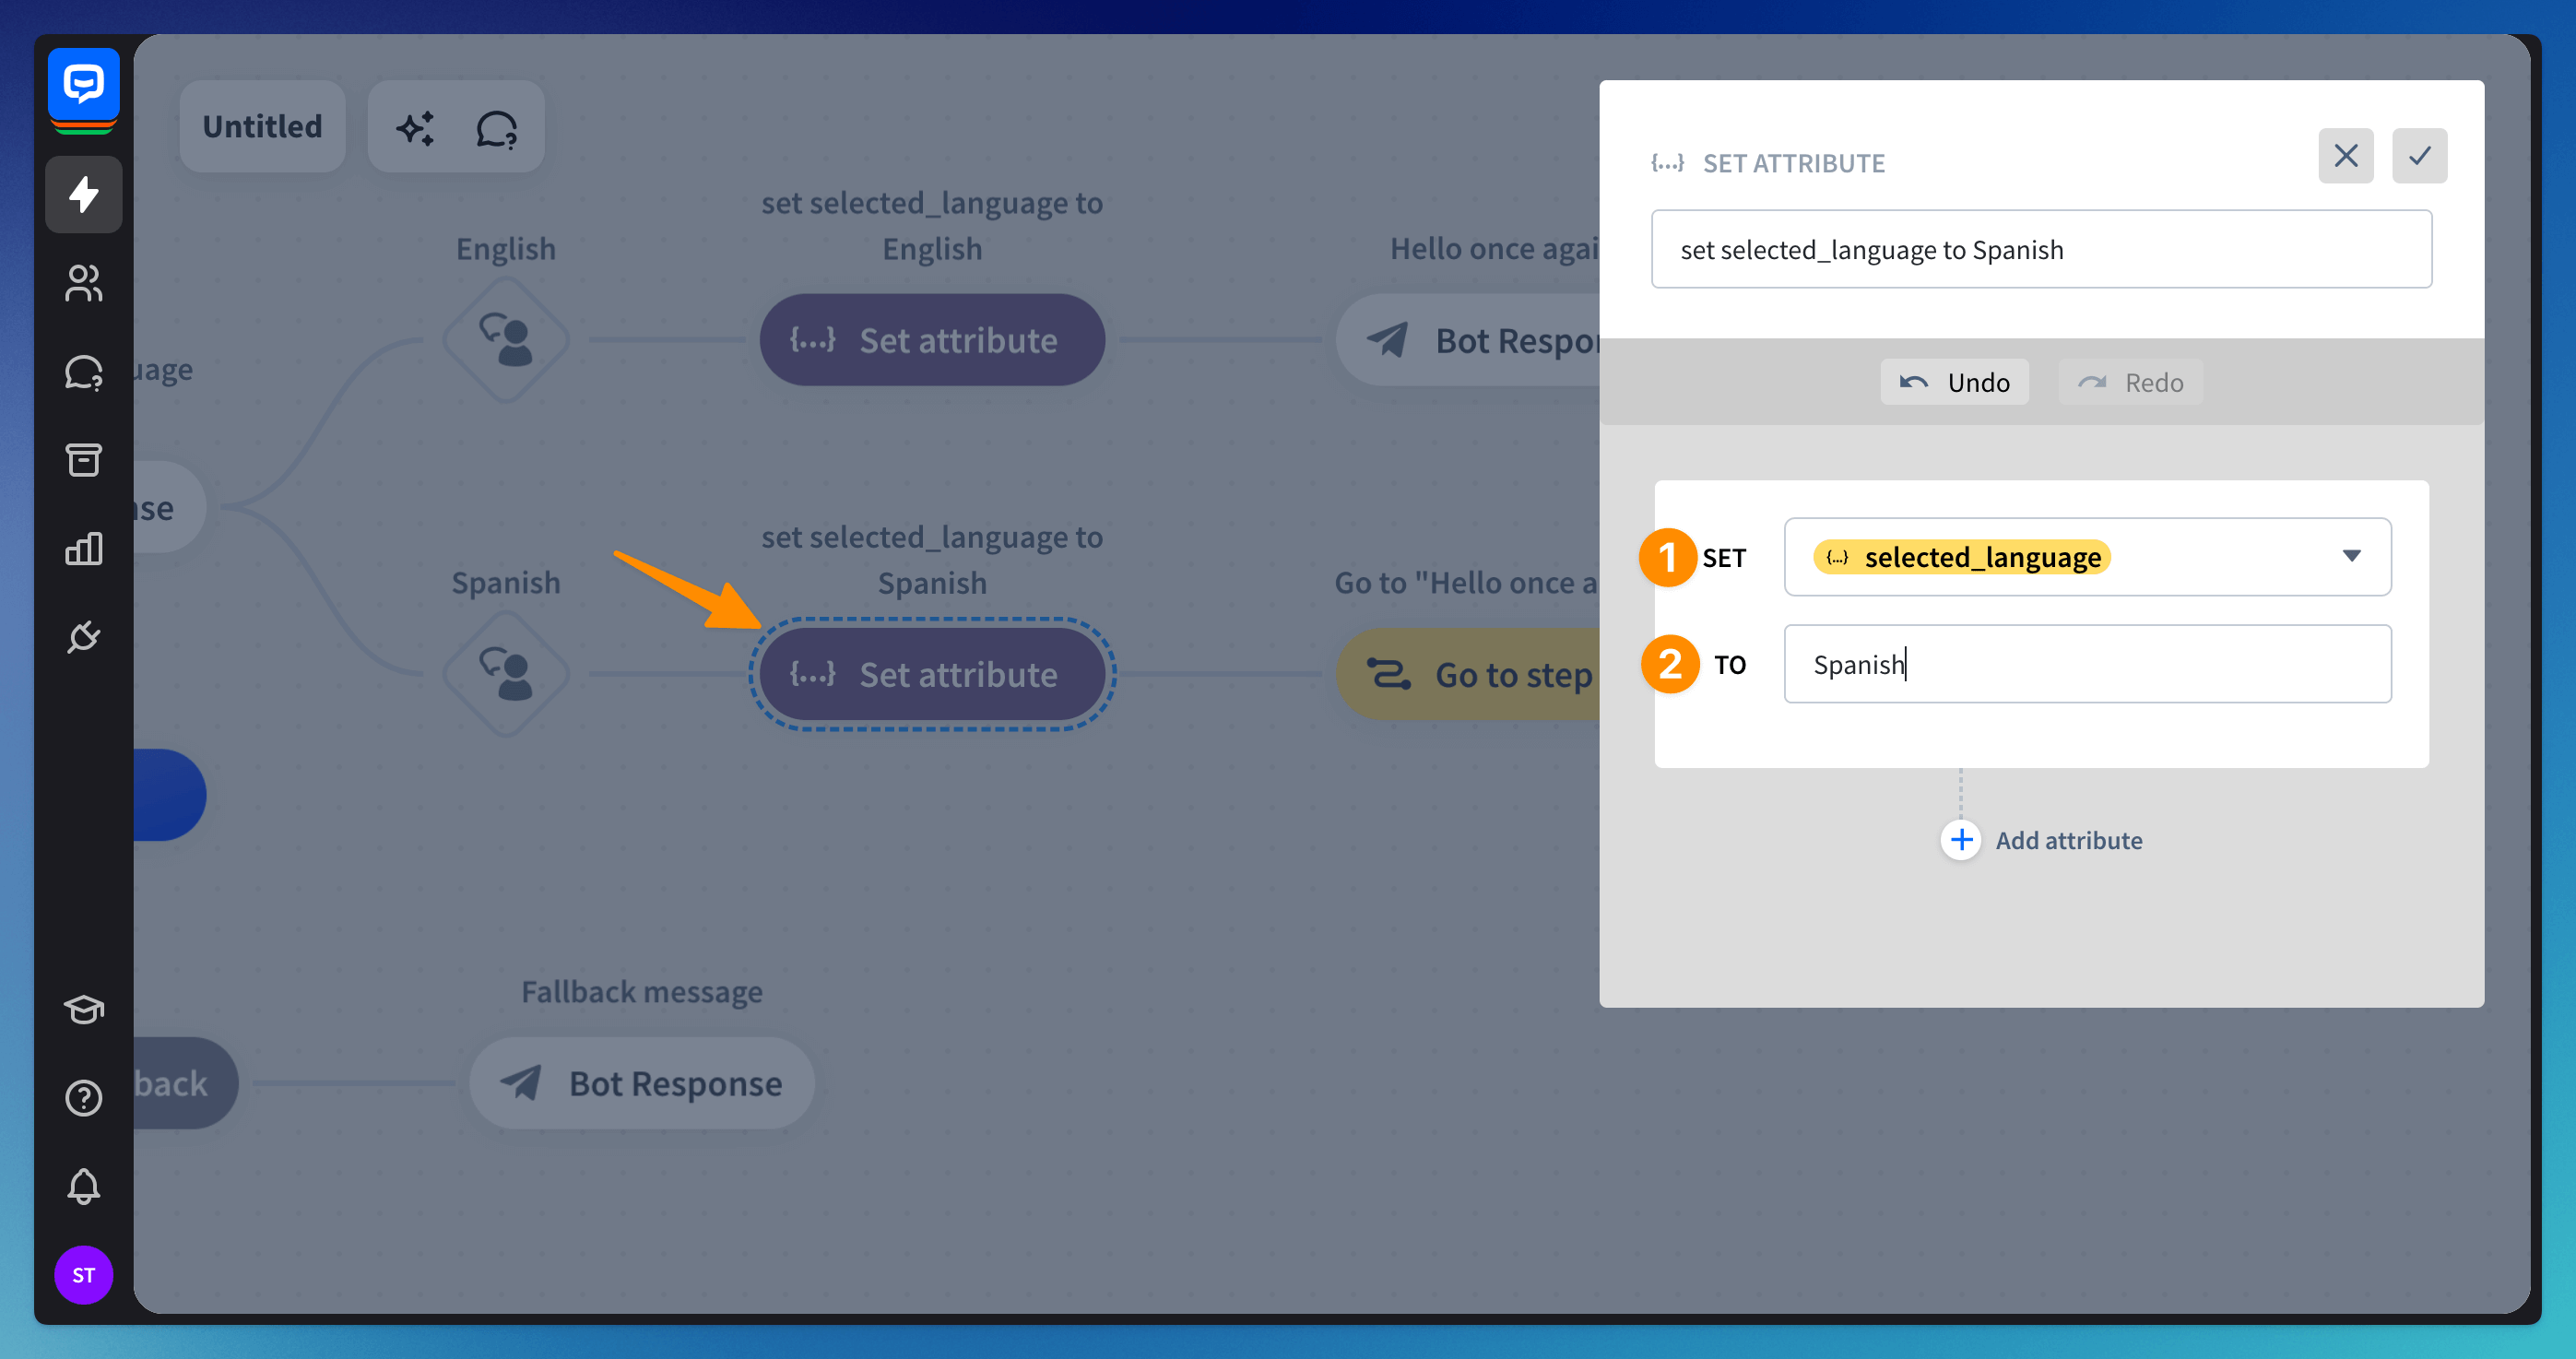
Save the language chosen by the user - once a user clicks a chosen button, one of the related Set attribute blocks is triggered to set the language in your chatbot. Each of the mentioned Set attribute blocks changes the value of the
selected_language(1) attribute to English or Spanish (2).If the
selected_languageattribute is not available on the list of attributes to choose; use the +Add custom attribute option once you open the SET dropdown.
-
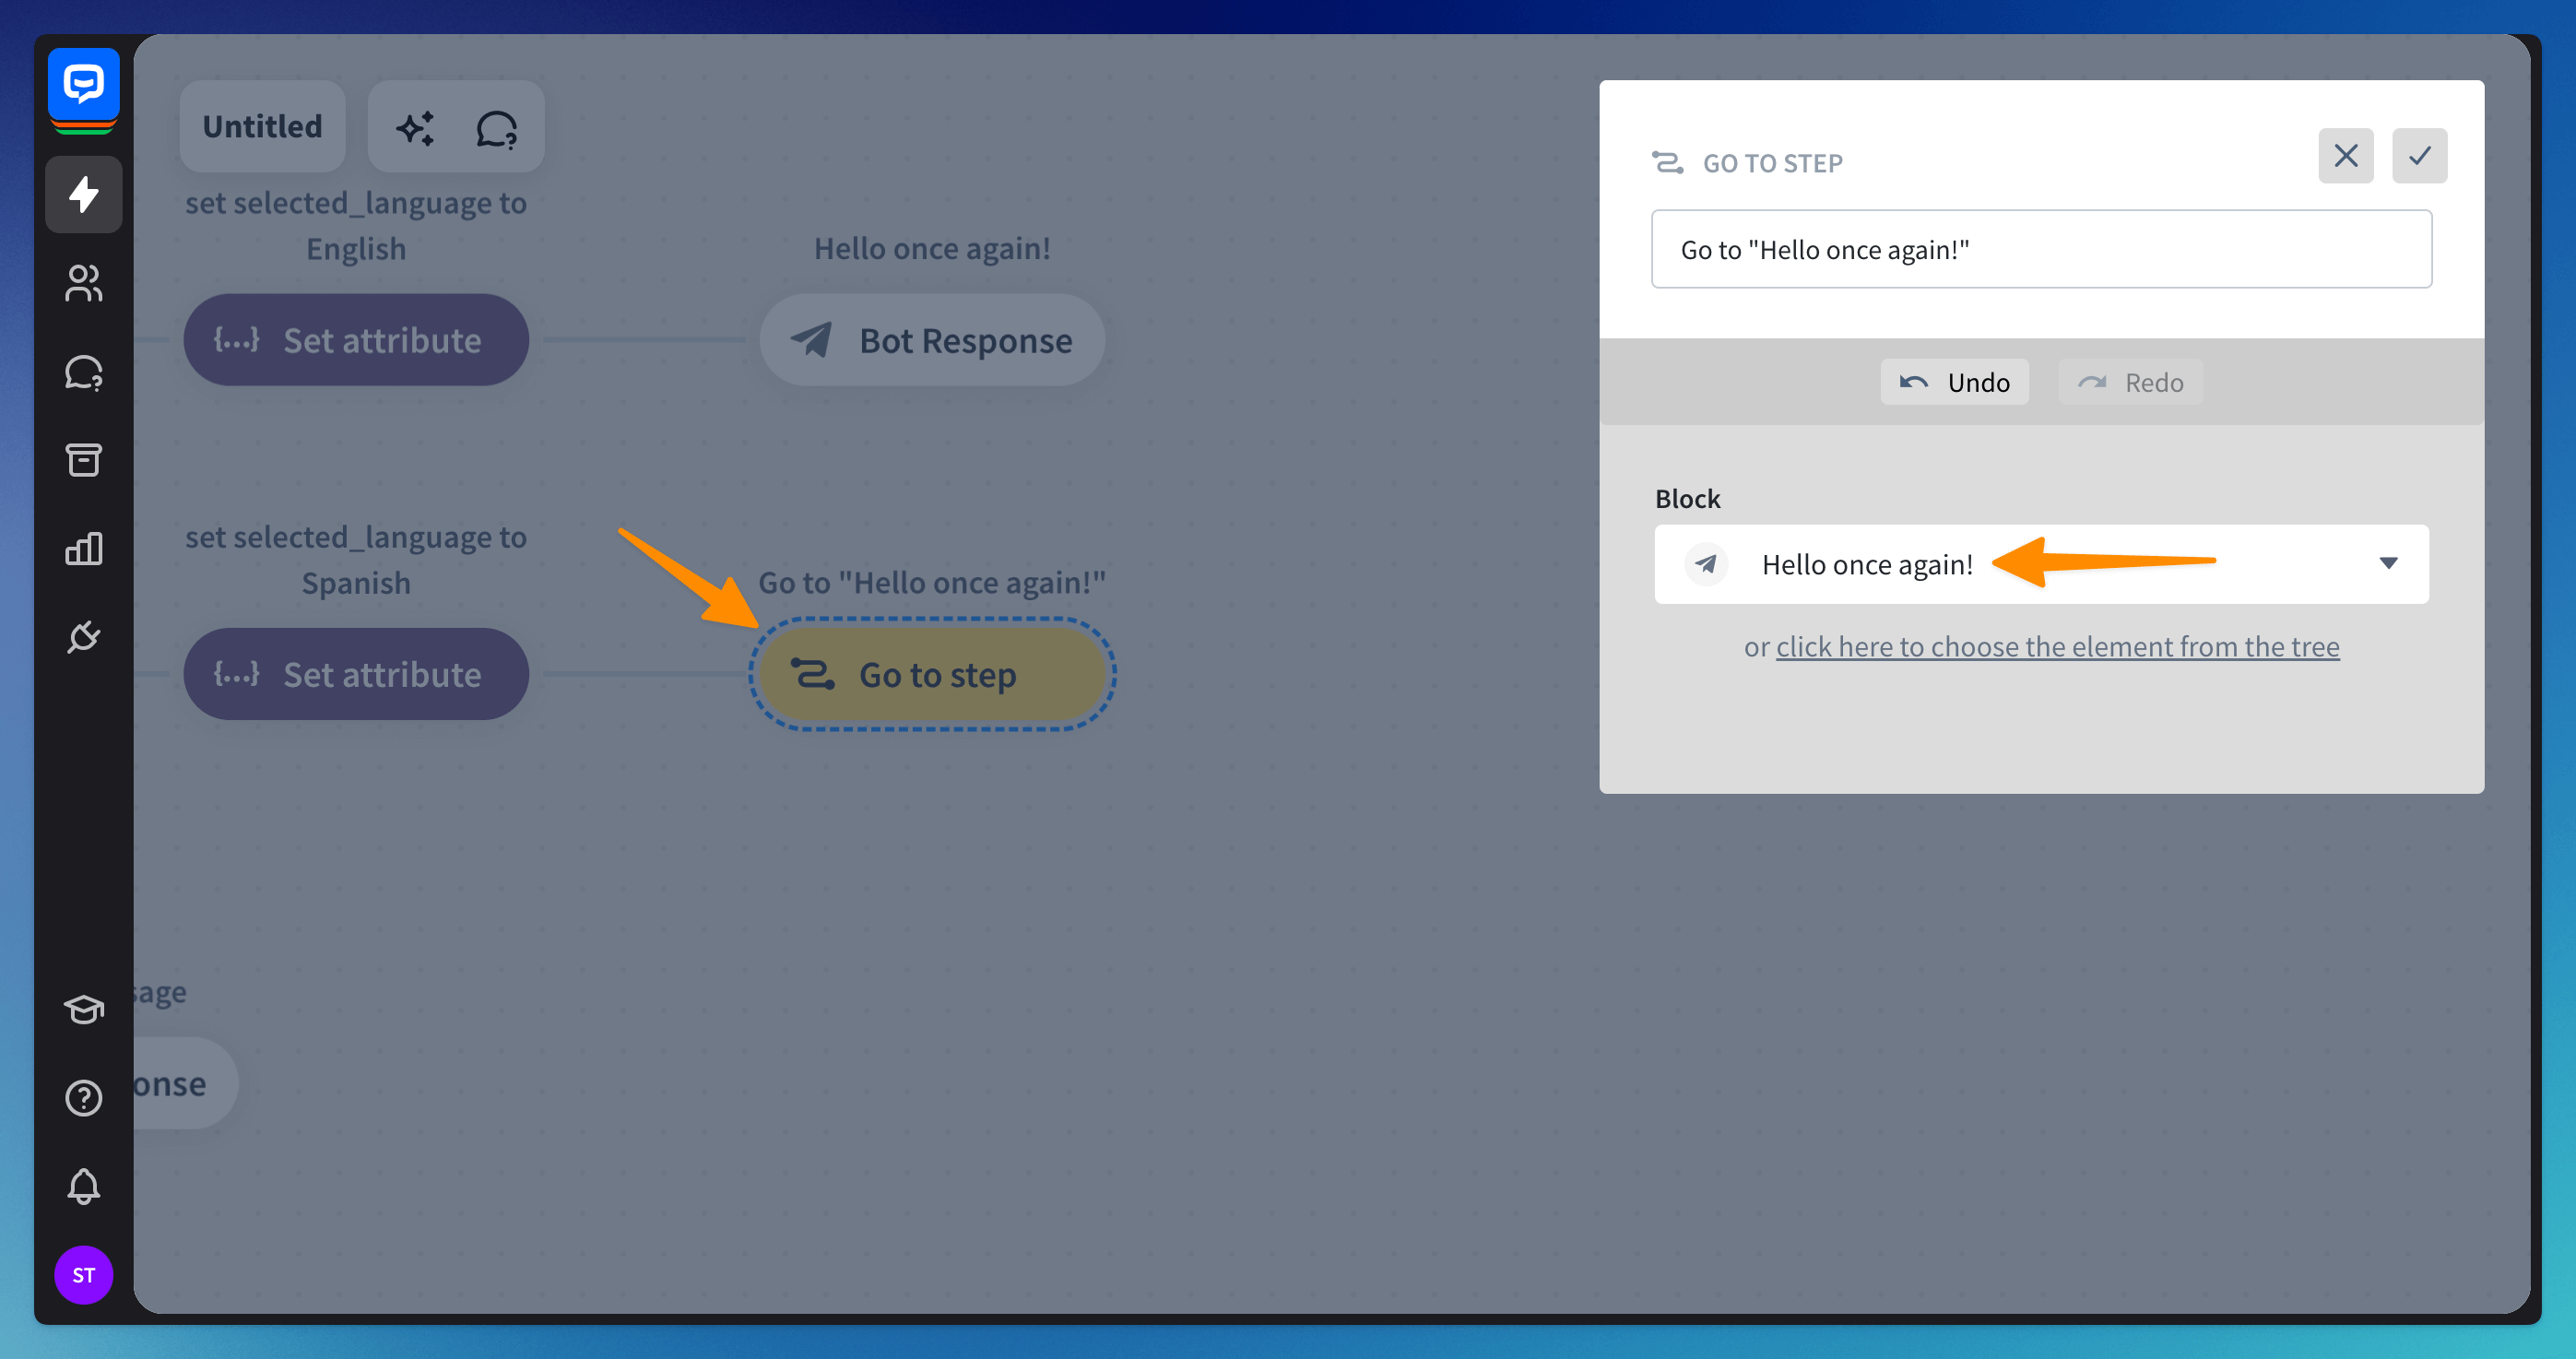
Go to “Hello once again!” - when your chatbot sets the language, the flow continues. If the Spanish language is set, the Go to step block brings the bot and the customer back to the main flow. If the English language is set, the flow continues automatically to the “Hello once again!” Bot Response and further on.
-
“Hello once again!” Bot response - After successfully setting the language, each Bot Response block can be set to display the expected language messages. In the example, the chatbot uses filters to check the value of
selected_language. Each response needs to have a filter added to check the value ofselected_language.
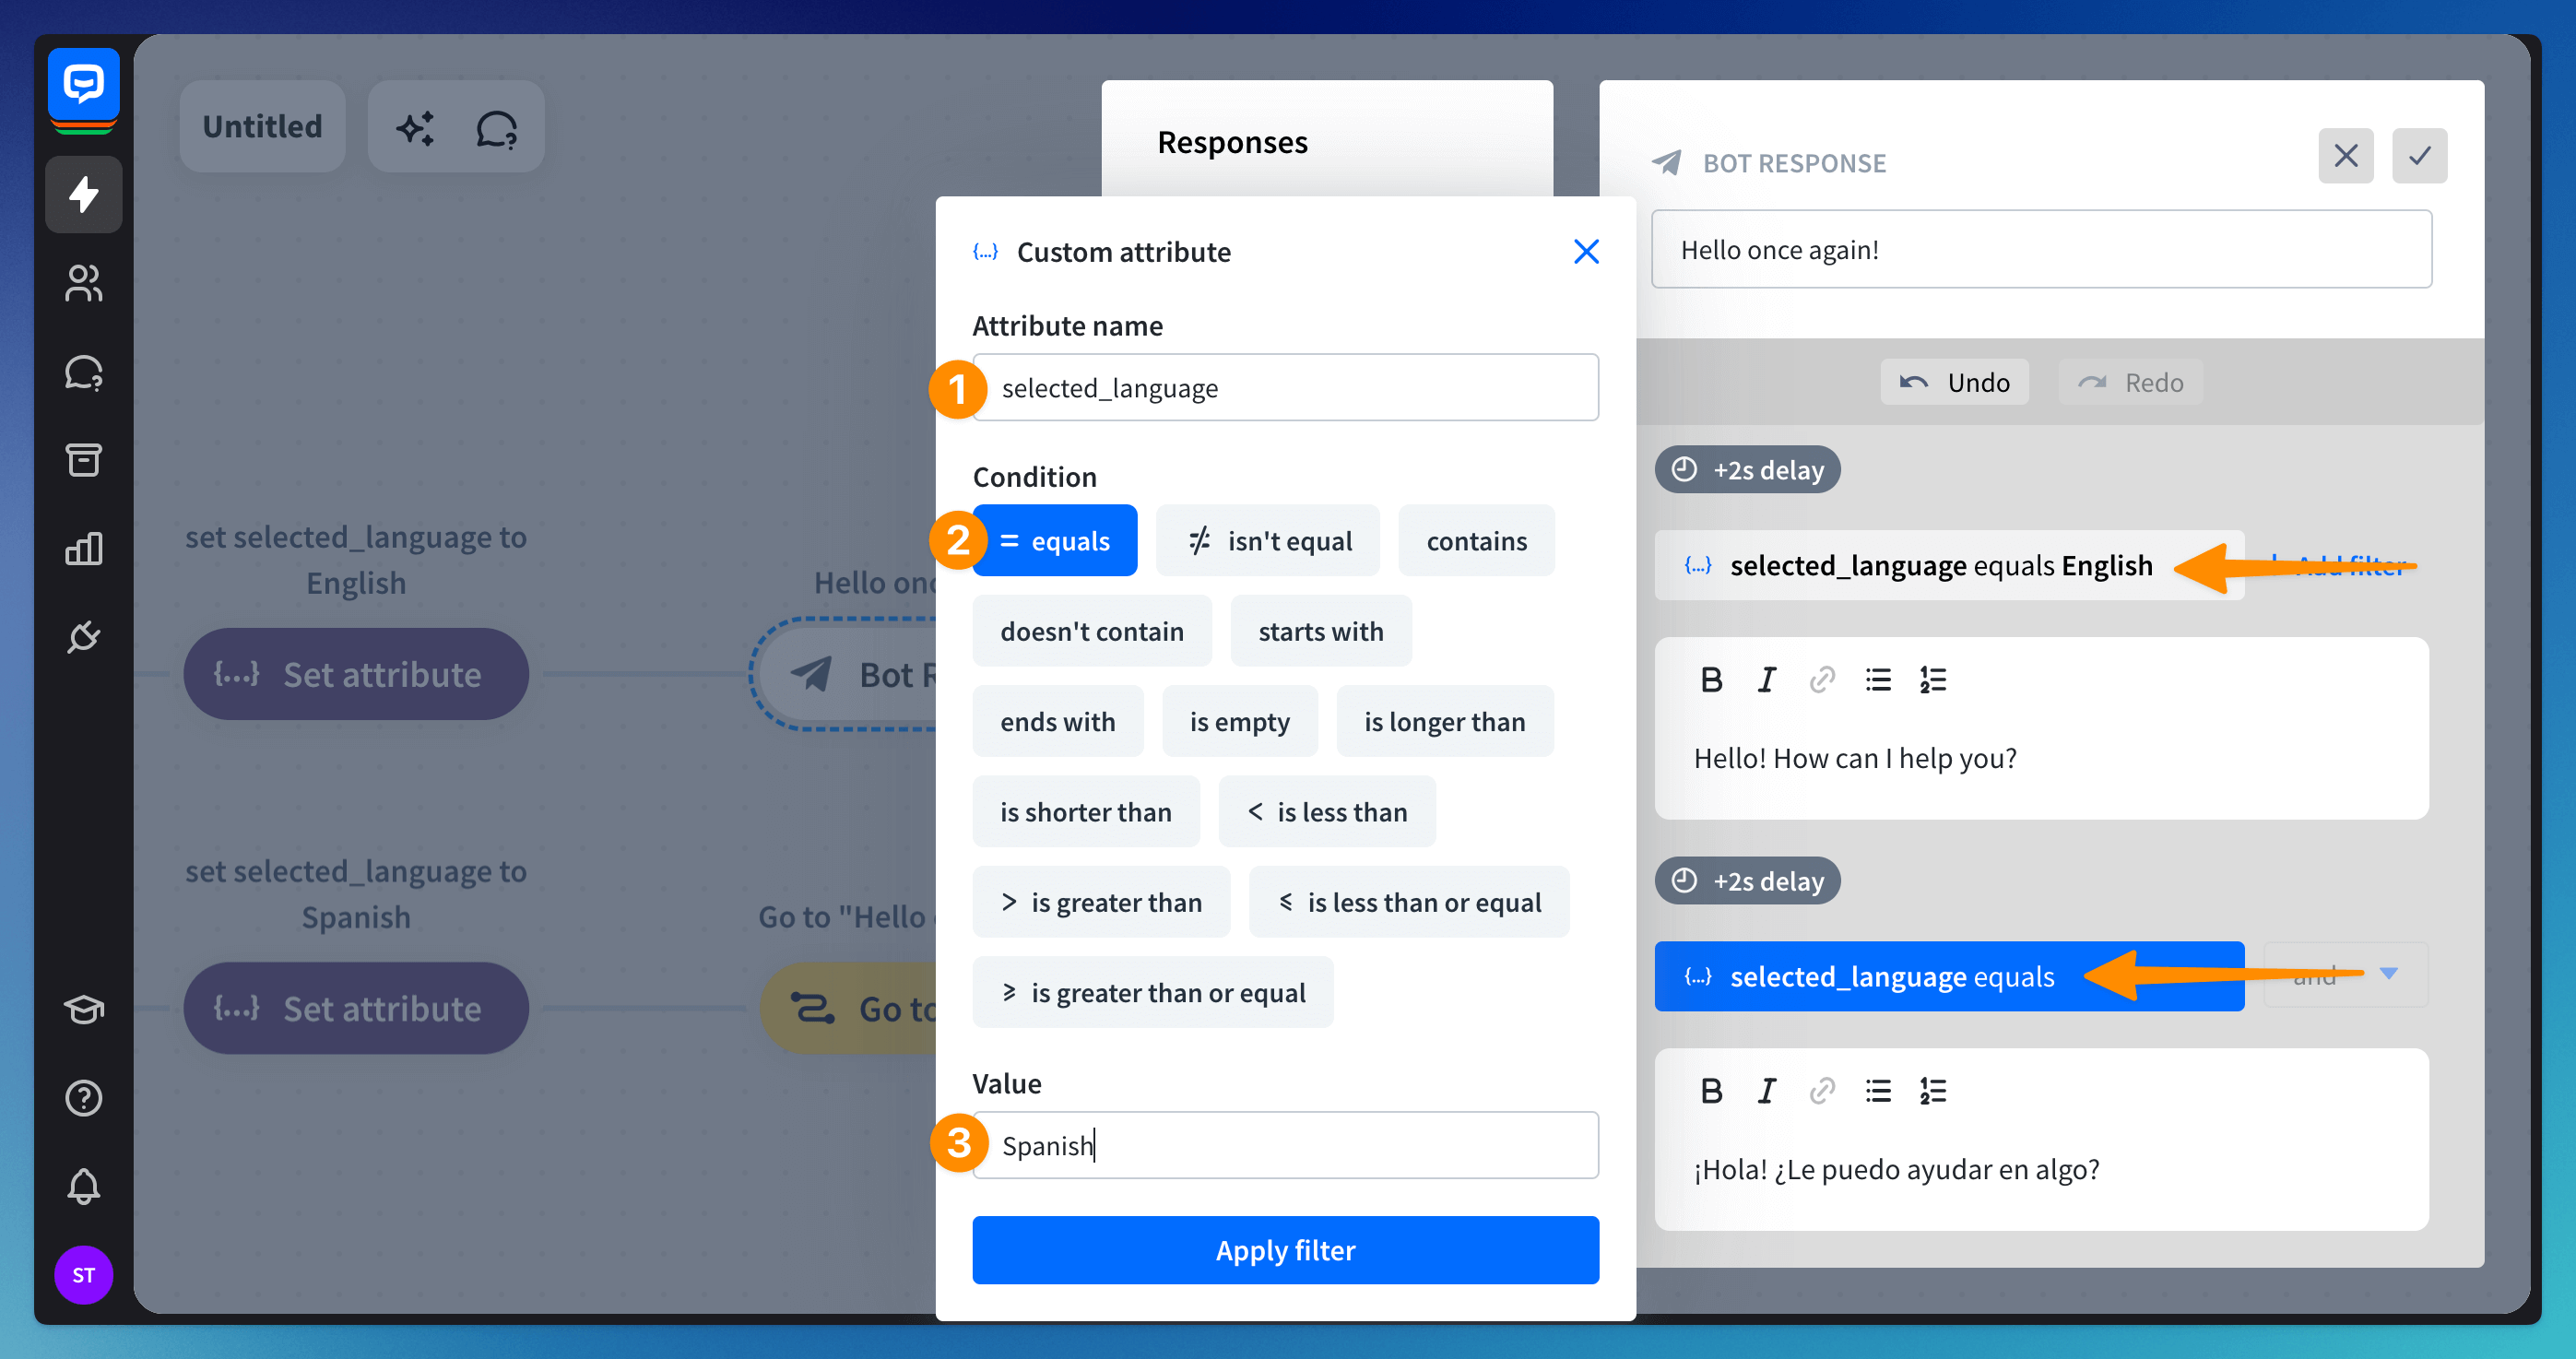 Once you set the mentioned filters for your Bot Response messages, your chatbot will always check the
 selected_languageto see what language message it should send.
Automatically detect the website language with JS
If your website has different language versions, you can have your chatbot recognize which one is loaded when a customer starts a chat. This can be done using the Chat Widget API and the setSessionAttributes method.
function onReady() {
	// add actions that you'd like to perform when chat widget is ready
	// for example:
	OpenWidget.call('update_session_variables', {
		selected_language: "English" // or "Spanish"
	});
}

OpenWidget.on('ready', onReady)
For example, if you have two language versions of your website - the English and the Spanish ones: on the English version, you need to add the code with the selected_lanugage: “English” parameter, and on the Spanish one, you need to set selected_lanugage: “Spanish”.
Once you set it, when customers open a chat, depending on the language version of your website they opened, the chatbot will receive information about the selected language attribute and whether its value is English or Spanish. More about ChatBot Attributes can be found here.
Using the described Chat Widget API method, the process takes place automatically on your website.
Set Filters in your chatbot to make it display English or Spanish messages respectively.
Each of your Bot Responses blocks needs to have two responses - one in English and the other in Spanish. Each one also needs a filter added to check the value of selected_language.
The filter of the English message has to check if the selected_language value equals English. The Spanish message filter has to check if the selected_language value equals Spanish.
Setting up a multilingual bot in ChatBot integrated with LiveChat
-
Ask users about their language for chats handled by ChatBot - If you want your chatbot to ask customers what language it should use to chat with them in the LiveChat widget, the configuration is required only on the ChatBot side. Follow the steps in this section of this article.
-
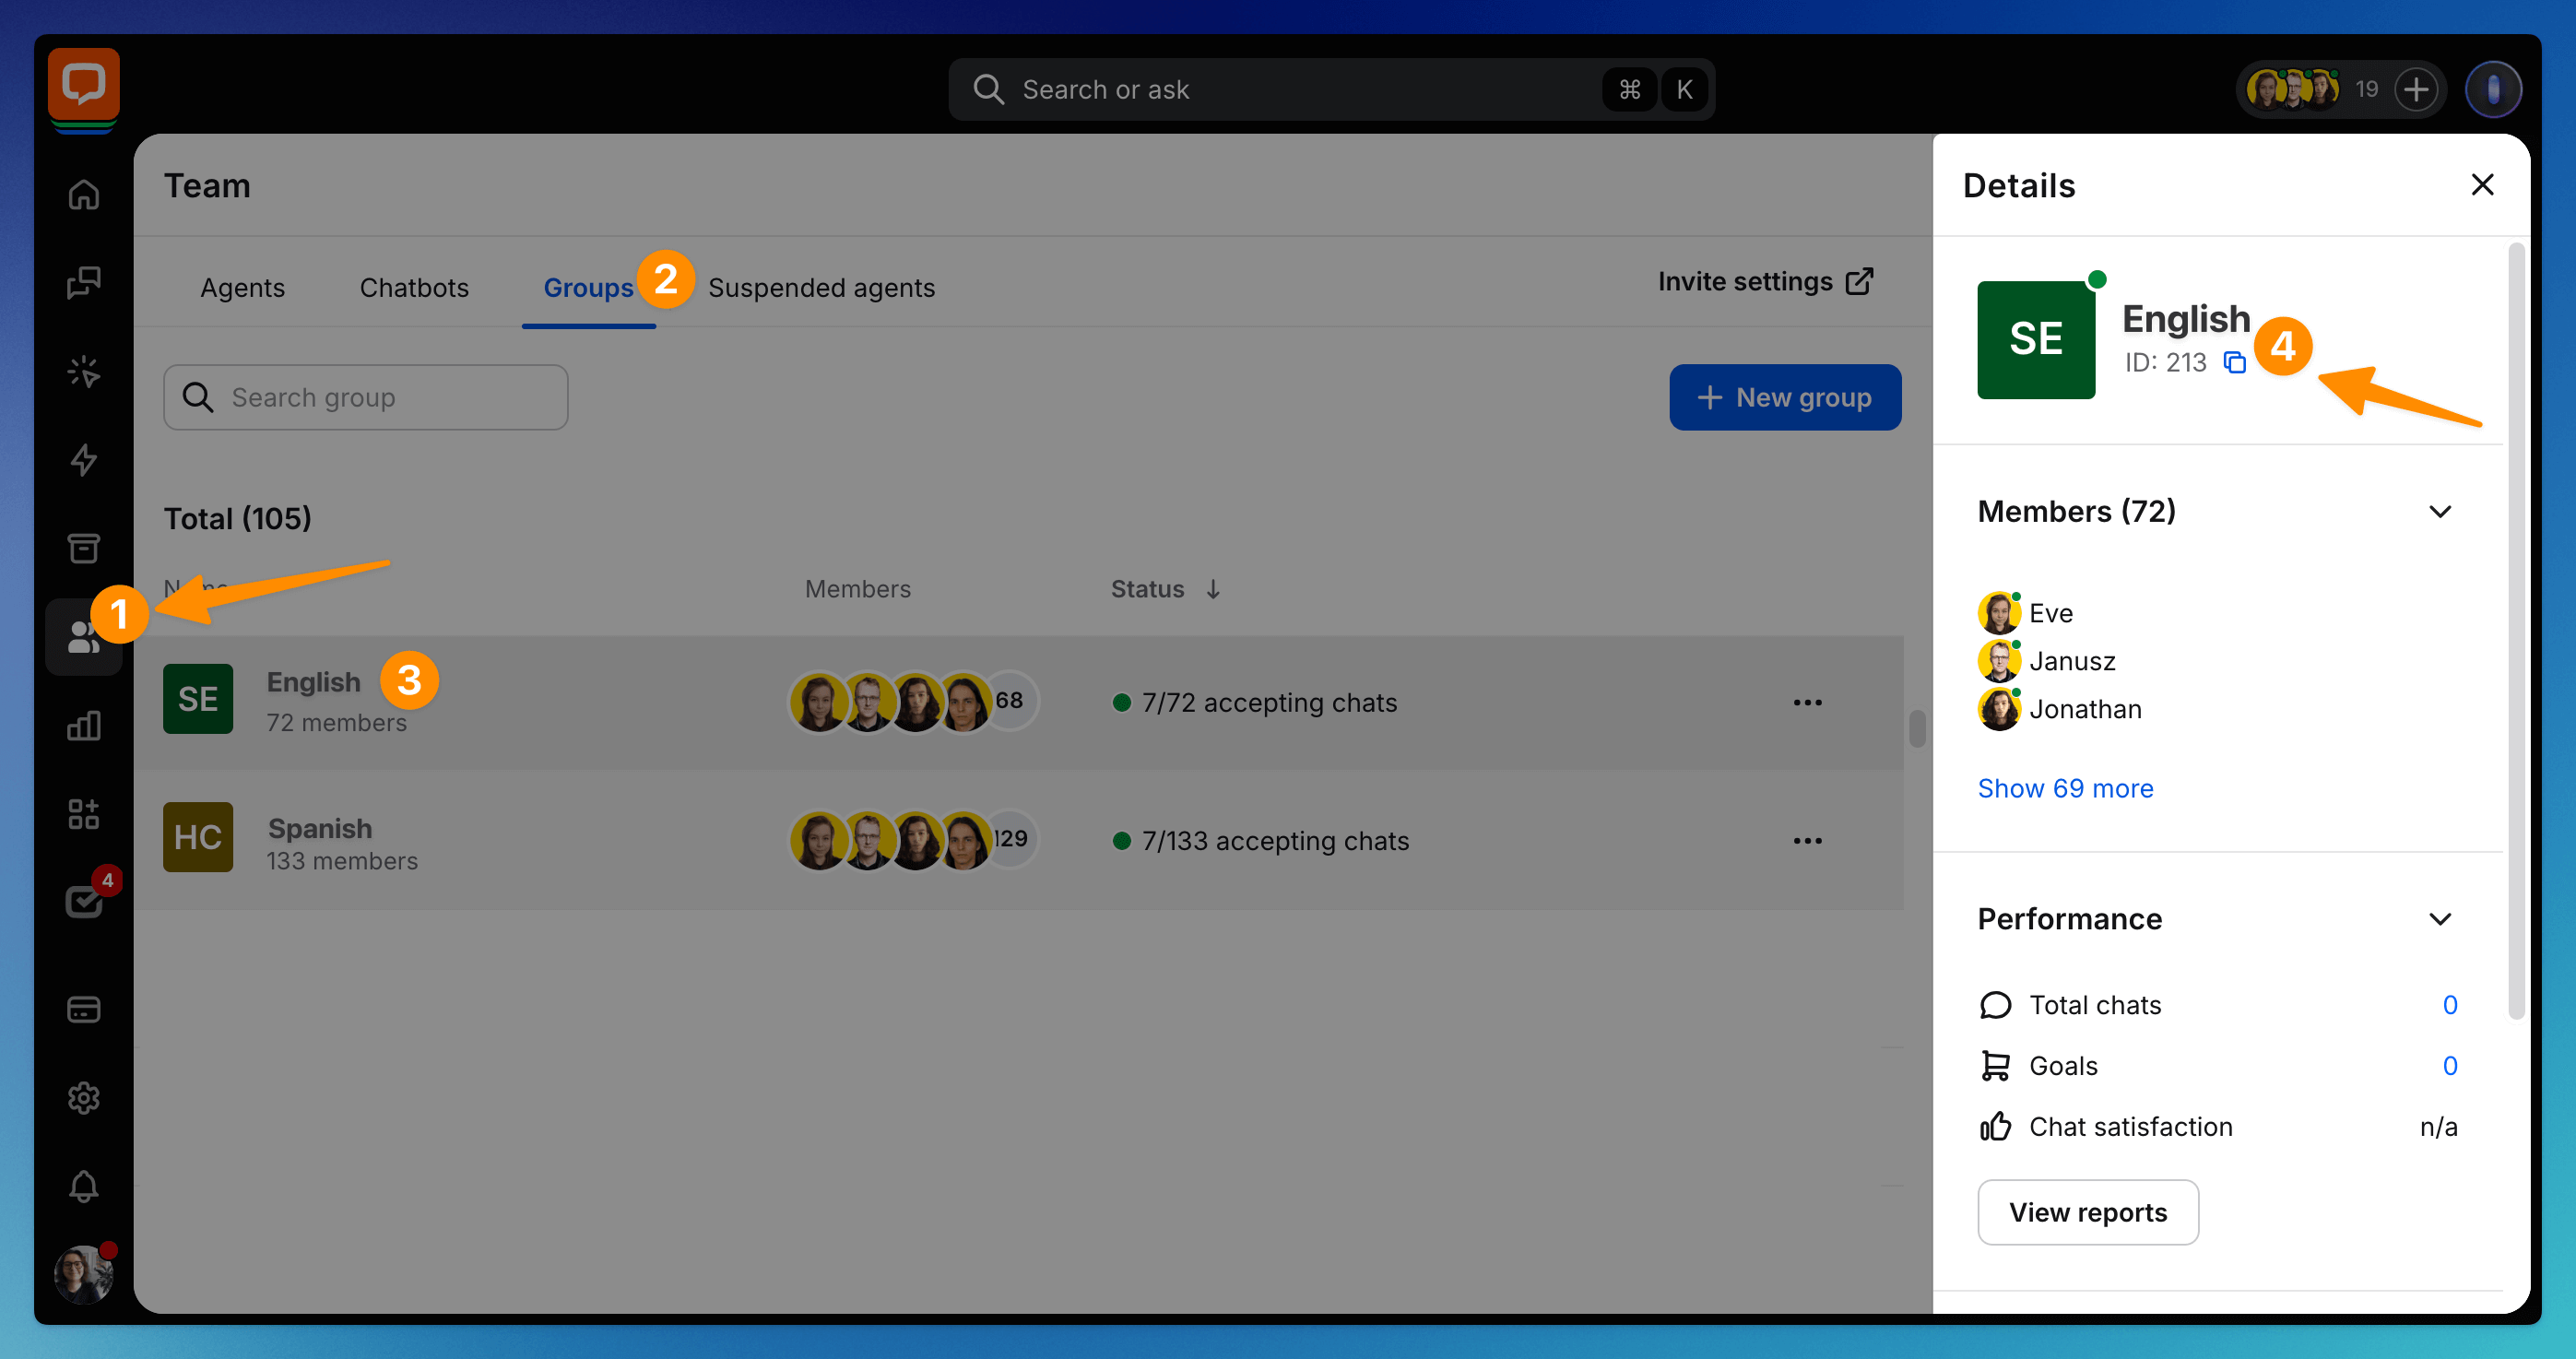
Make ChatBot use your LiveChat Group language - With LiveChat, you can set a different language for each of your LiveChat Groups. When ChatBot is assigned to a chat in the LiveChat app, it receives the information about the Group in which the chat was started.
ChatBot saves the Group’s ID number as the
default_group_idattribute. Using that attribute, you can filter your chatbot to use the expected language. The LiveChat Group ID can be found in your LiveChat agent application Team section > Groups tab or by following this link. After clicking the chosen group on the list, you can find its ID right below its name in the Details on the right.For our example, we created two groups. The “English” group has ID number 213, and the “Spanish” group has ID number 214.
 Within each of the bot responses, we need to add two of them – one in English and the other in Spanish.
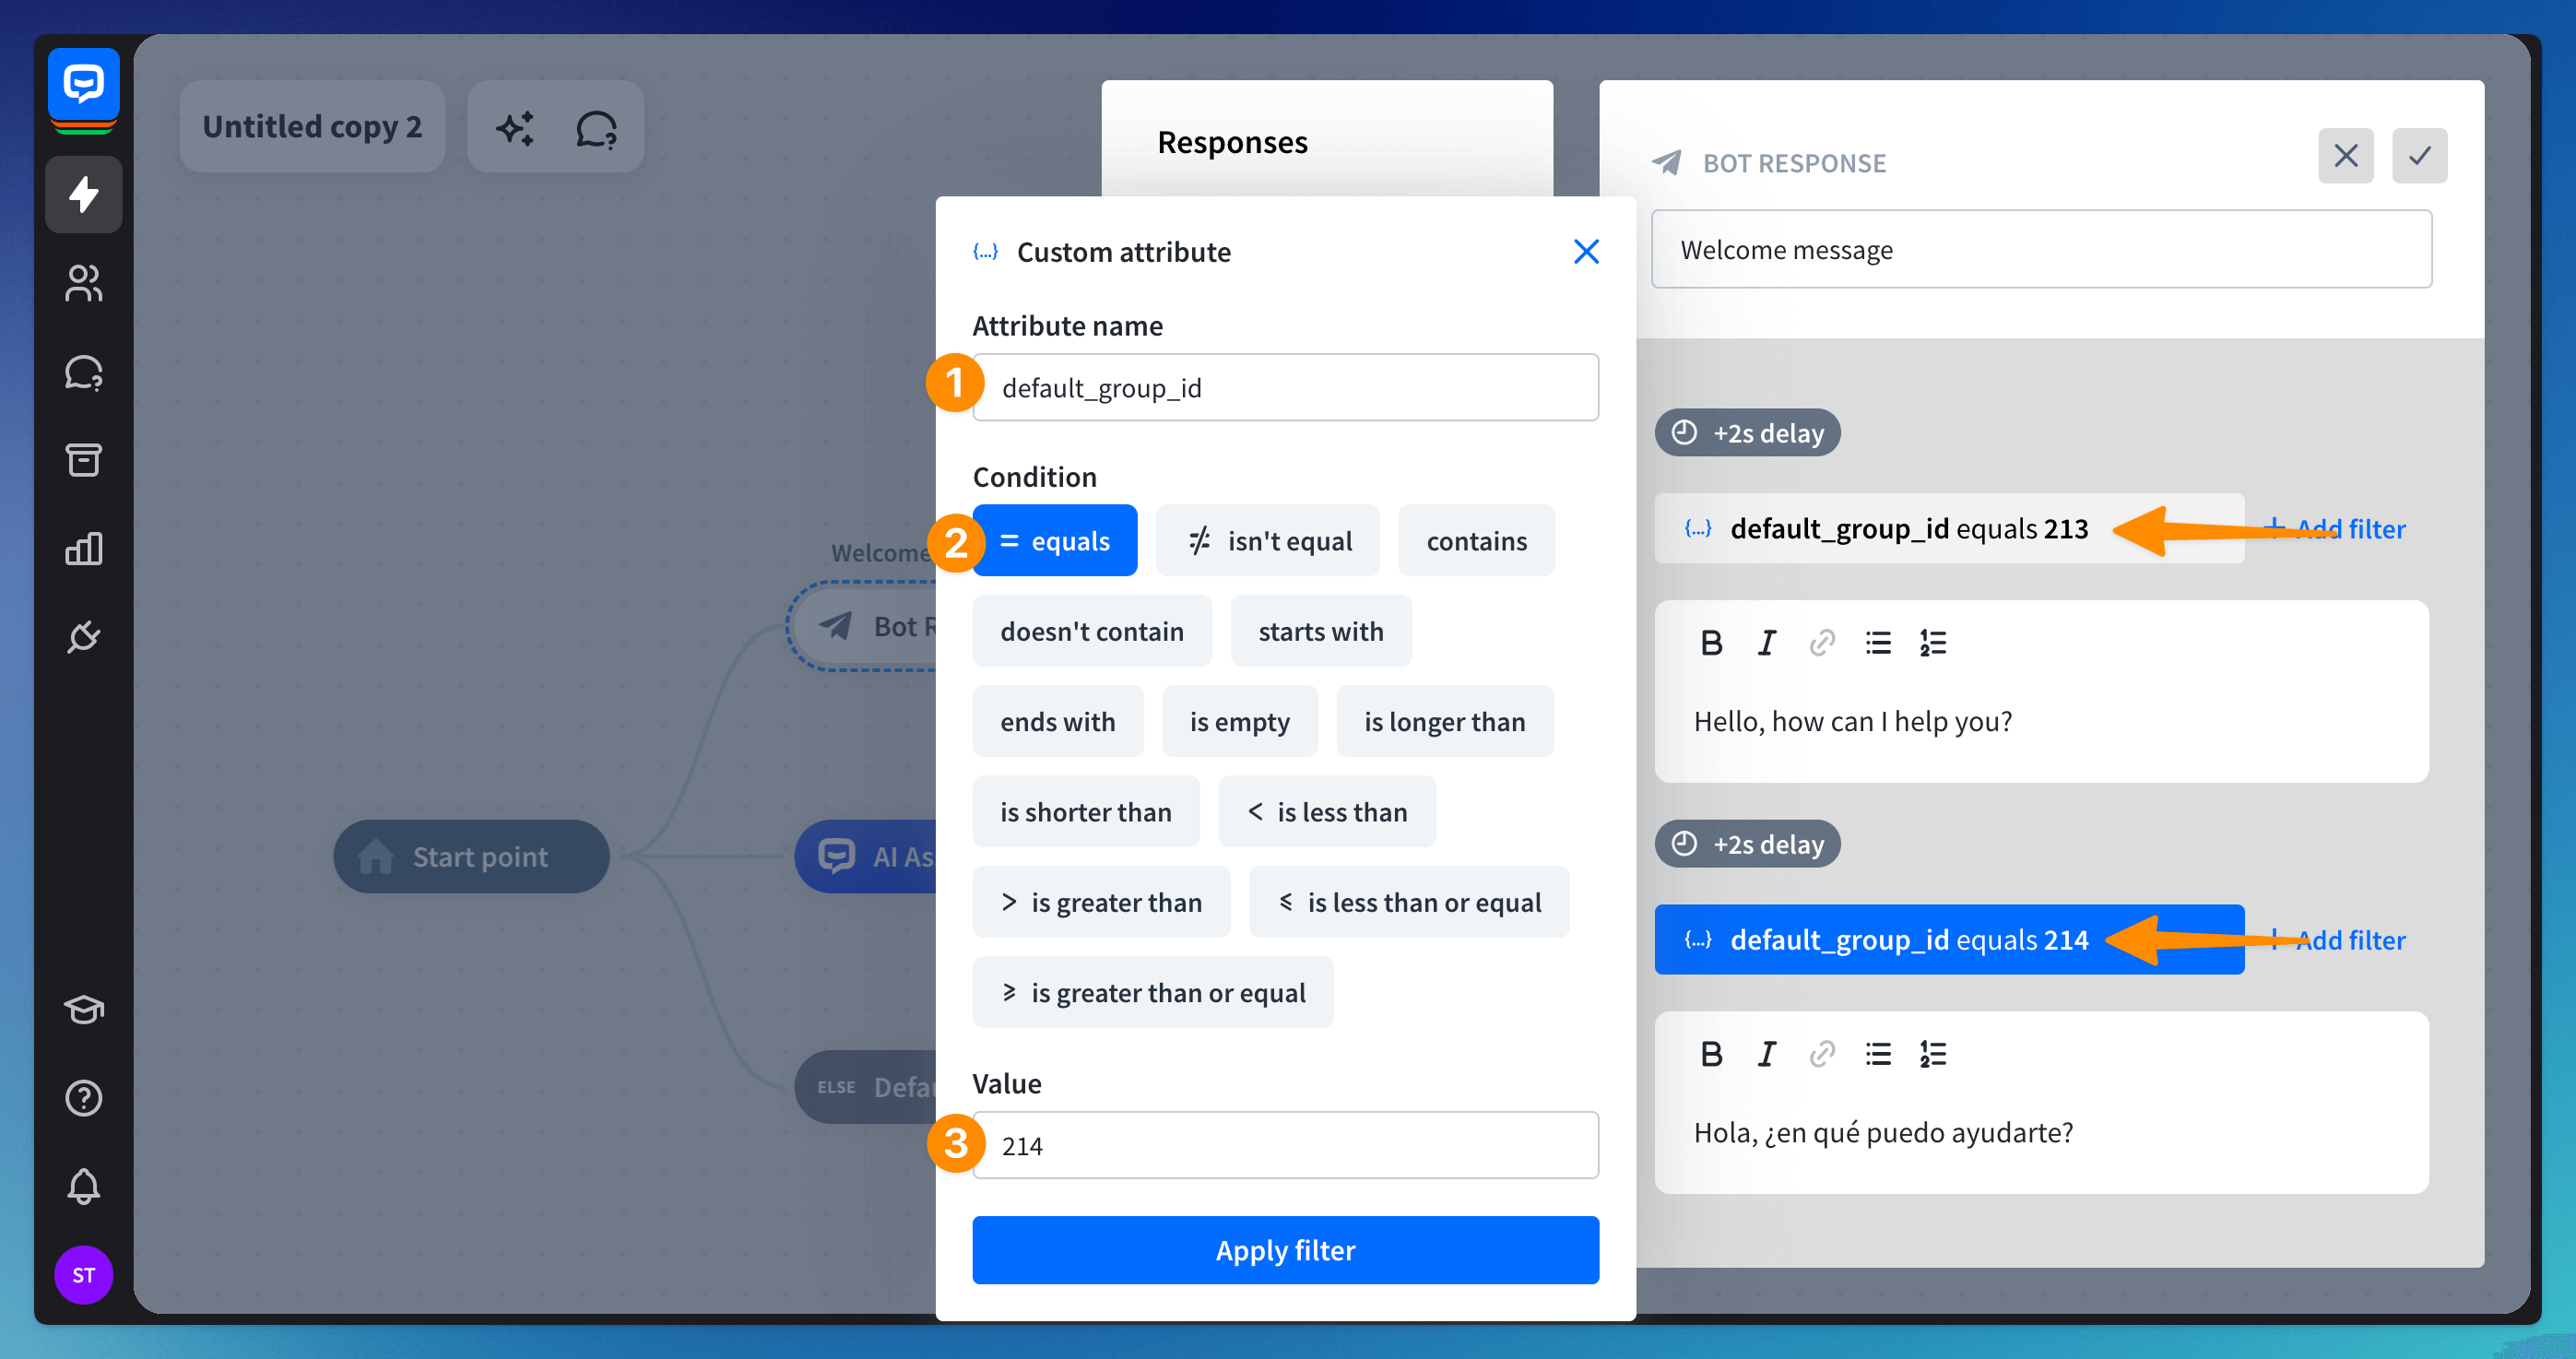
Each response needs to have a filter added to check the value ofdefault_group_id. If once we click Add filter, thedefault_group_idis not available on the list, we have to choose +Add filter for the custom attribute and adddefault_group_idthere (1).The filter of the English message has to check if the
default_group_idvalue equals (2) 213 (our English group ID). The Spanish message filter has to check ifdefault_group_idequals 214 (our Spanish group ID) (3).Once you set the mentioned filters for all of your Bot Response messages, your chatbot will always check the group ID to see what language message it should send. You can always add more languages and related filters if needed.
Read more: