Let your chatbot transfer chats to your customer support team whenever needed.
The LiveChat integration lets you pass an ongoing chat from your chatbot to your customer service team. You can decide when the transfer should be handled and what happens if your agents are unavailable.
How to use the Transfer chat action
You can choose a point in the chat where you want to transfer the chat to a human agent. The bot will transfer the chat only when the Transfer chat block is triggered on the bot flow.
To test LiveChat actions, connect your chatbot to LiveChat and try it in the LiveChat Chat Widget.
The chat won’t be passed to an agent when you test the Transfer chat action for LiveChat using the internal Testing Tool. The transfer is possible only when at least one agent is available in LiveChat and they accept chats.
-
Go to the bot, drag the Transfer chat block, and drop it at your chosen point.
The Transfer chat action supports two paths: Success and Failure. These allow you to prepare your chatbot for two different scenarios:
The Success path is triggered when a chat is successfully transferred and ends the path. From this point forward, a human agent takes over the chat, and no other chatbot interaction can be triggered, including sending a message with a Bot response block.
The Failure path is triggered when a chat transfer is unsuccessful. This may happen when:
- There are no human agents in LiveChat, so your chatbot can’t pass chats to them.
- Agents are logged into LC, but their status is set to not accepting chats.
- Agents are accepting chats, but they’ve reached the maximum number of concurrent chats.
-
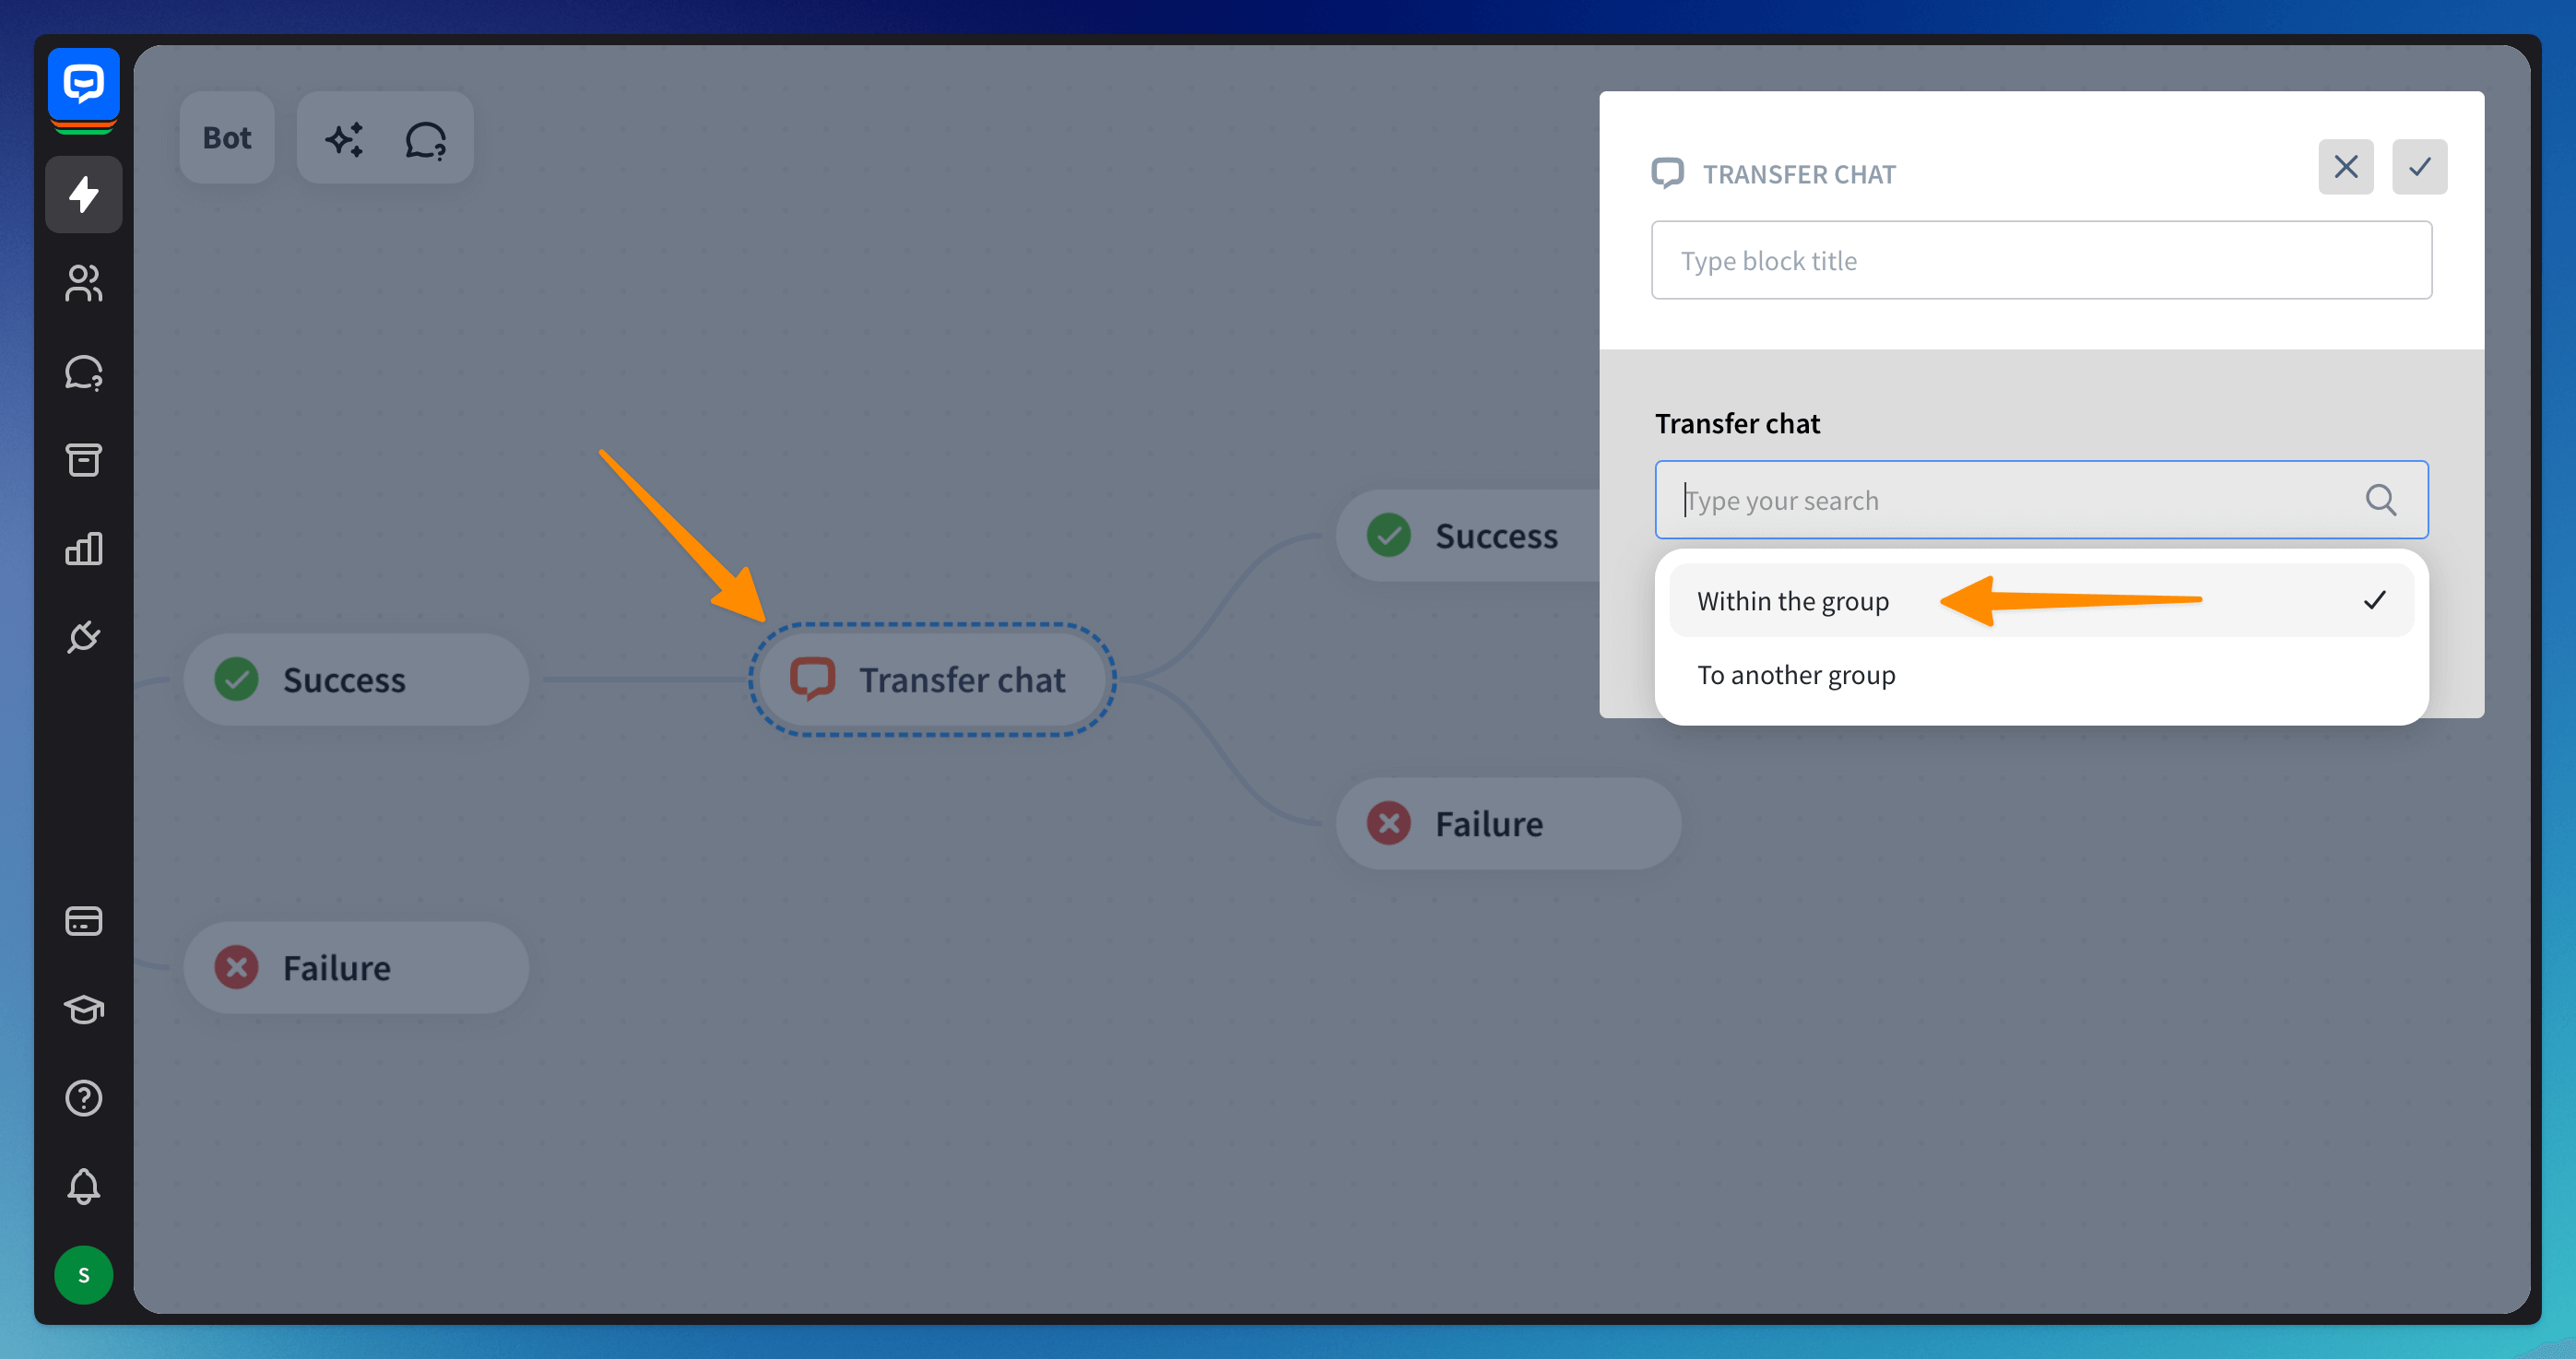
Open the Transfer chat block and decide which LiveChat group the chat should be transferred to.
If you want to transfer a chat within the same group it started, choose Within the group. If you want to transfer a chat to a different group than the one it started, choose To another group. Then, type in the group’s ID in LiveChat.
How to configure the Failure path
Add a Bot response after the Failure block. You can use it to let users know that your agents are unavailable. If needed, redirect them to another interaction to sustain a conversation or create a ticket and contact them later.
![]()
Transfer chats to a human agent when your chatbot can’t provide answers
You can set up your chatbot to transfer a chat to a human agent when it can’t match the user input with any interaction. To do so, you need to use Filters after Default fallback.
-
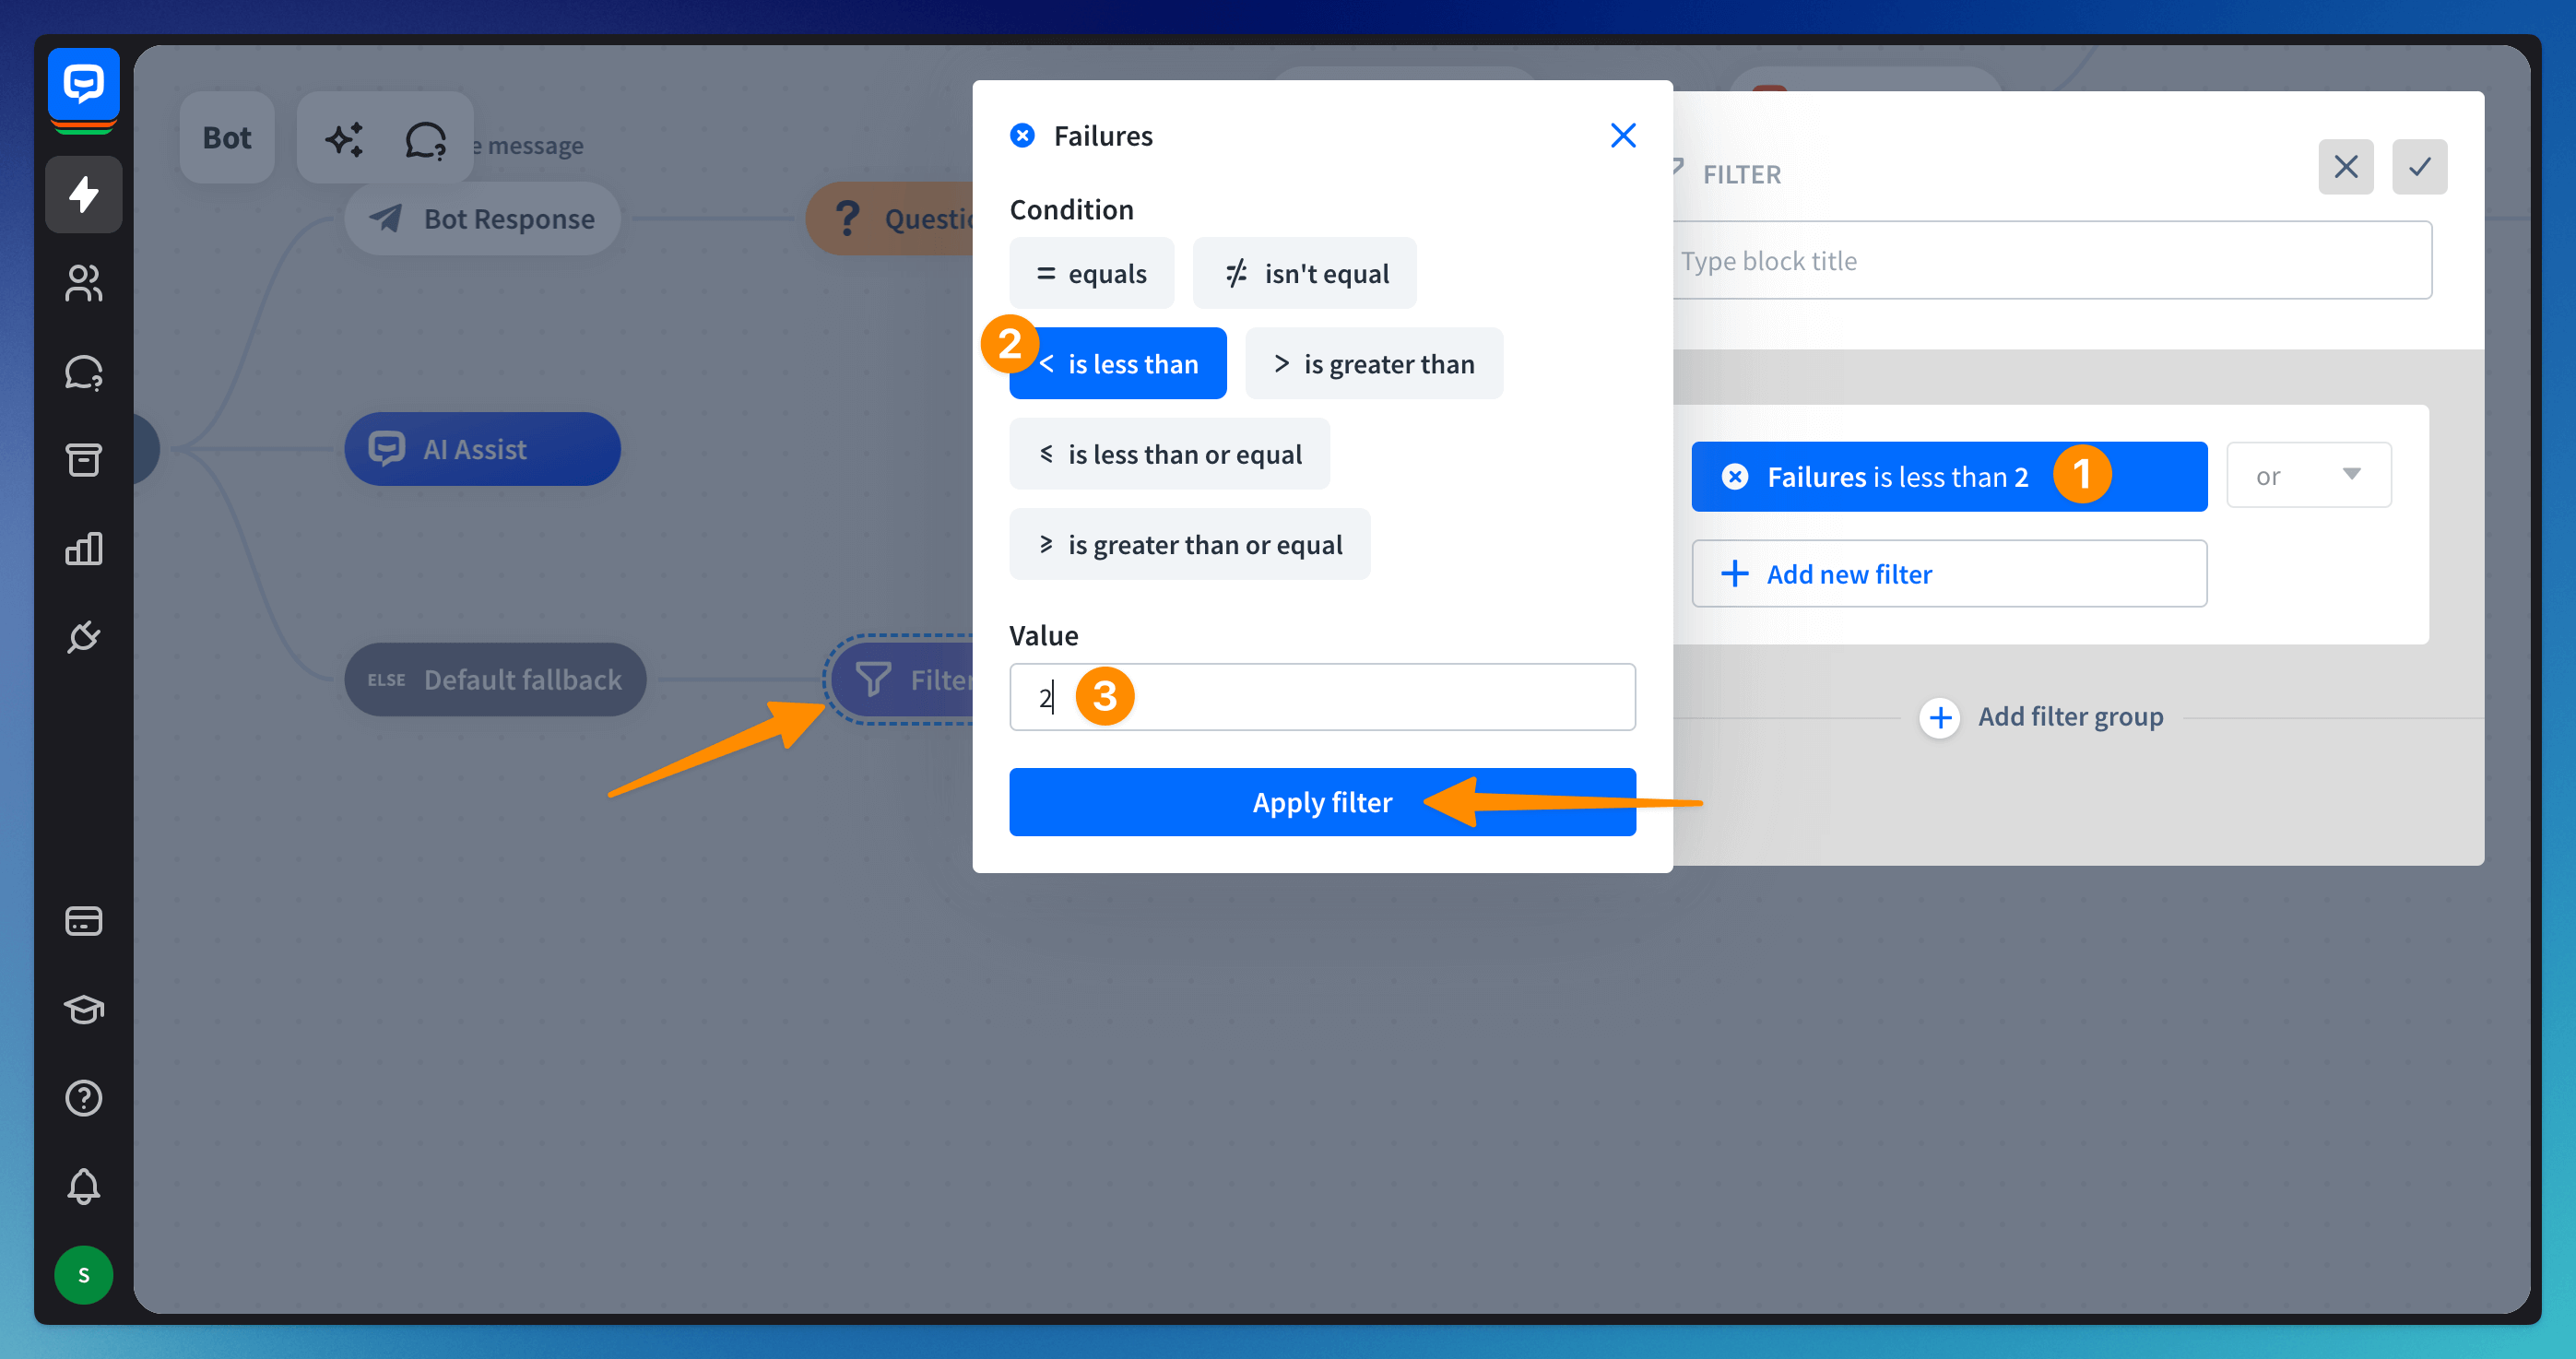
Drag a Filter block and drop it after the Default fallback. Open the block and select Failures in the + Add new filter field (1). Set up the condition to is less than (2) and provide value 2 (3). Apply filter.
-
Add a Bot response block to provide the bot’s reply if the chatbot can’t match the user input with any interaction. With this setup, the bot will display a Fallback message before transferring the user to an agent.
-
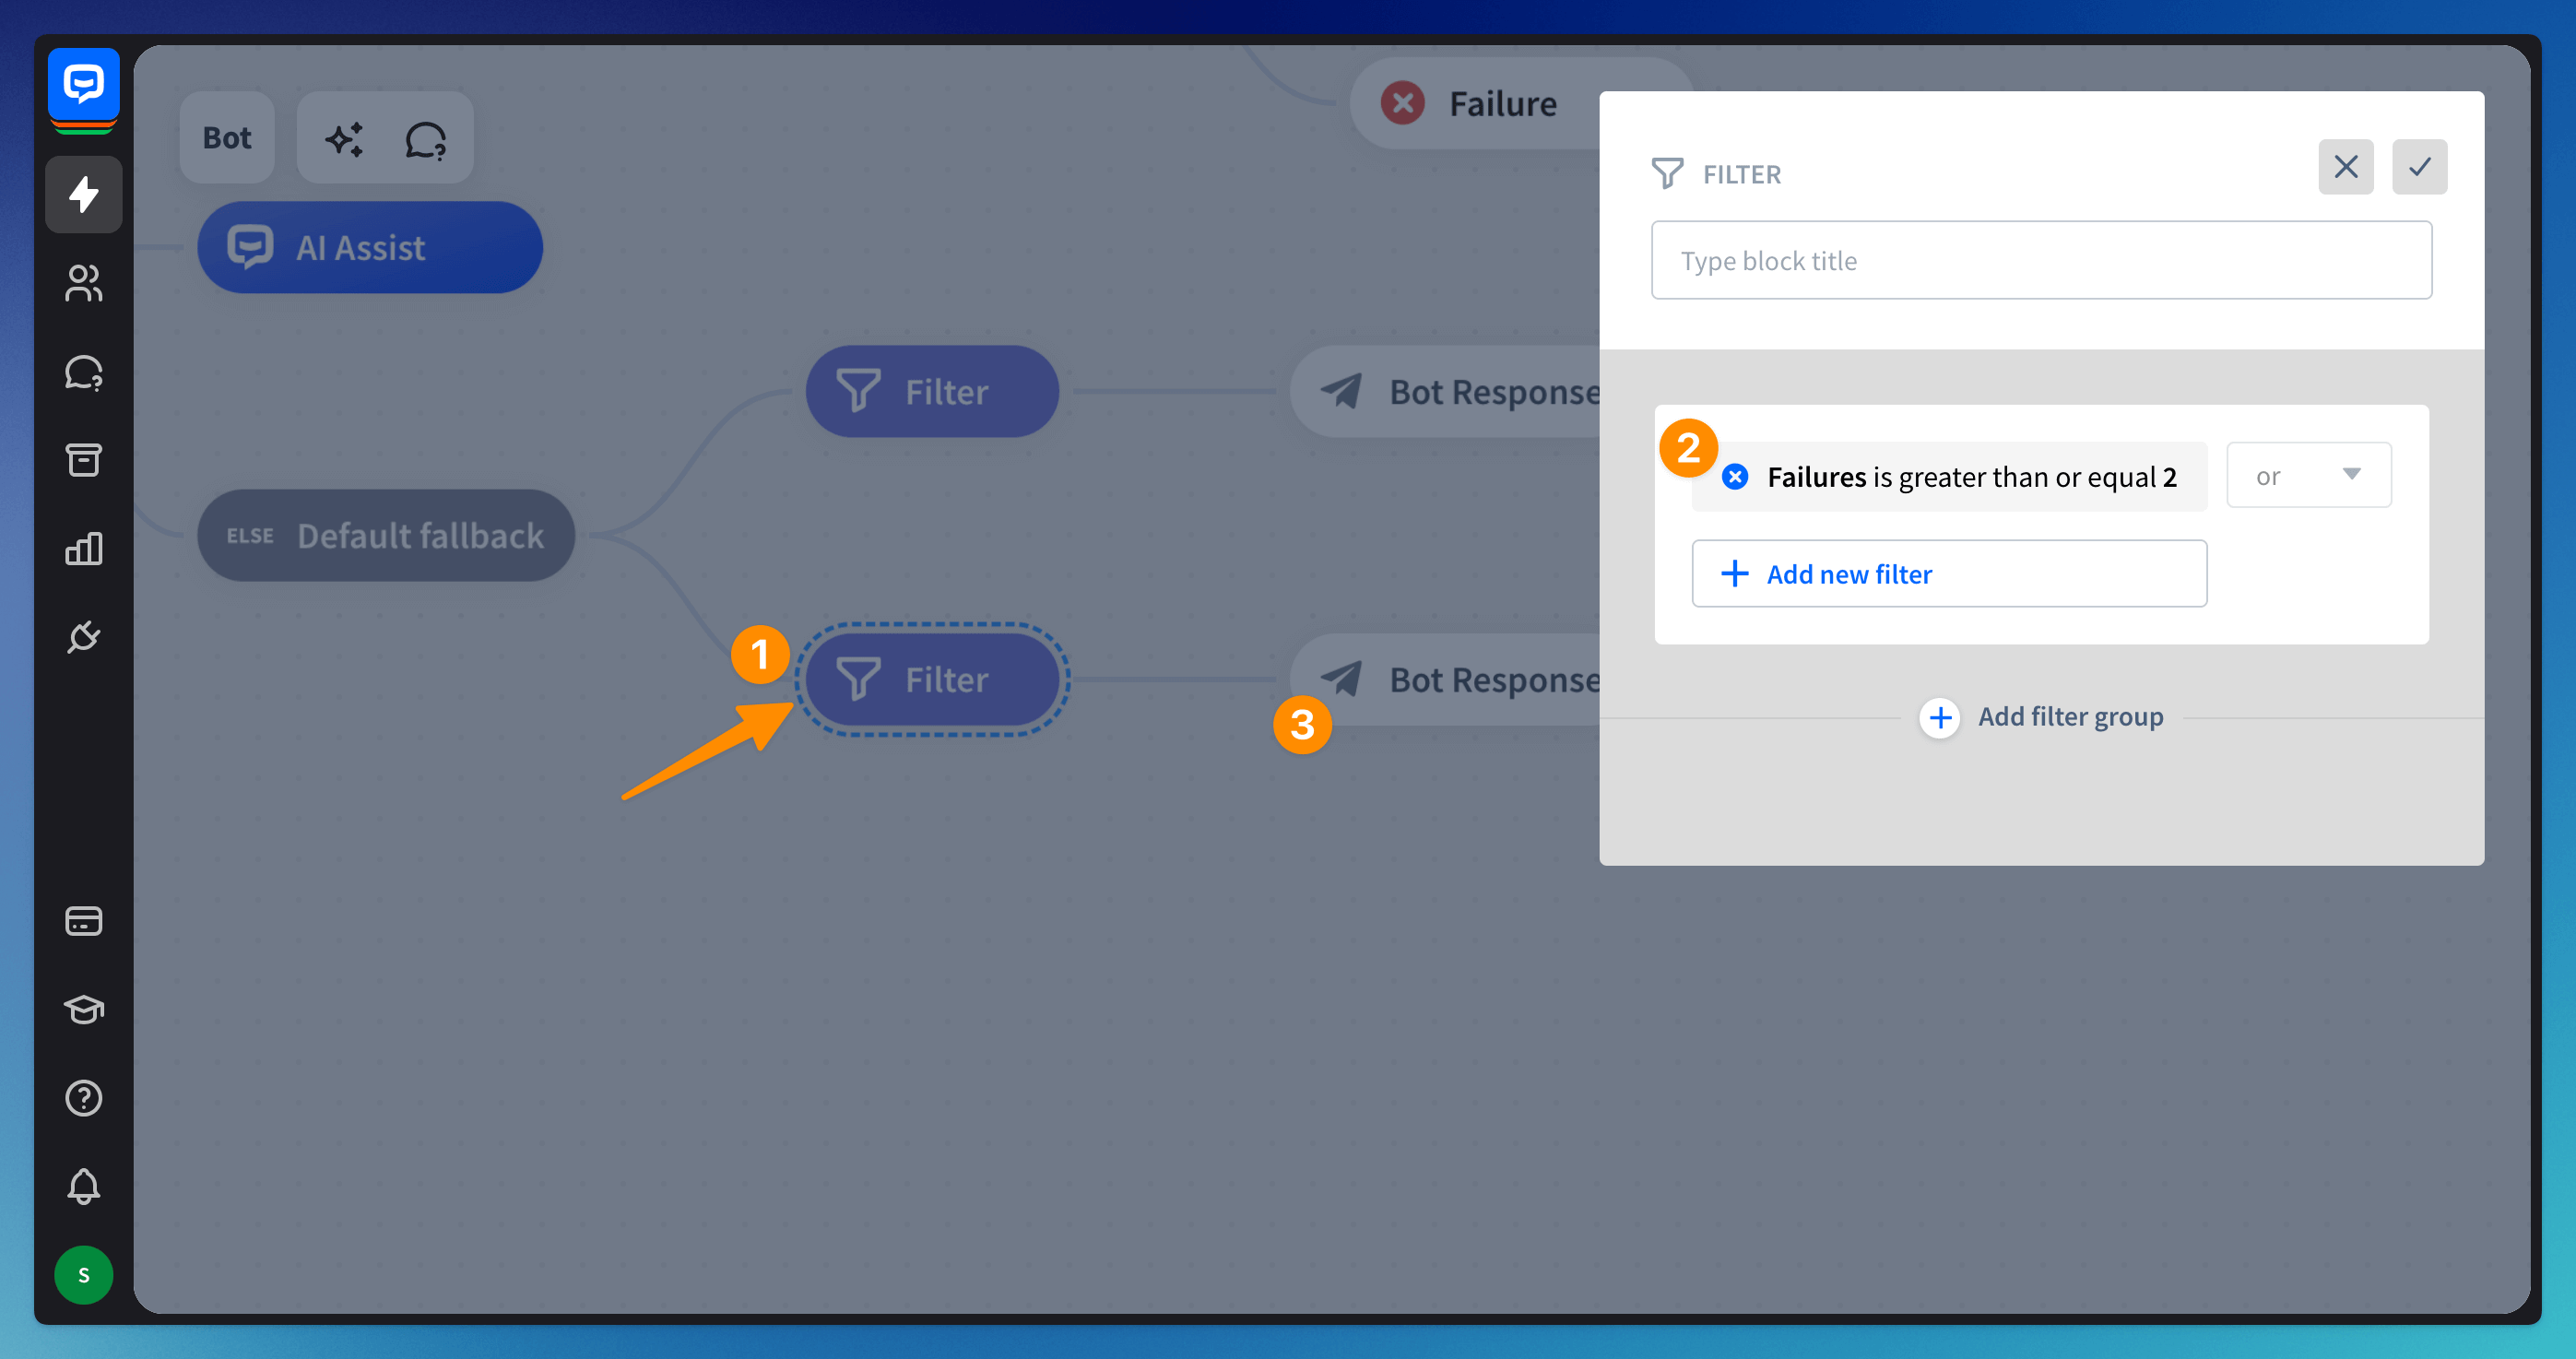
Add a second Filter block (1) and set up the Failures condition to is greater than or equal 2 (2) and add a Bot response (3) after the Filter block. Inform the user about the transfer to your customer support team.
-
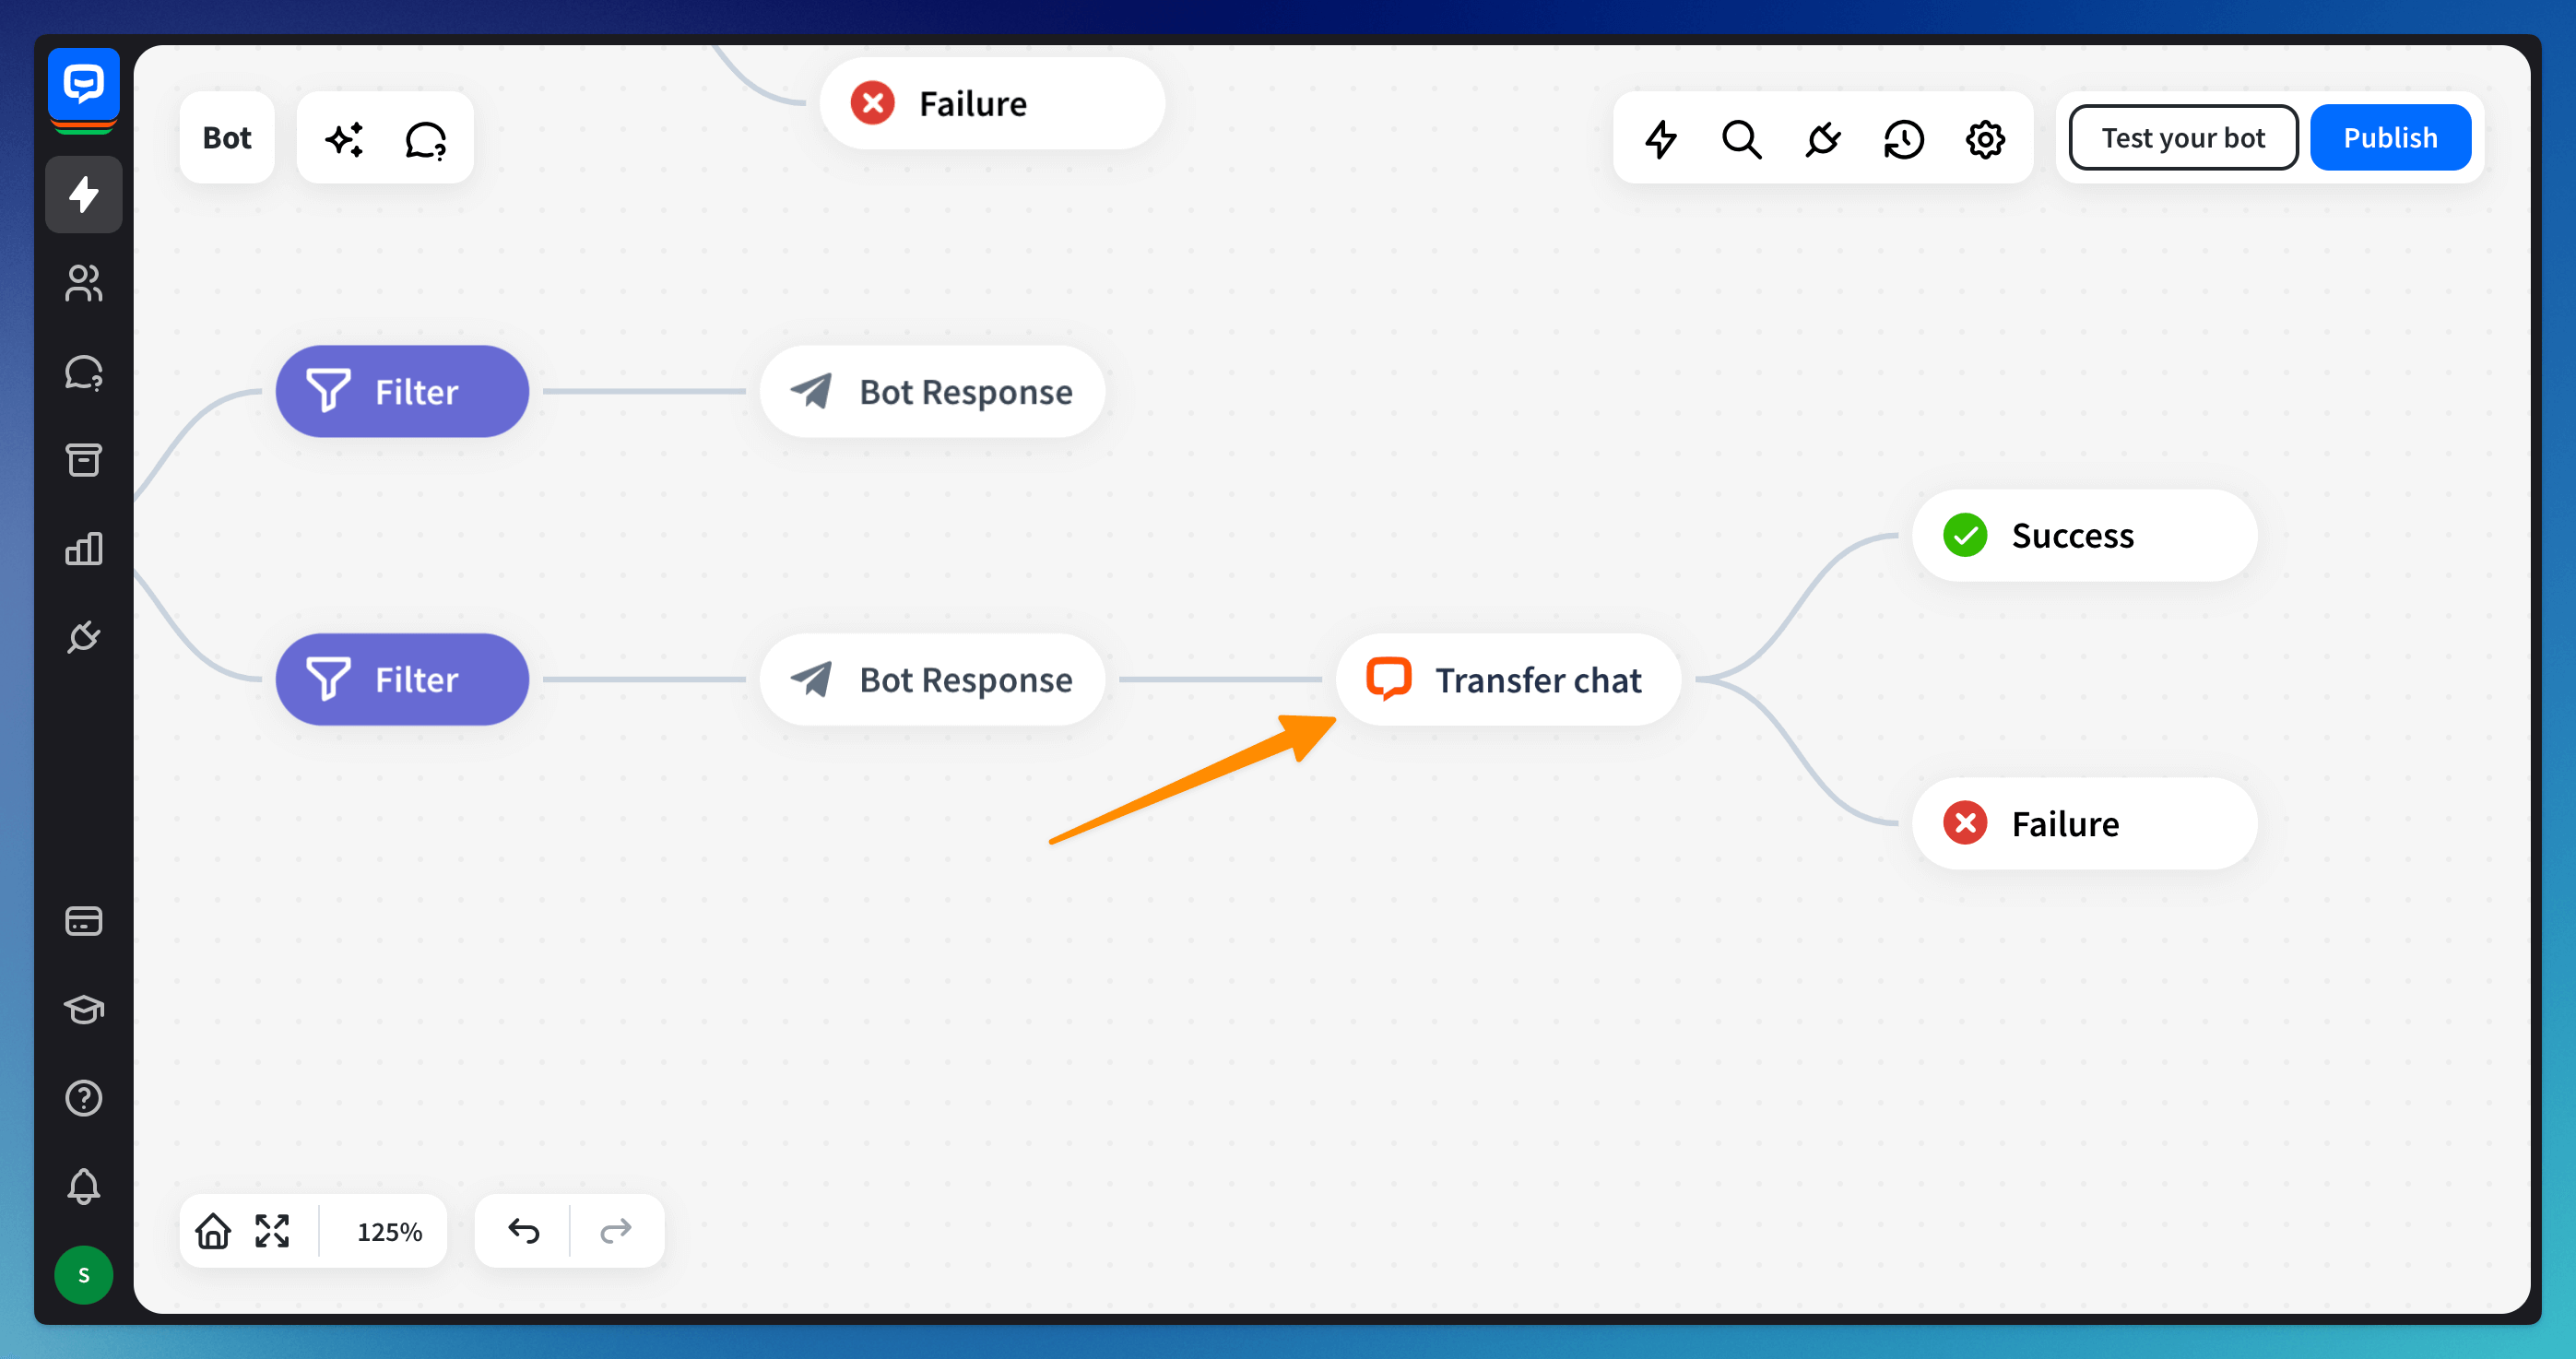
Drag the Transfer chat block from the right-hand menu and drop it after the Bot response.
Frequently Asked Questions
Customers are transferred to agents automatically, without going through the bot.
-
Check if your bot has the “Remember recent agent” option disabled. To do so, please go to your LiveChat Integration settings and turn off the option. If you leave it enabled, your returning customers will be transferred to an agent automatically without the option of going through the bot once more.
-
Make sure the “Transfer chat” action is placed in an appropriate place in your bot flow. If you have any part of the flow positioned after the Success block action, the customer will be transferred to an agent and won’t be able to chat with the bot anymore.
The Transfer chat action routes customers to an incorrect group.
-
Check that you picked the correct group in the Transfer chat block. If you want the customer to stay in the group where the chat started, choose Within the same group as an option. If you want to direct the user to a different group, choose To another group and fill in the group number.
-
If you’re certain you’ve set up the proper group to transfer the chat to, check that your Routing rules in LiveChat aren’t routing your customers to a different one.
What do Success and Failure blocks placed next to the Transfer chat block mean?
-
Success means that your chat was transferred from the bot to an agent.
-
Failure means that the chat wasn’t transferred to an agent—either because the agent wasn’t accepting chats or no agent was available.
Bot responses aren’t showing after the customer is transferred to an agent.
Once your customer is transferred to an agent, they leave the chat with the bot, which means that the bot’s path you created after the Success block following the Transfer chat action won’t be shown to the user.
I connected ChatBot to Facebook, but customers aren’t transferred to agents.
Once you integrate ChatBot and LiveChat, all of your other integrations need to be connected to LiveChat as well. If you connected your bot to Facebook, please disconnect it and integrate Facebook with the LiveChat app.
Where do I find the number of the LiveChat group?
You will find the number of the agent group when you select the group in your LiveChat Groups section.
How can I remove the chatbot transfer and chatbot tags from my LiveChat tag list?
You can disable the tags in the LiveChat Integration settings.
Can the bot work within Asynchronous messaging?
The bot can’t work within Asynchronous messaging.
Can I have manual selection on?
If you turn on manual selection in your LiveChat settings for the group where the chat starts, the bot cannot talk to your customers, who will be transferred directly to your agents.
Read more:
